Old Stove but new to me. HELP!

  • Active since 1995, Hearth.com is THE place on the internet for free information and advice about wood stoves, pellet stoves and other energy saving equipment.

    We strive to provide opinions, articles, discussions and history related to Hearth Products and in a more general sense, energy issues.

    We promote the EFFICIENT, RESPONSIBLE, CLEAN and SAFE use of all fuels, whether renewable or fossil.

SCANDIAMAN69

New Member
Dec 16, 2017
4
West Virginia
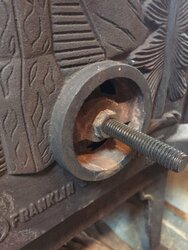
Hello. I purchased a new house late his last summer so this is my first winter with the stove that came with the house. My research has shown me that my stove is kind of junky, but oh well, it’s what came with the house. It’s a Scandia 810 by Franklin Casting Co.

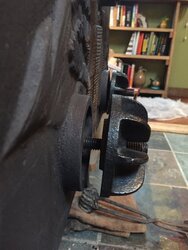
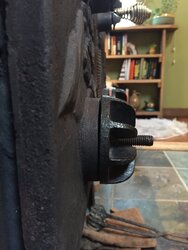
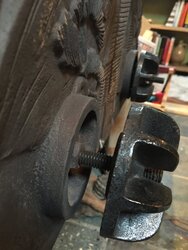
My question is regarding the dampers. I put a new gasket around the doors to get a better seal, which helped a lot. However, I’m still burning through wood. I noticed the campers are not sealing well and even when they are fully closed, there is a gap that allows air to enter. When I shut the dampers completely when the stove is full of wood, the stove still burns super hot. I was wondering if there were any improvements you can do to make the dampers seal better? Can you put gaskets on the dampers? Thanks in advance!
 
It could be an ill fitting piece is not sealing well. Or maybe a welded seam could be leaking? How tall is the flue system that this stove is connected to?
 
It could be an ill fitting piece is not sealing well. Or maybe a welded seam could be leaking? How tall is the flue system that this stove is connected to?
I would say approximately 20-25ft. The reason I’m suspected the dampers is because you can see so much space between the stove body and the dampers even when they are completely shut.
 
That could be part of the issue. Maybe the air control knobs could be tapped deeper so that they close further? Is there a damper on the stove pipe? That will help reduce draft which will help the stove to be more controllable.
 
Scandias were not quality stoves. This one probably wasnt very tight to begin with. Therefore there is no right or wrong on trying to get it run better. Hopefully you have very wide non flammable floors on all four sides as the castings were not known to be very high quality and on occasion the sides would crack while in operation and burning wood would fall out. With that in mind you really want to avoid drilling or in anyway putting any stress on the castings.

Good luck
 
That could be part of the issue. Maybe the air control knobs could be tapped deeper so that they close further? Is there a damper on the stove pipe? That will help reduce draft which will help the stove to be more controllable.
Yeah they definitely need to close further. The dampers do not connect at all with the body of the stove.
 
Did you remove the air dampers to see what is preventing them from closing? Possibly a nut behind the cap needs to be thinner, like a half nut used on many caps. A full nut prevents some draft caps from making contact with the door. It should contact the door all the way around and if crooked bend the threaded portion slightly so the cap is parallel to the door front. Make sure there is no rust on the threads behind cap and keep them greased with high temp grease or silver anti-seize which is rated at higher temperatures and lasts longer than grease.

As begreen suggested, use the flue damper to slow the incoming air until you get the air dampers to close properly.

Pictures would help so we're sure you have the right draft caps and hardware.
 
  • Like
Reactions: begreen
Did you remove the air dampers to see what is preventing them from closing? Possibly a nut behind the cap needs to be thinner, like a half nut used on many caps. A full nut prevents some draft caps from making contact with the door. It should contact the door all the way around and if crooked bend the threaded portion slightly so the cap is parallel to the door front. Make sure there is no rust on the threads behind cap and keep them greased with high temp grease or silver anti-seize which is rated at higher temperatures and lasts longer than grease.

As begreen suggested, use the flue damper to slow the incoming air until you get the air dampers to close properly.

Pictures would help so we're sure you have the right draft caps and hardware.

I think you are on to something with the nut preventing the damper from closing flush with the stove body. I don’t have a flu damper unfortunately. Here are a few pics I took. You can see the dampers not closing flush and the nut that is preventing them from doing so. I’m thinking I either need a smaller nut or that I don’t have the proper draft caps.
 

Attachments

  • F30F6083-5538-4A96-89FC-5EAC130D9852.jpeg
    F30F6083-5538-4A96-89FC-5EAC130D9852.jpeg
    97.5 KB · Views: 218
  • 02B5B5ED-3932-4113-AF93-141BBAFC171A.jpeg
    02B5B5ED-3932-4113-AF93-141BBAFC171A.jpeg
    91.9 KB · Views: 229
  • 6B5AA188-4726-4D6A-89BD-45F5723A0B1F.jpeg
    6B5AA188-4726-4D6A-89BD-45F5723A0B1F.jpeg
    104 KB · Views: 188
  • C9FF8D4E-A8D3-42EE-B7CF-E7727599A082.jpeg
    C9FF8D4E-A8D3-42EE-B7CF-E7727599A082.jpeg
    121.9 KB · Views: 218
  • 71BAB82A-8B75-4259-B2CB-0D0507A1F25D.jpeg
    71BAB82A-8B75-4259-B2CB-0D0507A1F25D.jpeg
    95.3 KB · Views: 207
You could make your own draft caps out of a pipe cap that has been drilled and tapped, but I would try the flue damper first. It's inexpensive and will help slow down the flue gases giving them more residence time in the stove which should help it heat better.
 
They are the correct draft caps.
The nut looks like a "half nut" but pictures can fool you by depth of things. A half nut is about half the thickness of a regular nut. They are for locking purposes such as used in your case to lock the threads from turning in the door. The way to see if the cap is bottoming out on the nut is to put a straight edge across the opening on door where the cap should touch. Measure distance from straight edge to nut. Then flip draft cap over with inside upwards and put the straight edge across draft cap. Measure the distance from straight edge to portion on cap that seals against door. If the depth of raised section on cap is more than the distance from door sealing edge to nut, cap is hitting the nut before contacting the door. Remove the nut and try it. If needed, grind or file the nut thinner. The nut only needs to be 2 or 3 threads thick since it is not a strength issue.

I would not file any material off the cap since those are the threads that wear and you want the most threads in the cap as you can get. That is why you must keep the threads greased to prevent wearing out threads to prevent cap wobble.