Did you end up submitting a warranty claim? I'm curious how this ended up working out for you.
No. Life got a hold of my time! I’ll worry about it after the burning season.
Sent from my iPhone using Tapatalk
Did you end up submitting a warranty claim? I'm curious how this ended up working out for you.
I cleaned my flue last night for the first time. Used a sooteater and cleaned from the bottom. I went up and down several times, but only ended up getting about a cup of creosote, which was a pleasant surprise. I burned marginally dry wood for about a month this winter, and so I figured I'd end up with quite a bit of creosote.
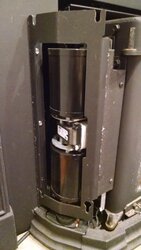
The sooteater flexible rods got pretty scratched up from making contact with the burn tubes while spinning. It's not possible to remove the burn tubes, is it? Does anyone else use a sooteater to clean their Enviro?
The manual says to put a Phillips head screw driver into one of the holes and use it to slide the tube to the right. I just tapped the screw driver gently sideways with a hammer and it worked perfectly.
Sent from my iPhone using Tapatalk


Touching the bricks is ok. If it is tight a bit of the brick can be ground out for a better fit. Make sure mantel clearances are proper.I think I've decided on the Venice 1700. Seems to be the biggest and best looking stove that will fit my fireplace. Not a huge fan of the surround but I plan on getting the trimmable option that way I can trim it almost to the edge of my brick so I can still have as much brick exposed as possible. My only concern is at the rear it calls for a 22 3/8 width. This would pretty much put the stove touching my bricks on the back edges.(This is ok I assume since it is already a functional fireplace)?? There will be room behind it though as my depth is 22 3/4 but it tapers as it goes back. The house is a ranch 1450sq ft. living room/kitchen/dining are all pretty open. I won't blow myself out will I? Living room is only 17x11 but there is a 9ft bay window and 5 ft opening into the kitchen. Ceilings through out are 8 ft. This is where it will be going.
View attachment 224874
I think I've decided on the Venice 1700. Seems to be the biggest and best looking stove that will fit my fireplace. Not a huge fan of the surround but I plan on getting the trimmable option that way I can trim it almost to the edge of my brick so I can still have as much brick exposed as possible. My only concern is at the rear it calls for a 22 3/8 width. This would pretty much put the stove touching my bricks on the back edges.(This is ok I assume since it is already a functional fireplace)?? There will be room behind it though as my depth is 22 3/4 but it tapers as it goes back. The house is a ranch 1450sq ft. living room/kitchen/dining are all pretty open. I won't blow myself out will I? Living room is only 17x11 but there is a 9ft bay window and 5 ft opening into the kitchen. Ceilings through out are 8 ft. This is where it will be going.
View attachment 224874
Came across the enviro line of stoves the other day and am quite impressed. The model im interested in is the Kodiak 1200 stove. Looking to heat 1000 sq.ft on a somewhat drafty house. What are your guy's thoughts? And does anyone know the price roughly on these stoves?
Getting ready to clean my blower for the first time, and looking for some help in accessing the blower. A few people have posted the steps for accessing the blower on the Kodiak. I thought someone had posted the steps for the Boston as well, but I can't seem to find the post. So far I have:
1. Taken the top plate off (slid right off, no screws needed to be removed)
2. Taken the side panel off on the lefthand side (slid right off)
3. Taken the door off (slid right off)
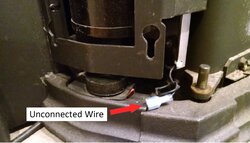
Do I need to take surround off in order to remove the blower? There are a bunch of screws in the region of the blower. Does anyone know which specific screws need to be removed in order to remove the blower assembly?
Don’t remove the blower. Just blow it out with a compressor from the top and bottom. Didn’t need to remove door either.
Sent from my iPhone using Tapatalk
You can loosen the 3 screws on the left in your pic. You can then remove the frame that held the side panel for a little better access. It swings like a door but can be lifted out.
When you put everything back don’t tighten anything but the three screws I just mentioned. Everything else can be held in place by gravity. Not sure about the door, I’ve never taken that off.
Sent from my iPhone using Tapatalk
Ok, thanks. That's a pretty easy process. So you just stick the compressor hose into the fan and that just knocks stuff loose? And then you vacuum it out?
Ok, thanks. That's a pretty easy process. So you just stick the compressor hose into the fan and that just knocks stuff loose? And then you vacuum it out?
I need to change my door gasket and add a thermometer to my kodiak 1700. Just read the owners manual. Nothing on gasket size. I saw 1 inch thickness after a quick Google search. Is this correct? Also how are those kits on Amazon? They seem to have some good ratings for the price and if I need to change it every 2 years or so at that price I'm ok with that. As for thermometer, what is a good brand and where is a good place to mount it. Thanks in advance!
I would recommend vacuuming what you can before hitting it with a compressor or blower. The less dust in the air, the better. Get ready for a pretty big cloud of dust! Although I think you only have one year of burning on your stove if I remember correctly. I had four or five on it before it did it!
Sent from my iPhone using Tapatalk

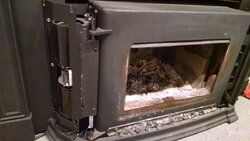
Keep practising, especially on the weekends. You will be able to load it full of wood. Once the fire is burning hot like this keep closing down the air until the flames get lazy, but not out. Let the fire regain strength, then close it down some more. If draft is decent you should be able to run the stove with the air control at least 75% closed if not more. As the air is closed down you will see stronger secondary burn under the tubes. This is normal and where the real heat is produced. Enjoy the light show.On my second burn in the 1700. First real one for me. This is a pic after an hour. Fan kicked on after 30 minutes. It has some ash and one piece of pine. Should I load this more than the 4 average size logs? Wood is right at 20%. The damper is 3/4 open. Trying to learn but it's tough working a lot during the week.
View attachment 231219