Can't keep dv580 majestic lit, plz help.

  • Active since 1995, Hearth.com is THE place on the internet for free information and advice about wood stoves, pellet stoves and other energy saving equipment.

    We strive to provide opinions, articles, discussions and history related to Hearth Products and in a more general sense, energy issues.

    We promote the EFFICIENT, RESPONSIBLE, CLEAN and SAFE use of all fuels, whether renewable or fossil.

Ls3c6

New Member
Mar 24, 2018
15
Midwest
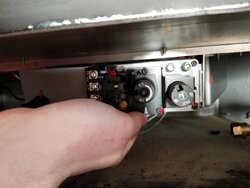
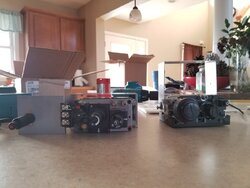
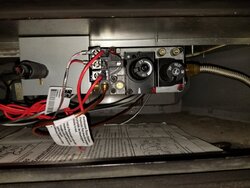
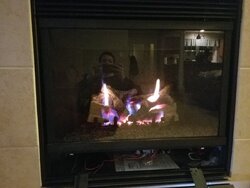
This has the Honeywell valve with rf control, I can easily light the pilot but and the led begins blinking showing that the valve is powered, but as soon as I release the pilot knob the flame goes out.

I measured the thermopiles at .5v and .4v while pilot lit, plugged into control valve.

Any suggestions?

Edit: tested the thermopiles open circuit and they were .5 and .7v
 
Last edited:
From the unit's manual...

DV360/580 Series Direct Vent Gas Fireplace
CORRECTIVE ACTION

Turn valve knob to "Pilot". Maintain flow to pilot;
milivolt meter should read greater than 10 mV.
If the reading is okay and the pilot does not stay on,
replace the gas valve. Note: An interrupter block
(not supplied) must be used to conduct this test.
 
What is an interrupter block?

Not sure. Never used one. I looked it up & it seems to fir on the t-pile.
There wasn't one specific to Majestic gas units or Honeywell Valves.
One of the other gas techs will hafta chime in on this one...
 
Ah gotcha, I've seen a few threads about this valve and it's issues and it isn't looking good for me

I removed valve and disassembled, looks like the pilot solenoid inserted in the valve body is not functioning. Cannot buy this valve and I'm finding sit conversion kits for $700!!!!

Anyone have a better solution?
 
Well, I ordered the retrofit, it comes with SIT valve that has stepper motor, a RF box and a remote. Should do the trick, i'll transfer the gas valve fittings to it and install.

Any advice on getting the pilot assembly out of the fireplace? I see there's high temp rtv on the bottom and I attempted to remove the screws up top but they feel like they're going to break so I quit, maybe spray them with some penetrating oil?
 
Try to cut through the RTV & get it out.
You will hafta do that to remove & reinstall the pilot tube, thermopile & thermocouple lines.
I wouldn't worry about the screws breaking. If they do, drill the remainders out &
use larger ones to install the new pilot assembly.
Reseal everything with new RTV.

Great, I ordered this kit: http://www.ibuyfireplaceparts.com/1...g-dv360rfn-dv360rfn-dvrt36rfn-dvb4136rfn.html

Sit valve but skytech rf controller to retain remote operable fan and flame height... all should go well I hope, will report back soon.
 
  • Like
Reactions: DAKSY
I was able to remove the existing pilot assembly, there was a rtv'd plate on the bottom side of the firebox floor and had to carefully uncoil the wires & pilot tube to remove from fireplace.

When I install the new set, should I uncoil, install and recoil or individually remove each from the bracket and push up through the bottom? Bending the small tubes is nerve racking.

Also i'll need to transfer the fittings from the old gas valve to the new, just wipe off and brass brush the pipe dope off of the old fittings and recoat?
 
Carefully uncoil the tube & wires. It's gonna make getting all three of them thru the bottom of the stove & into the valve cavity easier than if you don't.
The pilot tube needs to be carefully unfurled so you don't kink it. Once everything is into the valve cavity, as long as they are clear of the new valve, there is no need to recoil them. You can if you want to, but, again, you'll hafta be careful with the pilot tube.
Wire brushing is fine, if you can get at the threads, but unless the existing pipe dope is as hard as a rock,
it shouldn't interfere with the thread engagement.
Any fittings that are brass-on-brass generally do not need pipe dope, but you can use it if you want to.
Any brass to dissimilar metals will require pipe dope.
 
Got the pilot assembly in no problem, but the supplied bracket is nowhere near close, sits much higher in the cabinet and would need to be notched for a lip under the firebox even if I do that the gas valve will be basically flush against the underside of the box... what now?

Screw holes were too small too, drilled those out on the bracket and found out still not close.

New valve left, old valve right both with brackets on.
 

Attachments

  • 20180328_184533.jpg
    20180328_184533.jpg
    104.5 KB · Views: 761
  • 20180328_184254.jpg
    20180328_184254.jpg
    116.8 KB · Views: 562
I think I would use the old bracket, or some of it, to make an adapter for the new bracket to be attached to.
Does THAT look doable?
 
I think I would use the old bracket, or some of it, to make an adapter for the new bracket to be attached to.
Does THAT look doable?

I tried but can't because sit valve is wider than the Honeywell, I think I need some spacers to add to the existing studs then screw the bracket with screws to the extension collar that I add. Is it ok for the valve to sit close to the ceiling of the service cabinet ?
 
I tried but can't because sit valve is wider than the Honeywell, I think I need some spacers to add to the existing studs then screw the bracket with screws to the extension collar that I add. Is it ok for the valve to sit close to the ceiling of the service cabinet ?

If there's an air gap between the surface you're mounting to & the actual burner I'd say go for it.
If there isn't, I'd space it from that surface. You don't want any heat to potentially damage
seals or diaphragms in the new valve...
 
If there's an air gap between the surface you're mounting to & the actual burner I'd say go for it.
If there isn't, I'd space it from that surface. You don't want any heat to potentially damage
seals or diaphragms in the new valve...
I notched it and there's about half inch there should be ok, buying new fittings and pipe dope now should wrap it up soon tonight!
 
And we're running... fan and power through skytech rf box, sit 820 valve, new fittings, valve is close to Firebox floor.

The pilot is much higher than the other setup and contacts the logs on that side is that ok?

Not seeing any leaks and have a co tester near as well.
 

Attachments

  • 20180328_223529.jpg
    20180328_223529.jpg
    170.8 KB · Views: 1,209
  • 20180328_223545.jpg
    20180328_223545.jpg
    119.9 KB · Views: 542
Measure the pilot milliVolts at the thermopile connections on the valve terminal block.
Most units call for the reading to be at about 550mV...
If you're over 600, you can cause the thermopile to fail prematurely.
Turn it down using the PILOT adjustment screw on the front of the valve...
It's the slotted brass just to the right of the thermocouple input.

Thanks, I adjusted down to .570 and ran the unit 4hrs yesterday no problems.

When it turns on the burners light from right to left and one at a time as the flame jumps I guess, never paid attention before but seems normal.

Do the logs breakdown over time? A few have surface cracks but seem structurally sound... they also are no longer available.
 
They WILL break down...They are generally manufactured from ceramic fibers & are pretty brittle. If they DO break, I have put them back together with drywall screws, RTV & Stove Bright Hi Temp Paint...
 
Thanks, here's a video in operation, there is a tiny flame straggler at the far right lower front is that a problem? Instructions said to keep the wool and embers away from the corners so the tiny 1/4" raised flame just lives over there.

 
  • Like
Reactions: MontanaFlyFish
Ls3c6, that tiny flame is likely at the edge of the burner where the ceramic burner tiles meet the edge of the metal frame, that is normally a small strip of cerawool (fiberfrax) gasket. My guess is yours may not be fully there. It shouldn't pose an issue in the grand scheme of things. I'd be tempted to stick a small piece of the rockwool ember material on it, just so it doesn't stand out so much.
 
  • Like
Reactions: DAKSY