Wood stove automation using the Raspberry Pi

  • Active since 1995, Hearth.com is THE place on the internet for free information and advice about wood stoves, pellet stoves and other energy saving equipment.

    We strive to provide opinions, articles, discussions and history related to Hearth Products and in a more general sense, energy issues.

    We promote the EFFICIENT, RESPONSIBLE, CLEAN and SAFE use of all fuels, whether renewable or fossil.
I love the idea of the stepper motor controlling the blaze king thermostat. Now you've completely screwed up my plans!

Still getting rid of line level voltage would be nice. I have a few group 31 batteries kicking around too. Choices choices
 
Starts getting into mechanical engineering with the steppers. YAY! Another thing I am not good at!

At least there are boards and programming libraries that make the coding part easy on Pi and Arduino.

https://www.adafruit.com/?q=stepper

I plan on using the NEMA-17 size motor to move the Pacific Energy air contoll lever in front. I need to also use a couple of limit switches so the system knows when the air control lever has hit limit on each side.

For the Blaze King you probably will not need nearly such a beefy motor to twiddle the air control.

Not sure if a servo motor would work better than a stepper ...

https://www.lifewire.com/stepper-motor-vs-servo-motors-selecting-a-motor-818841

It would be helpful to have a way of knowing the controls position.

https://en.wikipedia.org/wiki/Rotary_encoder
 
trainman4 has been posted to GITHUB. It adds in accurate room temperature acquistion and display on the LED.

https://github.com/yodagami/trainman/tree/master/trainman4

Several years back before I added in the room temperature display I would often catch myself adding in a bunch of wood when the room was already at 77F. Ooops! Now a quick glance off to the Green LED Room Temperature display and I know how much wood I should add to make it through the evening. I put the sensor right next to the recliner chairs, im hoping that relates accurately to how the room feels when sitting in them.

Well that pretty much documents and wraps up the current status of this project. I need to get working on a button box for menu control and of course the automation of the air control. That will take me a while. Hope I can get it going before the end of the burning season.

.... more random thoughts on automating the BlazeKing and other stoves with stove thermostat control ...

1) A servo will probably not work. Need accurate control and that means stepper motor not servo.

2) See if a timing pully such as ... https://www.adafruit.com/product/1253 can replace the plastic knob on the stove thermostat.
Use a small Timing pully on the stepper motor https://www.adafruit.com/product/1251
With a timing belt between the two this will allow the greatest number of steps and the greatest degree of control and/or
Allow the motor to be away from the thermostat shaft because ....

3) Will need a way to mount the motor inline with the thermostat on the stove.

4) A direct gearing system or just connecting the stepper shaft to the thermostat control might work but there needs to be a way to mount that motor. The stepper I have has 200 single steps per revolution which is probably enough not counting INTERLEAVE mode.

5) There may need to be limit control on the timing pully mounted to the thermostat shaft. Maybe drilling a hole in the side of the pulley, tapping it for a long screw and then making a plate with a couple of limit switches so you can detect when the thermostat is all the way min/max.

6) The limiter solution also has to be mounted next to the thermostat shaft.

7) Might be possible to forgo the limiter solution if you trust the stepper counting and/or it doesn't destroy the interlink system (belt/gear/motor/shaft) when it tries to blow past the counter-clockwise and clockwise limits on the stove thermostat. Smaller stepper motor might be better so it doesn't break stuff.

8) If it works then you will really be looking at a highly accurate way of measuring room temperature method similar to trainman4. Then you will be able to nail a comfortable room temperature by having the system micro-manage room temp via micro-movements of the stove thermostat ... waaayyyyyy better than a human would ever want to do. This is what computers are good for, doing the boring stuff.
 
TRAINMAN5

There has been a good cold snap here. Enough to test out the automated air control for the Pacific Energy Classic wood stove.
So .... what can I say about this. Hmmm.... IT'S REALLY FREAKING COOL!

At first I thought it wouldn't work or it would be a novelty but now its just so awesome to be able to throw wood in the stove, light it up and the system just takes care of burning what I put in there. I don't have to worry about over-firing the stove or getting too many coals because I forgot to open up the air control at the end of the burn. I find I am putting more thought into how much wood should I chuck in by looking at inside temps, outside temps and how long I want the room warmed up rather than messing around with the air control lever all the time trying to get a good burn. The SO acceptance factor is huge. She loves the little minion Pi robot that takes care of the stove. It's hillarious.

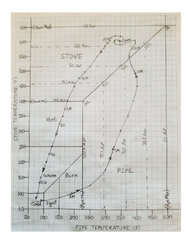
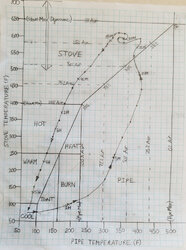
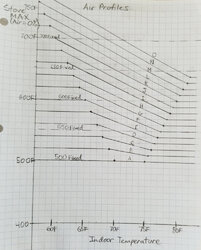
The wild thing is that I haven't even really started getting into optimizing the code. All I did was simply figure out how many steps (airsteps=468) from max air to min air and then based on min (pipemin=225F) and max (pipemax=500F) pipe temperatures set the air control using a linear formula. Dead simple. Its not optimal but I was amazed how it works pretty good for such simple logic.

https://github.com/yodagami/trainman/tree/master/trainman5

Yeah, so software needs some work but lets talk about hardware which is almost done. Adafruit makes a stepper motor hat for the Pi. This goes under the trainman board. I use stacking headers with the long pins on the motor hat so its easy to make it all work together. Pi on bottom, stepper motor hat in middle and trainman board on top.

First the good news. The PE super stoves have this awesome air control lever that on min air setting can crash the burn even if I stuff the box full of junipetrol kindling sticks in a wind storm. Even better is the long travel on the lever between max air and min air allowing for more fine grained control than a lot of non-cat stoves. The air control lever operates smoothly, making automation fairly easy to accomplish.

The challenges:
a) The air control lever hinges on a pin so its motion is actually semi-circular instead of linear.
b) How to control air lever without drilling or permanently modifying the air control lever
c) Attaching the air control to the stove without drilling or permanently modifying the stove.

Solution: Open builds V-Slot rail and Mini-Gantry to the rescue

Here is the basic hardware list:
# 1xAdafruit #324 Stepper motor - NEMA-17 size - 200 steps/rev, 12V 350mA
# 1xAdafruit 12VDC power supply
# 1xAdafruit #2348 DC & Stepper Motor Hat for Raspberry Pi - Mini Kit
# 1xAdafruit #1184 Timing Belt GT2 Profile - 2mm pitch - 6mm wide 1164mm long
# 1xUltibots #N17D NEMA 17 Damper - Astrosyn MY17RMDAMP
# 1xOpenbuilds GT2-2M Timing Pulley - 30 Tooth
# 1xOpenbuilds V-Slot 20x20 Linear Rail
# 1xOpenbuilds Mini V Gantry Set
# 1xOpenbuilds Motor Mount Plate for NEMA 17 Stepper Motor
# 1xOpenbuilds Idler Pully Plate
# 1xOpenbuilds Smooth Idler Pulley Kit

Why this is cool: The stepper motor, pully, vslot rail, belts and gantry allow the translation of the semi-circular motion of the air control into a straight linear motion. All I did was to use longer bolts and some spacers on the mini-gantry and the lever is pushed left and right between these two spacers. Easy.

NEMA 17 Damper makes things alot more quiet than hard spacers on the motor. I use the MICROSTEP motor operation call rather than SINGLE or DOUBLE for even more quiet motor operation.

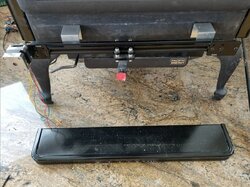
Attaching the rail to the stove: I made a couple of spacer brackets out of 1-1/2x1-1/2 aluminum channel and just reused the holes (in the stove) and bolts that hold the Ash Pan in place to attach the V-Slot linear rail at the right distance and height to operate the air lever. Once that is done the timing belt is tie strapped to the gantry and the belt snugged up by adjusting the positon of the the idler pully plate on the rail. The channel works better than square tube. Its still fairly strong but lets you get tools in the right places to attach the spacer brackets to the stove. Yeah, the ashpan still fits over top. It wedges in place betwen the alumium channel spacers and the stove.

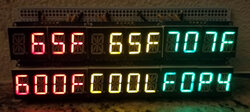
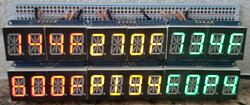
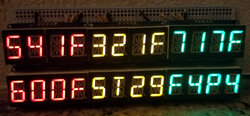
So how does this work? The trainmain5.py code makes calls to the Pi stepper library based on temps read by the thermocouples. Pi stepper motor hat powers the stepper motor and controls its steps clockwise or counter-clockwise. The rotation of the timing pully on the motor shaft with its teeth pushes/pulls the notched timing belt. The timing belt loop moves the mini-gantry linearly along the v-slot linear rail. The spacer pegs on the mini-gantry top plate engage the wood stoves air control lever moving it left and right. No drilling or permanent modification of the stove air control lever is required.

Other parts and other thoughts:
- Limit switches: You can get switches that mount onto the rail that can detect min/max positions. I have them but have not implemented this yet. The hardware doesn't seem to get harmed if I blow past the min max of the air control. The motor will just "skip" instead of breaking the motor, timing belt or other components. Maybe I don't need them. Maybe they would be cool to have.

- NEMA 17 heat sink and thermal tape. Ultibots sells these along with the motor damper. Inexpensive so I just slapped one on my motor. Easy. Maybe it will help with motor longevity. I haven't seen mine fail yet even after burning an entire season without the heat sink.

- DPST motor switch. I want a way to allow manual motor override similar idea to my 3 position switch for fan control that allows manual operator override of the fan speed in case something goes wrong. A simple double pole switch for the 2 coils on the stepper motor seems the easiest way to allow for manual operator override of the air control Right now the stepper motor pretty much locks the air control into place. Its pretty strong. Breaking the coil circuits from the motor hat to the stepper motor should free up the lever enough for manual air control override.

- So that's it for now. I have a lot of work to do on the air control code. This has got to be the best and most fun part of the entire project. Cheers!
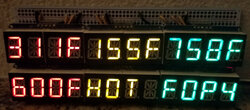
 

Attachments

  • trainman5-steppermotor-minigantry.jpg
    trainman5-steppermotor-minigantry.jpg
    237.5 KB · Views: 394
Last edited:
I am moving down this route too... I do not intend to control the stove with it, but want to be able to see the temperature from my phone and a display next to the stove. The display is easy, for me, a dumb mechanical engineer, but the web server reporting and graphing temp is much harder. I just ordered enough to get me going... Probably relying heaving on your code! Very excited!

FWIW, my stove is controlled with a pull rod that has a stroke of about 3"... I looked into controlling it using a linear actuator. That would be the right actuator for my stove, but would be a problem when you didnt want it automated. more to follow... now to figure out hot to use a raspberry pi... read a thermocouple... and remotely monitor it...
 
I want my stove to cook me some raspberry pie. Yum.
 
I am moving down this route too... I do not intend to control the stove with it, but want to be able to see the temperature from my phone and a display next to the stove. The display is easy, for me, a dumb mechanical engineer, but the web server reporting and graphing temp is much harder. I just ordered enough to get me going... Probably relying heaving on your code! Very excited!

FWIW, my stove is controlled with a pull rod that has a stroke of about 3"... I looked into controlling it using a linear actuator. That would be the right actuator for my stove, but would be a problem when you didnt want it automated. more to follow... now to figure out hot to use a raspberry pi... read a thermocouple... and remotely monitor it...

I started out with simple goals and simple dreams and next thing I knew there was all kind of stuff added to this project. Part of me thinks I went overboard ... but then I had the pulley system off the stove for maintenance when the cold weather hit. I sure missed not having to move the air lever at the right time and quickly put it back on and fired up the Pi. Runs great!

Trainman6: I still have more work to do on the air control logic. I want to add a stove thermostat that factors in the current room temperature so the air controller will try to target a stove top temperature. Example: Its 65F in the morning and I want the air modulated to target a stove top temp of 650F so the room heats up quickly. As the stove heats the room up the stove top target gets gradually reduced to 400F at a room temp of 72F. Also like to have a way to set thermostat profiles much like I have for the automatic fan speed controller part of the program. Then I can set a more/less aggressive heat production profile as needed.

The mechanical aspects of this project were the most challenging. I've never messed with robotic/stepper motor anything before. I could probably add in some kind of remote monitoring/graphing and if I did I would just write a python plugin and add it to my Nagios server that monitors everything else around the place. I don't really recommend Nagios for beginners. I would not call it a light weight monitoring package and It has quite the learning curve. Right now if I want to know whats going on remotely I just ssh onto the Pi and tail the log file that I have writing into RAM so it doesn't burn out the SD card ...

tail -1000f /var/tmp/trainman

Its crude but i'm lazy :) I like the idea of using a phone app or just make a web server on the Pi with a page that displays the temperatures. A real-time auto-updating graph of stove temp, pipe temp and fan speed would be great! Software buttons that do what the hardware buttons do right now would also be useful.

I tried to document the code as much as I could so it could be understood and reused. Feel free to use/modify/hack anything in it you want and have fun!
 
Howdy!

I have been working more on the code to control the air lever. Previously the system just looked at the pipe temperature and set the air control 100% for 225F (pipemin) and lower, 0% for 500F (pipemax) and higher. For temperatures in between these two set points it reduces the air in a straight line fashion. e.g. 362F = 50% air.

The logic is easy to calculate and works great on stove startup. In order to get an efficient burn and keep the heat from just going up the chimney a gradual reduction of air based on pipe temperature is perfect to get the secondary burn going without snuffing out the primary burn by choking off the air too soon or over-firing the pipe by not being aggressive enough quenching the air.

However in the latter parts of the burn, when the stove is heated up, this pipetemp-controls-air-logic provides too much air. Not only can the stove go up to 700F the secondary burn is not as robust as I would like. The stove has too much air to optimize the secondaries and too much heat is going up the chimney.

Non-solution: I tried regulating the air to try to fly the stove temperature to hit a certain temperature. Basically if Temp too low->increase air, Temp too high->decrease air. This logic wasn't stable at all. The stove would go from 0% to 100% to 0% to 100% There was too much momentum in the stove temperature once it starts heading up or down.

Simple Solution: Calculate air control based on stove top temperature the same way air is calculated on pipe temperature. According to my magnetic stove top thermometer 400F (stovemin) is a good minimum temperature at 650F (stovemax) is a good maximum temperature. So in the same manner as pipe temperature the air setting is calculated for stove temperature. Super simple linear relationship between stove min temp (100% air) and stove max temp (0% air). Much more stable than trying to force the stove to hit a particular temperature.

But now there are two air settings. One determined by pipe temperature and another determined by stove temperature. The code simply picks the lowest air setting of the two calculated air settings and uses that to set the position of the air control.

So what this means is after ignition the pipe temperature rockets ahead of the stove temperature. As soon as the pipe gets over 225F (pipemin) the air control is regulated by pipe temperature. As the stove catches up and surpasses the pipe temperature the air control is regulated by the stove temperature. Eventually the stove cools off below 400F (stovemin) and the air control is set to 100% as the stove cools off. Full air helps burn off coals at the end of a burn.

The stove has 3 basic "states":
1) 100% air on startup and cool down.
2) 99%-0% air regulated by pipe temperature. (PIPE)
3) 99%-0% air regulated by stove temperature. (STOVE)

For fun I broke down the 100% air state into multiple sub states:
Logically they don't do anything. They are just for fun.
a) COOL
b) IGNT (ignition recently started)
c) BURN (heating up but not yet at PIPE regulation state)
d) HOT (coming down from STOVE regulation state but stove is still heating up the room)
e) WARM (Probably not doing much for heat but I could probably restart the stove easily if I wanted)

More fun: I made a crude graph of a typical burn as it progresses through these various "states". Pipe temperature is on the X axis and Stove temperature on the Y axis. Time is shown at various points along the line with the arrows on it (10M=10minutes, 2H=2hours).
I like how the stove temp meanders around 600F for most of the active burn.

So far this logic works really well. Now I just build a fire, light it and shut the door. The systems runs the air control and fan speed all the way from start to finish with a nice efficient burn.

Improvements: I will probably vary the stovemax value to obtain more control over the macro burn rate. Not sure if I will incorporate room temperature.

Cheers!
 

Attachments

  • trainman6_pipe_vs_stove.jpg
    trainman6_pipe_vs_stove.jpg
    115 KB · Views: 301
  • Like
Reactions: Ryan723
I like what you are discovering, but I am not in favor of it opening up the air 100% on cool down. That would shorten the burntime and be an unnecessary waste of fuel for our Alderlea. An algorithm that recognized the difference between a cool stove on startup vs one that is cooling down would be preferable for our stove.
 
Wow. Nice work!!

That temp-temp plot is a really neat way to see what it’s doing!

Have you datalogged the stovetop and stack temperatures and plotted against %air?

It would be cool to see how it actually reacts to air changes. And might help tune it a bit more if you needed to.

I’d really like to see how a time vs temperature plot looks and compare it to what my BK Ashford does with the mechanical t-stat air control.

Here’s a recent ‘low and long’ burn for me.

E51768B0-A486-4E31-9A4A-87ABF610520C.png
 
> not in favor of it opening up the air 100% on cool down

Its possible to just leave the air control mid way during cool down to room temp and promote the coal formation. Looking at the graph (It was a 3 split small size load) the air control only was set to 100% when stove cooled off to 400F and pipe was 175F. By that time there were no flames at all. Just glowing coals.

Stovemin (400F) only comes into play on cool down so that could be adjusted downward if need be.

On startup (pipe temp > stove temp). Cool down (stove temp > pipe temp). So its possible to write logic based on that.
 
Yes, agreed. This logic would help, particularly in PE stoves that have the secondary air supply control coupled to the primary.
 
I love the idea of the stepper motor controlling the blaze king thermostat. Now you've completely screwed up my plans!

Still getting rid of line level voltage would be nice. I have a few group 31 batteries kicking around too. Choices choices

With the BK, you would want to sit down and decide how you want the logic to work. You are going to introduce oscillation and constant adjustment if your logic is "if the stovetop is below X turn up the thermostat". The logic for thermostat adjustment should be pretty hands-off. (Also, the stove already does what the OP was trying to achieve in the first place.)

One cool application would be to run the thermostat and the fan based on room temp, though. That would be a neat upgrade, though you would want to be able to set a max adjustment range for those cold days when you know you will be gone for 24 hours and don't want the fuel to be gone in 12.

This is a great project. I have a stack of pis of various generations at home. (Only one doing actual work at the moment, but they keep coming in handy for this and that over the years.)
 
Last edited:
> Have you datalogged the stovetop and stack temperatures and plotted against %air?

The air control % setting is kinda/sorta/hidden on the graph. Look at the vertical dashed lines for the PIPE state or the horizontal dashed lines for the STOVE state. 100%, 75% 50%, 25%, 0% Air.

The air control lever gets set every 30 seconds so pretty much can tell what the air was set to at any particular point.

I think Its a weird looking graph. I would normally just plot time (T) on the X axis like yours with the various (F) temp values on Y axis, but I wanted to show:

1) The relation of the stove temp versus pipe temp through a burn.
2) How that difference can let you identify if a stove is heating up or cooling down
3) How the program modulates Pipe temperature on startup. Pipe temp reacts relatively quickly to air control. You can see how it bounces off the Pipe=415F temperature at about 9 minutes when the air control gets shut down to about 35%.
4) The transition from PIPE to STOVE regulation state at 12 minutes, 40% air Pipe=380F Stove=540F.
5) After the STOVE regulation takes over the air gets quenched back even more, living between 20%-12%. Secondaries are going off like crazy and the stove does not smoulder or over-fire. Was only a small 3 split load so secondaries only burned for about an hour.
6) I get too many clinkers left over if I just leave the air shut off on cool down so the STOVE regulation works well to open that back up to 100% when the flames are gone.

Next up are air profiles that allow modification of the StoveMax parameter. I think I will have some FIXED profiles like 550F, 600F, 650F, 700F as well as ones that key off the room temperature. Aka AUTO that peel back the StoveMax as the room heats up (e.g. Room 65F->StoveMax=700F, 68F->650F, 71F->600F, 74F->550F). Then I can play around with what works with various scenarios.
 
  • Like
Reactions: Ryan723
Great stuff.

I’ve been thinking about keying my fan according to room temperature. Basically let the stove’s t-stat do it’s thing to maintain stove top (well, back in the case of the BK) temperature. And peel off extra heat with the fan for the room as needed.

Have you looked into PID control for your airflow? Dont know if you’re seeing much overshoot, but from my smoker controller and home brew days, a tuned PID routine might really help overshoot which in this application might really help efficiency and extending burn time.

The RPi should have plenty of extra horsepower to handle a PID routine and there should be some readily available libraries for it.
 
Fan control was one of the first things I put in (see pics on first post of this thread). The PE classic came with an AC variable speed fan so I just used that instead of going the DC route but DC powered PWM fans would make a nice quiet truly variable fan solution.

For now, the AC blower fan that came with it is nice and powerful. My relay box lets me have 8 different fan speeds + off. I currently have 9 fan profiles that ramp up and down the fan speed based on stove temp. I find with the automatic air control if I want a lot of heat I can just up the fan profile and that will blow the heat off the stove. The system will then tend to increase the air control due to the lower stove top temp and thus increase the burn rate.

I still I want to have another adjustment that lets me macro control the air like the fan profile lets me macro control the fan. Sometimes I just don't want to have increased fan noise so in that case I would just bump up the air profile. That has been my goal all along. Macro control of the system by the human and let the program micro manage the air control and fan speed. A scheme that lets the air control adapt to room temperature would be nice. Then I wouldn't have to fiddle with the macro air control as the room heats up. The system would automatically peel back the burn rate in an already warm room.

I have not looked at PID code for fan or the air but its a very interesting idea.

https://www.csimn.com/CSI_pages/PIDforDummies.html
 
  • Like
Reactions: Ryan723
With the BK, you would want to sit down and decide how you want the logic to work. You are going to introduce oscillation and constant adjustment if your logic is "if the stovetop is below X turn up the thermostat". The logic for thermostat adjustment should be pretty hands-off. (Also, the stove already does what the OP was trying to achieve in the first place.)

One cool application would be to run the thermostat and the fan based on room temp, though. That would be a neat upgrade, though you would want to be able to set a max adjustment range for those cold days when you know you will be gone for 24 hours and don't want the fuel to be gone in 12.

This is a great project. I have a stack of pis of various generations at home. (Only one doing actual work at the moment, but they keep coming in handy for this and that over the years.)

This is definitely a cool project. I had the exact same idea for my BK as well. Just to feed room temperature info back to the airflow control to get a fully closed loop system. Some ideas to create a "stable" system are to either have a long update period or you can used some more advanced control techniques that model and/or predict how the stove will behave at various conditions. Not sure what the raspberry PI is capable of. I do control system engineering for work so it would be interesting to be able to play with some of it at home.
 
This is definitely a cool project. I had the exact same idea for my BK as well. Just to feed room temperature info back to the airflow control to get a fully closed loop system. Some ideas to create a "stable" system are to either have a long update period or you can used some more advanced control techniques that model and/or predict how the stove will behave at various conditions. Not sure what the raspberry PI is capable of. I do control system engineering for work so it would be interesting to be able to play with some of it at home.

The pi is just a little ARM sbc. Most of them out there run Linux, and the pi foundation builds a debian branch specifically for their hardware, so you are not having to compile every package and update in a dev environment (or worse yet, natively on the pi.. I heatsinked and overclocked one of my first ones, and it still took hours to build ffmpeg).

The new revision is MUCH faster than the original ones. You could use it for a (slow) desktop PC in a pinch. Without getting into compiling the entire environment, you can run a bunch of linux distros, plus FreeBSD and Android. Stick with Raspbian unless you have strong feelings about Debian.
 
Changes to LED display. Pictures attached.
This is what the alphanumeric 6 x quad LED display means now
Top Red=Stove Temp
Top Yellow=Pipe Temp
Top Green=Room Temp (yeah, still missing that decimal dot).
Bottom Red=Stove Max
Bottom Yellow=State
Bottom Green=Fan Profile + Fan Speed. (example: F6P3 = FanSpeed 6, Fan Profile 3)

For the PIPE and STOVE states the last two characters show air percentage from 99% down to 00% percent.

examples in pictures:
PI94 = Pipe regulation, Air is set to 94%
ST29 = Stove regulation, Air is set to 29%
 

Attachments

  • trainman6_cool.jpg
    trainman6_cool.jpg
    120 KB · Views: 209
  • trainman6_pipe94percentair.jpg
    trainman6_pipe94percentair.jpg
    159 KB · Views: 214
  • trainman6_stove29percentair.jpg
    trainman6_stove29percentair.jpg
    121.3 KB · Views: 193
  • trainman6_hot.jpg
    trainman6_hot.jpg
    122.8 KB · Views: 204
  • Like
Reactions: begreen
Best thing about Raspberry Pi is all the add-on stuff you can get for it.

Used this to make my own "hat" for this project....

https://www.adafruit.com/product/2310

Need a motor controller? Easy ....

https://www.adafruit.com/product/2348

Crazy amount of stuff you can get for it. Ive used the LED matrix controller and GPS for other ideas I had.

https://www.adafruit.com/category/405

Also have a bunch of Arduino projects but I like the Python/Pi on Raspbian development platform better, just personal preference.

Big downside on Pi that they haven't improved is the reliability of the SD/Micro SD chip. This is why I write the log to RAM instead of disk.

The ODroid https://www.hardkernel.com/ can use EMMC memory but even then its not as robust as an actual SSD. For any I/O intensive project I would rather use an Intel NUC.
 
Big downside on Pi that they haven't improved is the reliability of the SD/Micro SD chip. This is why I write the log to RAM instead of disk.

If you have the Pi networked, log one of every X measurements to an IOT platform. I’ve been using IO.adafruit and it is surprisingly good. They’ll archive a month of data for free. And it’ll be there after a device power cycle unlike the RAM disk. I’m sure there’s a python library....the arduino one is super easy to incorporate into a project.

Added benefit is you can view data and dashboards from anywhere. The plotting and ‘gauges’ are surprisingly good!
 
Trainman6 has been posted to github....

https://github.com/yodagami/trainman/tree/master/trainman6

This version is all code enhancements to Trainman5

1) Added stove regulation in addition to pipe regulation for the air supply control lever. This allows for a more efficient burn than just relying on pipe temperature.
2) Moved stuff around on the LED displays and added stove state (lower yellow LED).
example: PI55 = pipe regulation air set to 55%, ST08 = stove regulation air set to 8%
3) Air profiles give macro level of air control while allowing either a fixed stovemax or one that is dynamic based on room temperature. Automatic profiles reduce stovemax gradually as room warms up extending burn times and keeping room from being overheated.
Current stovemax and profile letter displayed on lower red LED. example: Profile H with a calculated stovemax=593F would be shown as 593H
4) Air control is batched up so its not constantly moving every second. Program now updates the air control once per minute or immediately if it is out of whack by 5% or more.
5) Better code organization. A bunch of code in the main loop made into function calls.

Attached a couple of crude diagrams with air profiles and an updated pipe versus stove graph.

NEXT UP:
- Wall bracket for LED display, Pi, Motorhat and Thermocouple ports
- Rotary Encoder or Switches to allow easier control over air and fan profiles.
- Manual override/kill switch for stepper motor.
- Limit switches for stepper motor operation.
 

Attachments

  • trainman6_pipe_vs_stove.jpg
    trainman6_pipe_vs_stove.jpg
    137.9 KB · Views: 221
  • trainman6_airprofiles.jpg
    trainman6_airprofiles.jpg
    120.5 KB · Views: 216
  • Like
Reactions: Ryan723 and KPru
Well I am working on the raspberry pi... as a mechanical engineer programming isnt coming natural to me. C++ is ok, python is harder... Troubleshooting now.... thermocouple readings are off....think the ADS8495 is bad)

BUT for about $10 I already have a decent readout.
https://www.ebay.com/itm/76-999-K-type-Thermocouple-Dual-thermometer-display-digital-LED-temperature/263798081879?ssPageName=STRK:MEBIDX:IT&_trksid=p2057872.m2749.l2649

If you want a readout in C vice F you can do it for a little cheaper.(but i dont think in C)

and this is the probe:
https://www.ebay.com/itm/9mm-x-5mm-Probe-Ring-K-Type-Thermocouple-Temperature-Sensor-2M-6-6Ft-X8F2/173299505924?ssPageName=STRK:MEBIDX:IT&_trksid=p2057872.m2749.l2649

Some scrap wood and here is the result, very temporary for now. Room in the box for the pi whenever i get that running...

Image is a bit fuzzy...

IMG_20181216_183401.jpg
 
Last edited:
That's an awesome ebay find! Perfect for someone wanting something inexpensive and all they need is a display of a K thermocouple probe. People have been asking about something like this in other threads.

Had a heck of a time starting out trying to get the thermocouple amp to work. Started out with the MAX31850K 1-wire version and one other one. They work fine when reading air temperature but don't work at all when I attached them to the stove. I really need one that could read a grounded thermocouple so I could directly attach it to the stove. Started reading up on a lot of docs about thermocouples.

Turns out the AD8495 does support a grounded thermocouple. Its the only one I found that does. One caveat: Make sure the Pi is grounded to the stove. If I don't then the voltages bounce all over the place and temps read too low. A simple wire with clips on both ends solves this for me. One clip attaches to the USB port on the pi, the other one of the stainless braids on the thermocouple probes. Bang on compared to a Fluke IR gun and rock solid stable.

DVM should tell if the amp is working or not. I have blown up chips before, I think I smoked one of the ADC digitizers early on. This caused me to not solder on the little breakout boards. I just use 0.1" female headers, cut them to size and solder those onto my permaproto hat board. Now all the little boards just plug into them like sockets.

Same deal with the LED arrays. I think I smoked one of the backpacks for those as well.