
So, this is my third winter heating my house with my Caddy furnace. I have been cleaning the furnace heat exchanger and the un-insulated pipe in the basement twice a year. Never any alarming build up, but I do it for peace of mind. Every time I looked up the main class A chimney pipe I never saw anything that looked alarming up there so I had not cleaned it. Till Now. I decided it best to clean the chimney and picked up a Soot Eater to do the job.
The Soot Eater instructions have a template for trimming the plastic lines. But I thought it was way to short. They would have you trim it basically to the diameter of the pipe. I did my own thing. I have a 6 inch chimney. I cut the lines so they were about 9 inches long overall. Worked great.
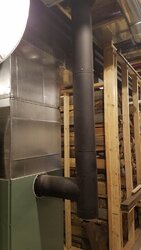
First, here is the set-up of the chimney on my furnace;

I took the pipes in the basement apart and cleaned them with the tool that came with the furnace for cleaning the heat exchangers. That left me with just the class A pipe at the ceiling in the basement.
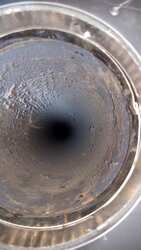
This is what it looked like before cleaning;

There was a post somewhere on this site about using a plastic jug attached to the vacuum cleaner hose to contain the soot. I thought I would take that one step further and use a pipe plug. Lets just say, it worked, kinda.....
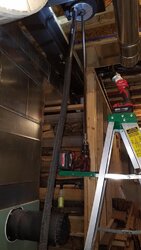
Here is the set-up I tried.

I cut an oversized 1 1/4" hole in the middle of the plug for the cleaning rods and another off to the side for the vacuum cleaner. I taped the edges of the holes so as not to cut myself, and so I would not cut up the cleaning rods.

The head of the soot eater goes in above the plug, insert the plug in the bottom of the pipe, attached the vacuum hose, attach the drill to the Soot Eater and start cleaning. Right away I could see the flaw in my design. The vacuum did not keep up and quite a bit of the soot would find its way around the opening that the rods go through. It got a little messy, but at this point I was committed! It helped to wrap a rag around the rod below the opening.
I did each 3 foot section at a time. Rotating in one direction on the way up, the the direction on the way down. It did not seem to need much more, but I did give each section a couple of passes. I was surprised at how easily the rods passed through my elbows. Up in the attic I have two 30 degree elbows. The thing went right through, I could not really even tell when I passed the elbows. I had 24 feet of cleaning rod and I think I was a foot or two short of the cap. Next time I have to get a second set of extension rods.
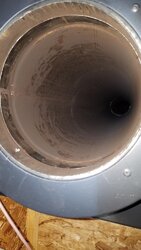
This is the chimney after cleaning;

I will make some changes the next time I do this. The second version of my design is going to use a 6" to 3" or 2" reducer in place of the plug. If I put the vacuum at the bottom and cut the hole for the rods on the side in the tapered section. I think it will work much better. Check back in a year to see how that goes!
All in all it worked pretty well. The Soot Eater worked great, it was only my system that needs a bit of refinement") With a few revisions to my system, I think it will be pretty painless the next time.
With a few revisions to my system, I think it will be pretty painless the next time.
The Soot Eater instructions have a template for trimming the plastic lines. But I thought it was way to short. They would have you trim it basically to the diameter of the pipe. I did my own thing. I have a 6 inch chimney. I cut the lines so they were about 9 inches long overall. Worked great.
First, here is the set-up of the chimney on my furnace;
I took the pipes in the basement apart and cleaned them with the tool that came with the furnace for cleaning the heat exchangers. That left me with just the class A pipe at the ceiling in the basement.
This is what it looked like before cleaning;
There was a post somewhere on this site about using a plastic jug attached to the vacuum cleaner hose to contain the soot. I thought I would take that one step further and use a pipe plug. Lets just say, it worked, kinda.....
Here is the set-up I tried.
I cut an oversized 1 1/4" hole in the middle of the plug for the cleaning rods and another off to the side for the vacuum cleaner. I taped the edges of the holes so as not to cut myself, and so I would not cut up the cleaning rods.
The head of the soot eater goes in above the plug, insert the plug in the bottom of the pipe, attached the vacuum hose, attach the drill to the Soot Eater and start cleaning. Right away I could see the flaw in my design. The vacuum did not keep up and quite a bit of the soot would find its way around the opening that the rods go through. It got a little messy, but at this point I was committed! It helped to wrap a rag around the rod below the opening.
I did each 3 foot section at a time. Rotating in one direction on the way up, the the direction on the way down. It did not seem to need much more, but I did give each section a couple of passes. I was surprised at how easily the rods passed through my elbows. Up in the attic I have two 30 degree elbows. The thing went right through, I could not really even tell when I passed the elbows. I had 24 feet of cleaning rod and I think I was a foot or two short of the cap. Next time I have to get a second set of extension rods.
This is the chimney after cleaning;
I will make some changes the next time I do this. The second version of my design is going to use a 6" to 3" or 2" reducer in place of the plug. If I put the vacuum at the bottom and cut the hole for the rods on the side in the tapered section. I think it will work much better. Check back in a year to see how that goes!
All in all it worked pretty well. The Soot Eater worked great, it was only my system that needs a bit of refinement
With a few revisions to my system, I think it will be pretty painless the next time.Attachments
-
 upload_2019-1-16_12-28-14.jpeg83.2 KB · Views: 139
 -
 upload_2019-1-16_12-29-41.jpeg95.4 KB · Views: 138
 -
 upload_2019-1-16_12-31-0.jpeg83.2 KB · Views: 161
 -
 upload_2019-1-16_12-39-3.jpeg99.6 KB · Views: 145
 -
 upload_2019-1-16_12-39-13.jpeg120.3 KB · Views: 171
 -
 upload_2019-1-16_12-50-41.jpeg84.7 KB · Views: 146

 I can run it from the bottom through my stove, through the 45degree elbow, and up the chimney no problem in one pass. Its pretty incredible how much flex the rods can. I will add that if you run 6" pipe cut your lines 10" or bigger otherwise they bend up and this makes for more passes required to get all of the soot out.