Hello
The old unit kept tripping the breaker and finally there was a burning smell it it stopped.
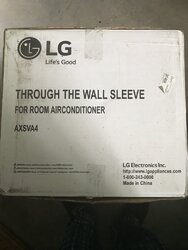
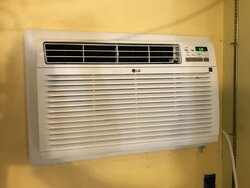
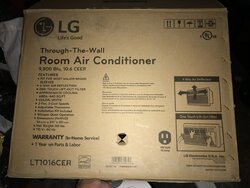
So I got a new LG wall unit Model LT101j6CER and optional sleeve for an easy install and servicing.
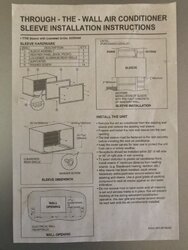
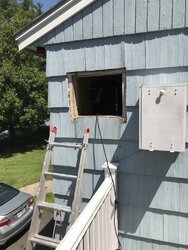
First I do want to mention that it is a good 9,800 BTU unit but the instructions a very flawed when they say to install the sleeve flush with the wall and use the foam strips to give the unit some tilt so the water or condensation will not flow into the house! This just does not work and you must install the sleeve at an angle to make the water flow outside! I install the top of the sleeve flush with the Sheetrock and the bottom pulled out about and 1” from the Sheetrock. Also I used wood shims on the sides to keep the sides straight before screwing the sides in with round head screws and washers.
Other than that every thing else is fine and once you get the sleeve or what I call the shell in the wall the rest is easy peasy. This is a good standard size shell 26” x 15.5” and fits many models, so should better going forward!
Anyway this is a 120 unit to be plugged into a 15 Amp AC outlet so since the old one is burned up, I got a new one and a new circuit breaker. In the meantime, I have it on an AC heavy duty extension cord to get through the rest of this Hot as Hati heat wave!
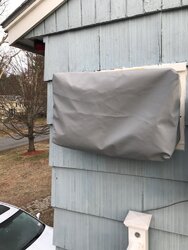
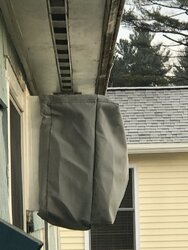
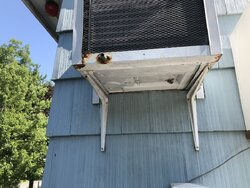
The old unit had to shelf brackets to hold it up on the outside but the sleeve of the new unit is screwed into the wall stud on one side and a 2x4 that is screwed into the wall stud on the other side so no outside support is needed. Also used 1” X 2” Azec Composite PVC trim for No Paint & o Rot! Now I can get a custom winter cover that will slip right on the unit.")
Will this unit be more efficient?
Pic 1,2 & 3 = old AC Samsung AW1216 - Manual does not state BTUs but control panel states 12,000 BTUs
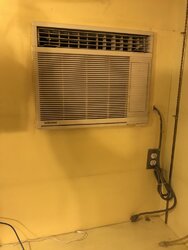
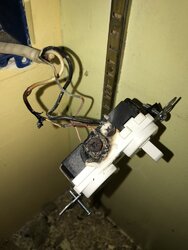
Pic 4 = burned up AC wall outlet
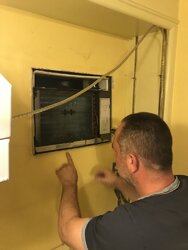
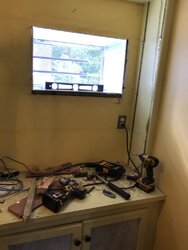
Pic 5 - 8 = widen hole of old AC unit to fit new one.
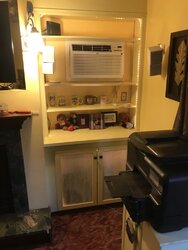
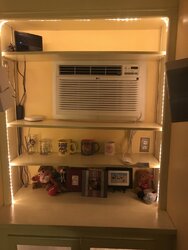
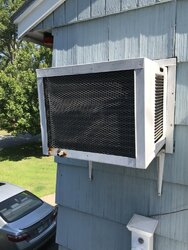
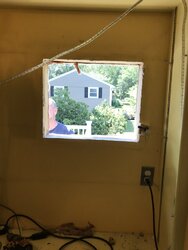
Pic 9 - 11 = new LG AC wall unit with optional sleeve.
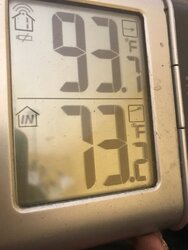
Pic 12 - new AC came just in time!
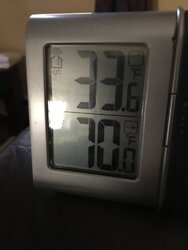
93.7 outside
73.2 inside!
The old unit kept tripping the breaker and finally there was a burning smell it it stopped.
So I got a new LG wall unit Model LT101j6CER and optional sleeve for an easy install and servicing.
First I do want to mention that it is a good 9,800 BTU unit but the instructions a very flawed when they say to install the sleeve flush with the wall and use the foam strips to give the unit some tilt so the water or condensation will not flow into the house! This just does not work and you must install the sleeve at an angle to make the water flow outside! I install the top of the sleeve flush with the Sheetrock and the bottom pulled out about and 1” from the Sheetrock. Also I used wood shims on the sides to keep the sides straight before screwing the sides in with round head screws and washers.
Other than that every thing else is fine and once you get the sleeve or what I call the shell in the wall the rest is easy peasy. This is a good standard size shell 26” x 15.5” and fits many models, so should better going forward!
Anyway this is a 120 unit to be plugged into a 15 Amp AC outlet so since the old one is burned up, I got a new one and a new circuit breaker. In the meantime, I have it on an AC heavy duty extension cord to get through the rest of this Hot as Hati heat wave!
The old unit had to shelf brackets to hold it up on the outside but the sleeve of the new unit is screwed into the wall stud on one side and a 2x4 that is screwed into the wall stud on the other side so no outside support is needed. Also used 1” X 2” Azec Composite PVC trim for No Paint & o Rot! Now I can get a custom winter cover that will slip right on the unit.
Will this unit be more efficient?
Pic 1,2 & 3 = old AC Samsung AW1216 - Manual does not state BTUs but control panel states 12,000 BTUs
Pic 4 = burned up AC wall outlet
Pic 5 - 8 = widen hole of old AC unit to fit new one.
Pic 9 - 11 = new LG AC wall unit with optional sleeve.
Pic 12 - new AC came just in time!
93.7 outside
73.2 inside!
Attachments
-
 764352C9-29C3-4B47-8D8B-D521C8F4B574.jpeg80.4 KB · Views: 411
 -
 54125BF9-5E30-4B2F-A809-237FC39B928C.jpeg171.9 KB · Views: 247
 -
 4C27BD32-424E-4A83-8AC3-DB71E41D8CA8.jpeg259.3 KB · Views: 257
 -
 9D448915-BE7D-4253-AA17-C48E5AD55A38.jpeg67.2 KB · Views: 240
 -
 56EC18D9-853C-4309-BC05-BC7B1940C961.jpeg85.9 KB · Views: 259
 -
 2857F7BA-26A2-48C6-A7AC-5FFDB8654E31.jpeg162.2 KB · Views: 262
 -
 BAB6DECA-D851-4B1B-B286-2EFCBAE2E2FD.jpeg89 KB · Views: 249
 -
 009FEF76-DB3F-447B-8B67-F82656C76B6F.jpeg88.7 KB · Views: 281
 -
 BB313122-1F89-45C0-ADB3-D6EC55A21343.jpeg110 KB · Views: 286
 -
 65C8FDBB-BB23-4C60-BD2E-6CA60E977965.jpeg170.2 KB · Views: 265
 -
 0FC1386A-9B30-4992-A3A0-51AD69654F64.jpeg157.7 KB · Views: 273
 -
 14DC541A-542B-4084-BD58-CA0843DC4676.jpeg79.2 KB · Views: 236
Last edited:


 True story..... Talk about getting your measurements right the first time. It all worked out fine. I'll get some pics if I get a chance.