building the hearth for my Napoleon NZ3000.....what a quest!

  • Active since 1995, Hearth.com is THE place on the internet for free information and advice about wood stoves, pellet stoves and other energy saving equipment.

    We strive to provide opinions, articles, discussions and history related to Hearth Products and in a more general sense, energy issues.

    We promote the EFFICIENT, RESPONSIBLE, CLEAN and SAFE use of all fuels, whether renewable or fossil.
Status
Not open for further replies.
S

ScotO

Guest
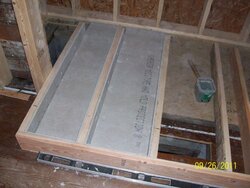
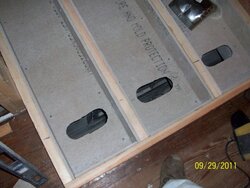
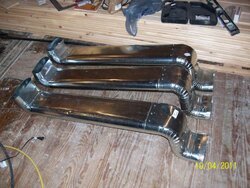
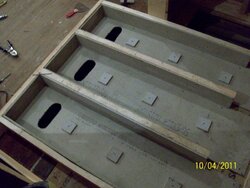
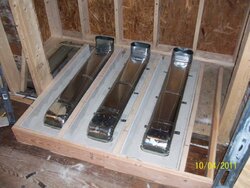
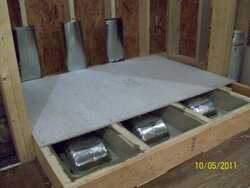
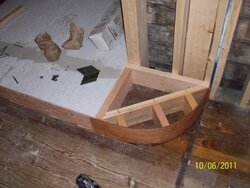
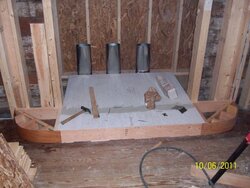
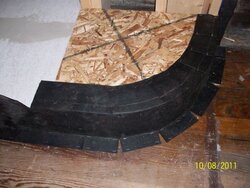
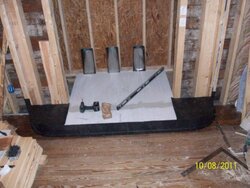
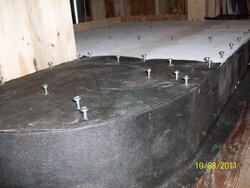
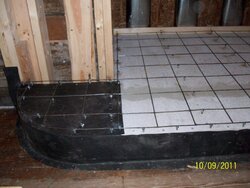
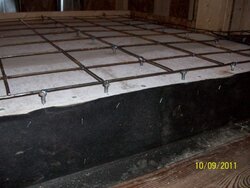
here are some pics of my NZ3000 hearth project...had some hurdles to tackle to be able to utilize the optional heat duct system on this fireplace, but I think we did a good job on accomplishing that task. We wanted a raised hearth from the get-go, and needed a way to get the heat ducts and the blower duct (three in all) up to the stove without going through the foundation, because the way the house is laid out (single level, built in 1918) going under the floor was the only option....anyway, we utilized the space under the hearth for the duct runs. Napoleon states that you need a one inch clearance to combustibles, so we lined hearth cavities in their entirety with cement board, and I kept the oval pipe up off the floor with blocks of cement board, giving me 1" on the bottom, 2+ " on either side and the entire top is 1/2" cement board with 2" of the high strength countertop concrete......all tied together with #14 x 2 1/2" wood screws that were left out of the underlayment 3/4" so I could WELD the concrete wire to every screw.....hence my name "Overkill"....lol...either way we are almost ready to put the stove up on the hearth and connect the HVAC, blower and OAK to the stove, hopefully on Saturday if everything goes right....here are some pics of this project.....more to come....
 

Attachments

  • 100_2779.jpg
    100_2779.jpg
    77.9 KB · Views: 3,606
  • 100_2782.jpg
    100_2782.jpg
    75.5 KB · Views: 2,384
  • 100_2809.jpg
    100_2809.jpg
    101.3 KB · Views: 2,347
  • 100_2811.jpg
    100_2811.jpg
    73.5 KB · Views: 2,242
  • 100_2815.jpg
    100_2815.jpg
    86.7 KB · Views: 2,728
  • 100_2821.jpg
    100_2821.jpg
    70.4 KB · Views: 2,554
  • 100_2825.jpg
    100_2825.jpg
    79.4 KB · Views: 2,205
  • 100_2827.jpg
    100_2827.jpg
    83 KB · Views: 2,091
Here's the outside of the chase....all natural stone from the mountain above our house, all the corners were hand cut......the stone took a good chunk of the summer, still have the interior stone to do, but we will have to wait for the fireplace to be installed before we get to that.....
 

Attachments

  • 100_2774.jpg
    100_2774.jpg
    102 KB · Views: 1,337
  • 100_2773.jpg
    100_2773.jpg
    98.7 KB · Views: 1,339
Monster project is an understatement. I can't wait to see the finished look inside. This is going to be a warm setting once you are done with all the beautiful stone work.
 
stejus said:
Monster project is an understatement. I can't wait to see the finished look inside. This is going to be a warm setting once you are done with all the beautiful stone work.

Thanks Stejus.....I agree, my wife and I have been doing this house project for the last 5 years, I started with the original family homestead that my Great-Great-Grandfather and my Great Grandfather built in 1918....we have since doubled the size of the house, completely re-studded the entire original house with 2x6" on 16" centers, all new sheathing, insulation, electrical, plumbing, etc....ugh....but we did the stone throughout the entire house (staircase wall, rear kitchen hearth, entire foundation, porch, garage, etc...I love doing stone masonry, and this put me to my limit but it is nice.....I also tore a barn down that was built right after the Civil War and we used hemlock sidiing and the beams out of the barn for our house.....anyway I appreciate your compliments, I will keep posting pics as the work progresses.....
 
looks good so far You will like that 3000 I know I do
 
  • Like
Reactions: ScotO
Dieselhead said:
looks good so far You will like that 3000 I know I do

Thanks Dieselhead, we like everything that we've heard about it, and we really like the looks of it with the wrought iron door and surround....it's nice to hear from someone who has one, we'll get more pics on here when we get more done...one question though, did you use the hook-ups for your heat ducts on the fireplace, and if so, how is the heat from them?
 
Awesome project. Are the ducts just to pull air from the front of the hearth and back over the stove or directing heat upstairs?
 
woodmiser said:
Awesome project. Are the ducts just to pull air from the front of the hearth and back over the stove or directing heat upstairs?
Two of the ducts are for the factory central heat option....the take room air from the fireplace room and direct it around the firebox, from there I am piping the heat down under the living room into it's own filter/blower box, and from there it will be distributed through the heat ducts on the front half of the house.....they claim it moves quit a bit of heat.....the other pipe is used for the room blower, it will take air from the other side of the house and blow around the firebox into the fireplace room....one system goes one way, the other system is reverse.....pretty nice options, and I wanted to be able to utilize them all!
 
going to try and get the stove set in place this weekend, along with hooking up the OAK and the supply and return ducts.....installing the ceiling firestop this evening in the chase, finally almost ready to get this thing test fired.....
 
I did not due to the layout of my house. The stove is in my great room with 22' tall ceilings and the upstairs is a loft with 2 bedrooms off of it. No problems with getting heat to the upstairs. Now if there was a way I can somehow plumb it with a fan to heaat my basement well that would be sweet!!!
 
Dieselhead said:
I did not due to the layout of my house. The stove is in my great room with 22' tall ceilings and the upstairs is a loft with 2 bedrooms off of it. No problems with getting heat to the upstairs. Now if there was a way I can somehow plumb it with a fan to heaat my basement well that would be sweet!!!

do you have an area under the hearth where you could somehow do the same thing I did?
 
Yes but I need to do some kind of fan to pull the heat through the stove into the basement. The air comes out at 180°ish when it first kicks on, going to need to find a inline fan 6 inch round or so that can handle some decent temps that I can put inside the ductwork. Thats the only way I can picture it happening right about now.
 
Scotty how is this project coming along? The few other 3000 owners are curious as to how you like it.
 
Scotty, the pics are great! Nice workmanship. Very nice. I like the use of the screws to create the base for your wire rod. Can't wait to see more.
 
  • Like
Reactions: ScotO
MF1635 Owner said:
Scotty how is this project coming along? The few other 3000 owners are curious as to how you like it.
had to put it on hold for a couple of weeks, but I did get the chase insulated and plan on installing the fireplace sometime this week.....problem is, deer season starts tomorrow so it may be a bit longer depending on my luck in the woods....lol....don't worry I will definately post more pics soon and give some feedback on how the stove works....BTW how do you like your 3000?
 
Trail_Time said:
Excellent workmanship Scotty. The chase is massive! Can't wait to see it all completed.
Thanks TT.....I made it extra large for two reasons....one was to replicate the frontier style fireplace, we wanted it to look like a big colonial fireplace....the other reason was to accomidate a permanent ladder inside the chase for maintenance, inspection, etc.....that's how I got the name overkill....lol.....you can easily access the chase from a crawlspace under the livingroom...thanks for the compliments that means a lot....more pics when I progress a little further...
 
WoodNStuff said:
Scotty, the pics are great! Nice workmanship. Very nice. I like the use of the screws to create the base for your wire rod. Can't wait to see more.
yea I wanted that concrete pad to be really really solid, so welding that wire down to all the exposed screws was the way to go.......I just wan t to make it over code and overly safe.....I try to always go the extra mile esp. when it's a safety thing and my family means more than the world to me....hence the name scotty overkill....lol.....more pics to come when I get started back up on it....
 
Dieselhead said:
Yes but I need to do some kind of fan to pull the heat through the stove into the basement. The air comes out at 180°ish when it first kicks on, going to need to find a inline fan 6 inch round or so that can handle some decent temps that I can put inside the ductwork. Thats the only way I can picture it happening right about now.
Dieselhead they make an inline fan that is perfect for this purpose.....basically the same fan that Napoleon puts in their kit (which they charge you a thousand bucks for) its on ebay....here's the link http://www.ebay.com/itm/220881343379?ssPageName=STRK:MEWAX:IT&_trksid=p3984.m1423.l2649
 
Okay, I know I'm ressurecting an ANCIENT thread here, but with working two full-time jobs (more-or-less), and some other things that came up over the past year, not to mention good 'ol fashioned BURNOUT, I'm almost done with my NZ 3000 fireplace. I was OVERWHELMED over last winter, right through summer, with tree cutting jobs, and other chores and projects, and no heat out in that part of the house, so the fireplace was put on hold. Well, as others of you know my situation out there, the boss said she wants it done and wants it done NOW! Finished hooking the fireplace up to the central heating ductwork, also hooked the blower duct and OAK up, and installed the flue up to the top of the chase but not poked through. I have to wait for a decent day to take the temporary roof off of the top of the chase so I can measure the top to have my copper flashing fabricated, hoping it's decent out tomorrow after work to do that job. I'll post some pics tonight when I get it tidied up a bit. We're getting ready to hang drywall in that room this week and it's been hectic........
 
  • Like
Reactions: BrowningBAR
Money, time, and energy. The working triangle.
Lose one, and nothing gets done. BTDT....many times.
Seems to me though, that you're gettin' er dun.
Oh, and you definitely earned your nickname.:cool:
Tell the wife to have faith. I see the room being done with a little time to spare. Now, don't go deer hunting, go hang some drywall.:p
 
  • Like
Reactions: ScotO
Okay, some pics of the install.......

So to sum things up, the clearances in every direction of the install are ABOVE AND BEYOND what code calls for. I insulated the chase with Roxul R15 fireproof insulation, but decided NOT to drywall it for several reasons. One being to keep an eye on any water or mold problems in that chase (we get quite wet in our area in the spring and fall), the other being the service "ladders" I built in the chase. There is a crawlspace and a trapdoor in the bottom of the chase so I can access it from the basement to inspect it should I ever feel the urge to do so (little bit 'o OCD, can't help it).

First pic is the stove installed in the chase...second picture is with the ducting all hooked up......

2012-07-21_20-54-42_395.jpg 2012-11-04_21-13-37_344.jpg

I utilized the heat ducts that are shown in the first post on this thread, and tied them into the top heat output knockouts on the stove surround. They will be piped under the basement and into a main trunk that will be split into three different smaller outputs. One will run to the dining room, one to the downstairs bathroom and one to the opposite side of the living room. Very nice setup.

Here's a top view of the heat output ducts (on either side of the flue). You can also see the blower duct (goes into the right side of the stove), and the smaller OAK going into the left side of the stove.....

2012-11-04_21-14-42_910.jpg 2012-11-04_21-16-40_364.jpg 2012-11-04_21-17-45_170.jpg

blower duct and OAK....also a view of the firestop radiation sheild (I still have to insulate and drywall the ceiling in the chase for code), and a pic from 20 feet up the chase looking down........

2012-11-04_21-15-06_315.jpg 2012-11-04_21-15-31_297.jpg 2012-11-04_21-15-49_765.jpg 2012-11-04_21-19-05_792.jpg

OK, so that's where we are right now. I'm hoping the weatherman is right about tomorrow being a nice day, so I can get the temporary ceiling off of the chase and get an exact measurement for the copper chase flashing cap I want to get built. I will then have to get it down here and get an exact measurement for where the flue will go through that chase cap and take it back to the fab shop for the vertical surround to be soldered to the chase cap........stay tuned....
 
One more pic of the hand hewn barn beam I'm going to use for the mantle. That bassturd is HEAVY. All this stuff I plan on having ready to go for the stonework to commence in two weeks.....yeah, you read that right......TWO WEEKS. I'm off for 9 days, so I should have plenty of time to get the stone veneer up. I plan on some really really long days on that so-called 'vacation'.

I made my beautiful wife a promise, and I intend on trying my very best to keep it......

2012-11-04_21-14-24_128.jpg 2012-11-04_21-14-33_50.jpg View attachment 80007
 
Status
Not open for further replies.