relaxrn
New Member
My heritage stove is 5 years old. Im tired of replacing baffles but Im nervous about the 500 degree rating.
There is no glue to that I know of for that application, but maybe Hearthstone's stove cement would work? I too think that the bricks will restrict airflow, and what supports them?
Sounds like a stove with a larger firebox and a near bulletproof baffle might be a better long term solution.

The firebrick would be 1" thicker than the baffle board. That could be too restrictive. Also, what would support the firebrick?
My 2005 model did not have pins but my 2011 model did. I got 10 seasons out of one baffle and am pretty sure I jacked it up moving the stove. I am sure the fire can't lift the baffle but I do think in high draft situations, it may lift when you crack the door if not secured by pins or wire.
If I break another one, I will likely look at the bricks though.
I have some soapstone I picked up at a granite shop scrap yard....hmmm wonder how much heavier that is than bricks? Never mind, I am sure that is way heavier.
I kind of like the SS sandwich idea.


The firebrick would be 1" thicker than the baffle board. That could be too restrictive. Also, what would support the firebrick?
 I will get better pictures myself tomorrow.
My wife did a good job at installing the new baffle.
View attachment 186681
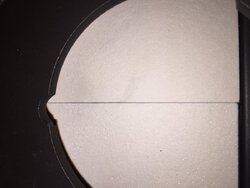
I am disappointed in the new baffle, see the big gap on the left.
View attachment 186682
This is as bad as the gap we had from our damage, not great for something I spent $100 or more.
I used a broken piece of the old plate on top of the new plate to seal the gap.
View attachment 186683
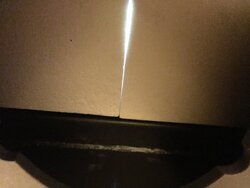
Here is a picture of the bracket that the firebrick mod would rest on in the front.
View attachment 186684
Maybe this was not on earlier models?
I still hope to hear from someone who has done a baffle mod.
Anyone put a flue damper on this stove?
Has anyone done any mods to this stove at all I would love to hear your experience.
Smoked something else I though about, if you used soapstone as a baffle would you have to wait 30 minutes to heat the soapstone before the secondaries would light?
The bracket pictured above is almost an inch tall and there is a tone of space above it. I almost with the firebrick would be tall enough to restrict the flue a bit but it would do nothing to the Flue.
I was a little dismayed when I realized my Heritage was not burning to specs this fall. The beginning of my third winter using this stove. Telling signs were the faster speed at which logs were being consumed and difficulty getting the good, low recirculating burn from low settings. I had been through this once before at the end of my first season with the Heritage. I got a light and looked up at the baffle. A one inch hole was visible in the ceramic plate.
There ya go, thousands of dollars upgrading my stove to this real beauty and it broke down already, after one winter! Oh sure, it was probably my fault. I probably 'shanked' the baffle with my poker or 'rammed' in too much wood. Maybe it was all those times I started the stove by leaving the ash door open that weakened the baffle? So off to the hardware to get a tub of furnace cement. A temporary solution at best. Don't bother is my advice, because this ceramic baffle is a 1/4 inch of, to put it politely, pith and nonsense. To top it off, I found out that it costs $65+ to get a new baffle. Typical, really great, expensive stove, that requires a replacement part every season or two. The ridiculous thing is that Hearthstone would bother with a baffle made of this ceramic stuff because it is too delicate for service in a stove. Of course you're going to 'prang' your stove baffle every so often. I don't care for 'feline-footing' around delicate parts that I need to put to daily use. I read about a fella that got three years out of his Heritage baffle. When I remove mine, it fell apart like pie crust. Oh! oh! Winters comin'!
It is obvious that the part makes sense for the service techs at the stove shop because sooner or later your gonna need baffle replacement and that means $$$$ for them. Go look in your Hearthstone right now, I bet you got a hole in your stock baffle. I wasn't going to roll over for these guys down at the shop so easily and they are probably wondering why I haven't been in yet to get a new baffle? I tried a few materials such as heavy ceramic tiles and a piece of asbestos board. Don't bother. Then I found these fire bricks in my old stove that I hadn't taken in for the scrape money yet. They are 4 1/2 x 9 x 1/2 inches and can be purchased at the Home Depot, inexpensively if you don't have any in an old stove. They are durable to heat but a little brittle so careful not to ding or torsion them when handling. The bricks form my old stove are 18 years old.
http://www.homedepot.com/buy/buildi...rts-accessories/6-pack-firebrick-154421.htmlk
For the modification I used a cannister filter mask, safety glasses, a pencil, square and a grinder with a small metal / diamond, cutting / grinding wheel for masonry work available, at the hardware store. Just do a good job smoothing the sides of the bricks that you'll have to cut. After you fit the bricks in, you get a nice row of 1 1/2 inch thick firebrick for a baffle that is much more durable then the 'wafer' that the Heritage comes with. Stove works well again and I not so worried about paying for a stock, junk, baffle material that doesn't appear to be up to the job.
I'd be interested in details of other effective solutions to this Heritage baffle problem but, so far, the stove works well again. Also be interested in reasons why I shouldn't do this type of mod.
Does anyone realize that this thread has over 10,000 views? Wow! That a lot of burners. Hearthstone must have sold a lot of these stoves. I have wrecked a baffle too. I repaired it with stove cement. Seems to be fine now.
============
You are not alone in having trouble with the very expensive, flimsy baffle, on an otherwise wonderful stove.
After digging around on various forums, I've concluded that Hearthstone used to make the baffles WAY thicker. They were just sturdier back then, as far as I can tell. Now, they're expensive garbage, in my opinion. Despite my best efforts, I broke 2 of them. And, as you surmised, quality control on the new baffles is poor (as evidenced by the gap in your picture).
The fire brick modification works perfectly. I measured the area (and checked the dimensions of the old baffle). I used several fire bricks and had to cut a bit off the last one with a wet saw. Put them in place (they rest on front & back ledges). Make sure there are no gaps at all. My first effort left a gap on the edge. My second was a perfect fit.
The bricks do sit a little higher than the baffle, but I've detected no drop in performance. In fact, my stove operates BETTER than before because the fire bricks actually fit snugly, and the poorly-cut baffles always left a small gap on the edge.
In theory, the slightly smaller airway would slow down airflow, but, practically speaking, the hot air slips right up the chimney, like it's supposed to.
If you have any questions, I'll answer them if I can.
I don't see why it couldn't. The bricks I installed fit together flush (no gap), so I didn't need a blanket.My baffle looked like this prior to installing it. If the throat of the baffle opening is large enough to accommodate a 1/2 inch ceramic blanket, why cant the blanket be installed above these baffles?
My baffle looked like this prior to installing it. If the throat of the baffle opening is large enough to accommodate a 1/2 inch ceramic blanket, why cant the blanket be installed above these baffles?