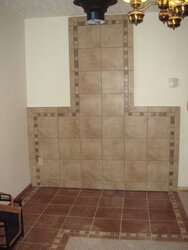
This has been about a year coming, but I wanted to share my work with the hearth.com community since they provided the inspiration and guidance to get this done. Thanks everyone!
Here's all of the higher resolution pictures
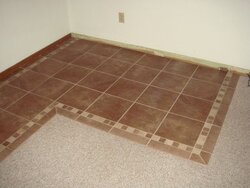
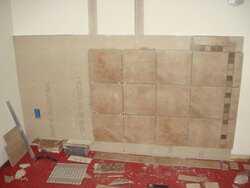
I am by no means a pro, but through much advice, borrowing of tools, and a little trial and error...I think it turned out pretty good and my wife loves the wood heat.
A couple of of things I learned for any other DIY'ers out there.
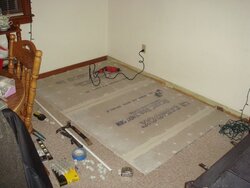
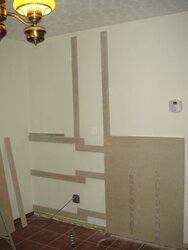
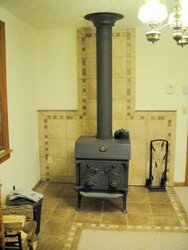
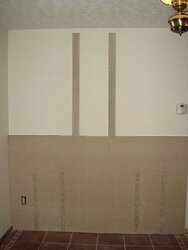
- There are two types of cement board out there (at least at Lowes, which was pretty much my only option) 1) DUROCK Cement Board and 2) HardieBacker Backer Board. The durock is a couple bucks cheaper, and I used it on the floor, but the HardieBacker is flatter "sheet-rock" like board, which worked great on the wall. The cement board screws weren't long enough as I used 2 layers of strips of cement board to give an air gap between my backer board and combustible wall, so I used deck screws and had to predrill all the holes. Use masonry bits, and I used a large masonry bit to create a counter sink as the hardiebacker has pretty much 0 compression.
- I tried to follow the NFPA code as much as was practical as I was installing an older used stove, but for some things I ended following the spirit of the law rather than the letter of the law. HOWEVER, your situation may require more stringent adherence. Make sure you check with your insurance company first. I had a friend who installed his own mfd. chimney as I did, but his insurance required it to be installed by a professional in order to be covered. My insurance company said it would not require anything special.
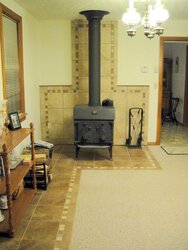
- I was only able to get my stove 29in. from my left wall rather than the required 36in. and after getting my stove pretty hot a couple of times I was uncomfortable with how hot that wall was getting. Rather than build tile on that wall as well, I used the side panel from an old black metal computer case and just hung it from that side of the stove to function as a heat shield. So far it has worked perfectly.
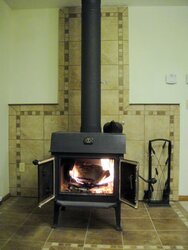
- If you have an older stove like me, try to make it as air tight as possible. My first winter, the doors did not seal very well, so if I really stocked it full of wood it would get going and I had no way to control it as I could hear the air sucking in the side of the door. When the stove thermometer was up around 800 and the thermostat in the room said "98..99..HI" it was a little too hot for me. This winter I got a roll of 1/8" by 5/8" stove gasket to seal the doors and what a difference it makes. I can now control the stove temp.
- I have a single story older home with old windows (that I need to replace) and the back bedroom did not warm up very well from the stove. I tried putting some fans in the doorways which helped a little, but still had to use some space heaters. This fall I installed a vent over the stove and put in an 8in. insulated duct with a duct fan in the attic and another vent in the back bedroom. I then used a single pole cooling thermostat near the stove that kicks the fan on when the stove room starts to heat up and turns it off with the stove room cools down. I know it hasn't gotten too cold yet here in WV (30s and 40s), but already it seems to working pretty effectively as it sucks the hot air from the ceiling over the stove, blows it in the back bedroom and then circulates back through the house. And a 35watt fan is definitely better than a 1500 watt space heater.
Well, that's all I've got. Hopefully this will prove to be helpful to someone else.
Here's all of the higher resolution pictures
I am by no means a pro, but through much advice, borrowing of tools, and a little trial and error...I think it turned out pretty good and my wife loves the wood heat.
A couple of of things I learned for any other DIY'ers out there.
- There are two types of cement board out there (at least at Lowes, which was pretty much my only option) 1) DUROCK Cement Board and 2) HardieBacker Backer Board. The durock is a couple bucks cheaper, and I used it on the floor, but the HardieBacker is flatter "sheet-rock" like board, which worked great on the wall. The cement board screws weren't long enough as I used 2 layers of strips of cement board to give an air gap between my backer board and combustible wall, so I used deck screws and had to predrill all the holes. Use masonry bits, and I used a large masonry bit to create a counter sink as the hardiebacker has pretty much 0 compression.
- I tried to follow the NFPA code as much as was practical as I was installing an older used stove, but for some things I ended following the spirit of the law rather than the letter of the law. HOWEVER, your situation may require more stringent adherence. Make sure you check with your insurance company first. I had a friend who installed his own mfd. chimney as I did, but his insurance required it to be installed by a professional in order to be covered. My insurance company said it would not require anything special.
- I was only able to get my stove 29in. from my left wall rather than the required 36in. and after getting my stove pretty hot a couple of times I was uncomfortable with how hot that wall was getting. Rather than build tile on that wall as well, I used the side panel from an old black metal computer case and just hung it from that side of the stove to function as a heat shield. So far it has worked perfectly.
- If you have an older stove like me, try to make it as air tight as possible. My first winter, the doors did not seal very well, so if I really stocked it full of wood it would get going and I had no way to control it as I could hear the air sucking in the side of the door. When the stove thermometer was up around 800 and the thermostat in the room said "98..99..HI" it was a little too hot for me. This winter I got a roll of 1/8" by 5/8" stove gasket to seal the doors and what a difference it makes. I can now control the stove temp.
- I have a single story older home with old windows (that I need to replace) and the back bedroom did not warm up very well from the stove. I tried putting some fans in the doorways which helped a little, but still had to use some space heaters. This fall I installed a vent over the stove and put in an 8in. insulated duct with a duct fan in the attic and another vent in the back bedroom. I then used a single pole cooling thermostat near the stove that kicks the fan on when the stove room starts to heat up and turns it off with the stove room cools down. I know it hasn't gotten too cold yet here in WV (30s and 40s), but already it seems to working pretty effectively as it sucks the hot air from the ceiling over the stove, blows it in the back bedroom and then circulates back through the house. And a 35watt fan is definitely better than a 1500 watt space heater.
Well, that's all I've got. Hopefully this will prove to be helpful to someone else.