Fixing Rust Spots on a Car

  • Active since 1995, Hearth.com is THE place on the internet for free information and advice about wood stoves, pellet stoves and other energy saving equipment.

    We strive to provide opinions, articles, discussions and history related to Hearth Products and in a more general sense, energy issues.

    We promote the EFFICIENT, RESPONSIBLE, CLEAN and SAFE use of all fuels, whether renewable or fossil.
Status
Not open for further replies.

thewoodlands

Minister of Fire
Aug 25, 2009
16,649
In The Woods
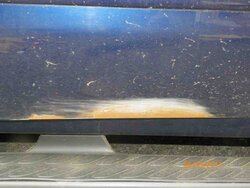
1. I will sand it down then clean it off and let dry.
2. Spray on the primer, let dry
3. Spray on matching paint, let dry
4. Spray on clear coat, let dry then wet sand
5. Repeat above
6. Primer and Paint is Duplicolor


How many steps am I forgetting?


Zap
 
The most important ones. What you are doing is temporarily hiding the rust. You'll need to kill it and then seal it before painting and even then people have limited success.

The POR15 folks sell a kit for just this application. I used it on my Ford fenders last year with excelllent results except for one repeat offender spot that I need to clean up again. May as well use a wire wheel for cleaning the loose rust off.
 
Highbeam said:
The most important ones. What you are doing is temporarily hiding the rust. You'll need to kill it and then seal it before painting and even then people have limited success.

The POR15 folks sell a kit for just this application. I used it on my Ford fenders last year with excelllent results except for one repeat offender spot that I need to clean up again. May as well use a wire wheel for cleaning the loose rust off.


Highbeam, I forgot about POR15 we actually used it on the old plow before we painted it. Attached are some pictures of what I did tonight including the inside bottom of the doors.(Not pictured)


Zap
 

Attachments

  • 100_3106.jpg
    100_3106.jpg
    44.8 KB · Views: 375
  • 100_3107.jpg
    100_3107.jpg
    41 KB · Views: 377
  • 100_3108.jpg
    100_3108.jpg
    48.3 KB · Views: 376
  • 100_3109.jpg
    100_3109.jpg
    39.2 KB · Views: 376
  • 100_3110.jpg
    100_3110.jpg
    56.4 KB · Views: 368
POR 15 is good stuff. Other good option is Metal Treat, if it is available in your area.
 
gibir,
Lets get that primer smoothed out, thats your base.
150grit or 220 should do it. They used to have spot putty, i think they called it,
for filling in larger imperfections in prime. Don't let this project set too long as the
primer will attract moisture. Don't forget to feather edge those areas well before priming.
have fun
rn
 
It looks like you caught it in time to avoid putting in new metal. You should get yourself some decent primer that will go with the paint you are putting on there. Can you get POR to match your car???? Otherwise if you can then make sure you clear it as POR has absolutely no UV conditioners in it and will fade which is just another reason I never fell in love with the stuff. Truthfully, it would be a lot better to get a pint of real paint from the local jobber and spraying it with a spray gun or even a Previal sprayer. I have used the rattle can stuff even custom matched to the paint and it still wasn't right even on a small job like that.
. Looking at the spots you have along that door take a look along the door's inner lower back side as well. That area is especially prone to rusting away with the newer cars and it's really easy to fix. If it's rusty just take a wire wheel and clean it like you did on the outside. You can then prime it and paint with whatever . You can't see it much anyways but that's a real rust trap down there. Afterwards it's a good idea to get a tube of panel sealer which comes in a standard gun tube like any other sealant. You can get that at the jobbers too. Paint over that afterwards as well, just brush it on , it doesn't matter in there.

heres a good web site forum that has all sorts of info on body work. Just search "lens autobody store forums".
"
L
 
Best primer to keep the rust from coming back is zinc oxide. It is what the military uses and it works to keep the rust from coming back.
 
Thanks for the replies, I decided we would use the product from Krylon instead of Por. I did more sanding today then had a party we went to so tomorrow I'll have pictures good or bad of what I have done.


Zap
 
rustynut said:
gibir,
Lets get that primer smoothed out, thats your base.
150grit or 220 should do it. They used to have spot putty, i think they called it,
for filling in larger imperfections in prime. Don't let this project set too long as the
primer will attract moisture. Don't forget to feather edge those areas well before priming.
have fun
rn


Rustynut, looks like tomorrow I'll have the primer and two coats of paint on it depending on the weather. Clear coat and the wet sanding will be done between Monday and Wednesday.


Zap
 
Oh, the most basic of basics, don't use your fingers to sand those edges. Always use a block of wood like a stub of 2 by 4 or one of those rigid foam sanding pads. Anything flat across the bottom will do. If you can feel the edge it's not smooth enough. If the edge appears like a solid line anywhere it isn't flat enough. You want it looking like an oil slick sheen on water, a wavy sort of blended feathered edge. It's lots easier if you use two different colored primers which serves as a guide coat to help you see if it's feathered. Running water over it and looking at a sharp angle will show you exactly how it will look painted.
It's all a lot harder to explain than it is to do. Personally I can't stand to hand sand much of anything anymore. Give me a nice little DA sander any time. It's harder to use but is soooooo darned fast
 
That's seam rust. You'll never stop it. The door skin folds over and is crimped to the inner door at that point. Water and other junk collects inside the bottom of the door and gets between the layers of metal and rusts. The rust expands and pushes the seam apart. Bubbles will also form but they are not surface rust, they are cancer.

So use whatever you want since it's just temporary anyway.

We just started using salt in my area and the rust is now a problem for newer cars where it used to be just a problem on old ones. I hate rust. Hate it hate it hate it.
 
Highbeam said:
That's seam rust. You'll never stop it. The door skin folds over and is crimped to the inner door at that point. Water and other junk collects inside the bottom of the door and gets between the layers of metal and rusts. The rust expands and pushes the seam apart. Bubbles will also form but they are not surface rust, they are cancer.

So use whatever you want since it's just temporary anyway.

We just started using salt in my area and the rust is now a problem for newer cars where it used to be just a problem on old ones. I hate rust. Hate it hate it hate it.


Looking for another 2-3 years out of this vehicle, I think this should do the trick. Painting was put off because of the weather today so I delivered some of the wood we sold.


Zap
 
Highbeam said:
That's seam rust. You'll never stop it. The door skin folds over and is crimped to the inner door at that point. Water and other junk collects inside the bottom of the door and gets between the layers of metal and rusts. The rust expands and pushes the seam apart. Bubbles will also form but they are not surface rust, they are cancer.

So use whatever you want since it's just temporary anyway.

We just started using salt in my area and the rust is now a problem for newer cars where it used to be just a problem on old ones. I hate rust. Hate it hate it hate it.


Don't be too quick to give up the ship on that one, especially the seam area in the back of the newer cars. That newer hardened tissue paper thin steel they use does cause problems . It rusts through about double as fast as the older thicker softer steels used to but you can keep it in check. I had asked about that in a few of the pro forums and the pros said just that so I did it anyways . Like you said it's just like treating cancer but the thing is it's easy to keep up for a few reasons . First you can do a halfways poor job of painting down there and it's fairly invisible. The back, where all the rust really goes wild in that seam is stone simple. No one sees it back there so clean it, treat it with Duro Extend, Naval Jelly or it's true chemical component PHOSPHORIC ACID. That's the stuff you drink in Coke and Pepsi. I have some really super auto body stuff called PICKLEX but at $100 / gallon I only use it for the special stuff. Guess what, PARKS makes a phosphoric acid etch solution they sell by the quart. It comes in a square thin plastic can and is minty green in color. You can get that in hardware stores for about $8 and it does pretty much the same thing. You use that in that seam in order to hold the rust off better after you remove it with a wire wheel. I use a 4" on a small HF grinder and finish off the tiny spots way down deep with a Dremel tool and 1" wire round brush. The round brush on the grinder is it's big brother. These are the ones shaped like a disk , not a cup, you work off the end not the flat face as with a cup brush. Anyways carefully clean it as much as you can digging out all of the seam seal in your way and if need be fold that seam out a bit to get in there. Clean it up then spray in the phosphoric acid after you blow it out or otherwise clean it of the rusty dusty debris. Air pressure works best if you have it. Let it dry and then paint on your favorite primer, let dry then paint. Just use a brush back under there, who cares? After that put some new seam sealer in place and prime and paint over that. This will keep the rust away for 2 to 4 years even here in the Rust Belt where I live. It really works and as long as you keep away from the front side of the door bottom's edge you don't need to use a sprayer. If you are careful and use a fine brush you can even do the very bottom half inch of the door seam on the front side as well. It works believe me and every month you aren't making that car payment you can put the $$$ in your IRA for what's really important.
Note, this is all 6 pack work. Take your time and get comfortable to work sitting down rather than bending (or if you are over 40 you'll be sorrrrryyyyyy in the morning). Wear a dust mask unless you are wet sanding so you don't breathe the dusty chemical stuff and above all USE SAFETY GLASSES when using a wire wheel brush or grinding wheel. Those tines fly off occasionally at 10, 000 rpm and you don't want them in your eye. The way to avoid this or prolong it all is weekly or so washing under the car during the winter. Hose it down well under there so the salt and sand doesn't accumulate and it will last much longer. That includes the weep holes along the door's bottoms once in a while. Keep the sand from building up in there and you won't get rust nearly so fast to begin with.
 
It's worse than treating cancer, at least you have a chance with cancer.

I'm with you Driz, do the best you can and extend the life but do realize that you can't stop it. The door skin is replaceable if it gets really bad.

I used a brush to apply the por15 system after using their acid solution, and then top coated with gloss rustoleum black also with a brush. On my dark blue truck nobody even notices the touch up. Gloss seems more important than a perfect color match.
 
Highbeam said:
It's worse than treating cancer, at least you have a chance with cancer.

I'm with you Driz, do the best you can and extend the life but do realize that you can't stop it. The door skin is replaceable if it gets really bad.

I used a brush to apply the por15 system after using their acid solution, and then top coated with gloss rustoleum black also with a brush. On my dark blue truck nobody even notices the touch up. Gloss seems more important than a perfect color match.

Yup and the best part is that the guys who told me that you can't fix door seams were all professionals. Weird how often you can show a professional something can't figure out. The single best part of it is that everything is out of site back down there so you can do it every year if you want to for a couple hours work and a couple dollars. That's where most of the rust is anyways an no one can much see your little goofs like if it was a top or a hood. On yours if you clear over that POR you will be fine as the UV protectant is in the clear. Base coat which is the color has nothing at all and will fade quickly once the clear is gone.
The clear really does a nice job of hiding goofs too. It paints on pretty easily as well. That's why I advocate that little Prevail sprayer if you don't have a gun and compressor. With one of those you can use the real hardened primers and paints doing a pretty fair job while you are at it.
 
Driz said:
Highbeam said:
It's worse than treating cancer, at least you have a chance with cancer.

I'm with you Driz, do the best you can and extend the life but do realize that you can't stop it. The door skin is replaceable if it gets really bad.

I used a brush to apply the por15 system after using their acid solution, and then top coated with gloss rustoleum black also with a brush. On my dark blue truck nobody even notices the touch up. Gloss seems more important than a perfect color match.

Yup and the best part is that the guys who told me that you can't fix door seams were all professionals. Weird how often you can show a professional something can't figure out. The single best part of it is that everything is out of site back down there so you can do it every year if you want to for a couple hours work and a couple dollars. That's where most of the rust is anyways an no one can much see your little goofs like if it was a top or a hood. On yours if you clear over that POR you will be fine as the UV protectant is in the clear. Base coat which is the color has nothing at all and will fade quickly once the clear is gone.
The clear really does a nice job of hiding goofs too. It paints on pretty easily as well. That's why I advocate that little Prevail sprayer if you don't have a gun and compressor. With one of those you can use the real hardened primers and paints doing a pretty fair job while you are at it.


Driz I have a question for you. On my 1997 GMC Sierra K1500 step side I noticed a line hanging down on the back left side going over toward the wheel, is this a brake line. (I don't have the picture with me)


Also without looking at the other side is there a picture of how that hooks up to the caliber or wheel cylinder on the net?


Zap
 
Most likely your ebrake cable. On that era of GM truck, the cable runs exposed along the outside of the driver's side frame rail. You can follow it to the wheel and see if that's what you are seeing. Low hanging ebrake cables are typical but usually don't catch on things.
 
Highbeam said:
Most likely your ebrake cable. On that era of GM truck, the cable runs exposed along the outside of the driver's side frame rail. You can follow it to the wheel and see if that's what you are seeing. Low hanging ebrake cables are typical but usually don't catch on things.


Highbeam, it's a tube that runs on top of the back axle from the center towards the wheel on the back tire on the drivers side. I will have pictures for tonight.


Zap
 
Rear diff vent hose, terminates higher than the pumpkin in case you go too deep in water? That's my guess anyway, my Yukon had that.
 
Is the tube metal or is it a big rubber hose, like a 1/4" hose?
 
Highbeam said:
Is the tube metal or is it a big rubber hose, like a 1/4" hose?


Here is what I think, the metal breal line in the back left was hooked in to the rubber tube and broke off.


Zap
 

Attachments

  • 100_3111.jpg
    100_3111.jpg
    40 KB · Views: 234
  • 100_3130.jpg
    100_3130.jpg
    39.4 KB · Views: 235
Backpack09 said:
differential vent. Zip tie it up somewhere high and you are good.


Backpack09, would it be ok if I zip tied it to the break line in the last picture above the axle? I did check the break lines tonight and everything was fine.


Zap
 
gibir said:
Backpack09 said:
differential vent. Zip tie it up somewhere high and you are good.


Backpack09, would it be ok if I zip tied it to the break line in the last picture above the axle? I did check the break lines tonight and everything was fine.


Zap


Zap -

As long as it's higher than the differential, plus a couple of inches, it should be O.K. If you could tie it to a frame member, so much the better. The higher; the better....


Is that on the Jeep?
 
Status
Not open for further replies.