This will obviously not work on older P series w/o the recessed area in the ash pan.
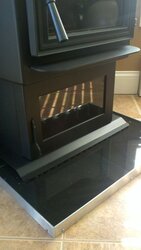
I saw the Harman slate insert choices at my local dealer along with some demo stoves with the slate installed and I thought they looked nice. Then I saw the price of the slate alone and said whhhhhhhat!!??? Then I was told about the "kit" required in addition to the cost of the slate that included the slate retaining/trim piece, a trim piece for the front edge of the little shelf under the door and another piece that goes on the face of the door. I asked if I could purchase the slate retaining piece separately. Nope, only available in the 3 piece kit. Sorry Harman, I'll own no other pellet stove, but bundling these 3 items is ridiculous. I appreciate their likely marketing idea is a one shot "complete dress-up kit" but at the same time I question why the hot air port grille is a separate part. Interesting.
Anyway, it became DIY time. I had a leftover 12x12 tile from my DIY hearth project and gave it a shot. In the end it was stupid easy providing you have a few tools.
The slate is 12"x6"
Step 1) Find a tile you like. Make sure its at least 12"x6". If so, skip to step 5. If not, hopefully it'll be a 12"x12".
Step 2) Mark your tile ON THE GOOD SIDE at the 6" point. If you choose a light colored tile you can just use a fine point sharpie marker. In my case, I used absolute black granite. It was very hard to see the line. I tried a tire crayon and aolso tried scratching the line in using a file. The granite didn't budge. I ended up carefully scoring a line using an angle grinder with a diamond blade. You could possibly also use a carbide tipped marking tool. Dont worry about the kerf of the blade, just mark and cut in the middle. Next step.
Step 3) Using an angle grinder with a diamond blade, start making the cut using controlled passes over the line. It helps to have the tile clamped to your bench. If you've never cut stone/tile this way, its not hard. Just keep a good grip on the grinder or you or your workpiece will pay. USE SAFETY GLASSES !! Did I mention to USE SAFETY GLASSES!!?? If you don't I can arrange Norm Abrams to show up at your door and punch you in the mouth for being an idiot. Hearing protection is good too. Also, try and do this outside as you will have stone dust on anything within 15'. Make several passes cutting a little bit at a time til you're around 2/3-3/4 of the way through and stop. Check to see your cuts depth is fairly consistent across the span.
Step 4) take the tile, face up and place a dowel directly under and paralell with the cut. Anchor one side with your palm and tap the other side with a rubber mallet or something similar. I just knocked it with the palm of my other hand. It should break nicely. Now carefully clean up the ragged edge with the grinder.
Step 5) Dry fit the piece. Do yourself a favor and put a piece of tape across the back of the tile leaving a few inches hanging out the front in case your piece fits too tightly, you'll be able to pull it back out. You do NOT wanna get it almost seated and find you can't get it out! During the dry fitting I recommend using painters tape over the cut edge to minimize scratching of your stove. Once it fits it's time for the last step.
Step 6) Get all the dust off the back of your tile. Get some high temp silicone. I used the clear stuff used to seal pipe joints. Its rated to 500° or something like that. Put 5-6 smallish blobs on the back of the tile and set it in place with the cut edge at the top. Now rig something up to hold it there for a day or so. That's it!
Total cost...$5 for the tile and about 15 min work. The P series stoves don't exactly have the sexy lines of the XXV or similar stoves. IMO, going full out on the Harman dress up kit is like blinging out an M-65 Abrams tank. The P series has the workhorse look and this addition helps to incorporate it into its location a bit better in a subtle way.
My long winded directions may make you think its a PITA but its simple.
I am not responsible for any damages to you or your stove during or after the completion of this project. If your tile shatters like a claymore mine spraying shrapnel into the room, it ain't my fault. I don't think Harman uses any special slate for their product. I used granite which is very stable AFAIK. Been on there a week and is holding out just fine.
I saw the Harman slate insert choices at my local dealer along with some demo stoves with the slate installed and I thought they looked nice. Then I saw the price of the slate alone and said whhhhhhhat!!??? Then I was told about the "kit" required in addition to the cost of the slate that included the slate retaining/trim piece, a trim piece for the front edge of the little shelf under the door and another piece that goes on the face of the door. I asked if I could purchase the slate retaining piece separately. Nope, only available in the 3 piece kit. Sorry Harman, I'll own no other pellet stove, but bundling these 3 items is ridiculous. I appreciate their likely marketing idea is a one shot "complete dress-up kit" but at the same time I question why the hot air port grille is a separate part. Interesting.
Anyway, it became DIY time. I had a leftover 12x12 tile from my DIY hearth project and gave it a shot. In the end it was stupid easy providing you have a few tools.
The slate is 12"x6"
Step 1) Find a tile you like. Make sure its at least 12"x6". If so, skip to step 5. If not, hopefully it'll be a 12"x12".
Step 2) Mark your tile ON THE GOOD SIDE at the 6" point. If you choose a light colored tile you can just use a fine point sharpie marker. In my case, I used absolute black granite. It was very hard to see the line. I tried a tire crayon and aolso tried scratching the line in using a file. The granite didn't budge. I ended up carefully scoring a line using an angle grinder with a diamond blade. You could possibly also use a carbide tipped marking tool. Dont worry about the kerf of the blade, just mark and cut in the middle. Next step.
Step 3) Using an angle grinder with a diamond blade, start making the cut using controlled passes over the line. It helps to have the tile clamped to your bench. If you've never cut stone/tile this way, its not hard. Just keep a good grip on the grinder or you or your workpiece will pay. USE SAFETY GLASSES
!! Did I mention to USE SAFETY GLASSES!!?? If you don't I can arrange Norm Abrams to show up at your door and punch you in the mouth for being an idiot. Hearing protection is good too. Also, try and do this outside as you will have stone dust on anything within 15'. Make several passes cutting a little bit at a time til you're around 2/3-3/4 of the way through and stop. Check to see your cuts depth is fairly consistent across the span.Step 4) take the tile, face up and place a dowel directly under and paralell with the cut. Anchor one side with your palm and tap the other side with a rubber mallet or something similar. I just knocked it with the palm of my other hand. It should break nicely. Now carefully clean up the ragged edge with the grinder.
Step 5) Dry fit the piece. Do yourself a favor and put a piece of tape across the back of the tile leaving a few inches hanging out the front in case your piece fits too tightly, you'll be able to pull it back out. You do NOT wanna get it almost seated and find you can't get it out! During the dry fitting I recommend using painters tape over the cut edge to minimize scratching of your stove. Once it fits it's time for the last step.
Step 6) Get all the dust off the back of your tile. Get some high temp silicone. I used the clear stuff used to seal pipe joints. Its rated to 500° or something like that. Put 5-6 smallish blobs on the back of the tile and set it in place with the cut edge at the top. Now rig something up to hold it there for a day or so. That's it!
Total cost...$5 for the tile and about 15 min work. The P series stoves don't exactly have the sexy lines of the XXV or similar stoves. IMO, going full out on the Harman dress up kit is like blinging out an M-65 Abrams tank. The P series has the workhorse look and this addition helps to incorporate it into its location a bit better in a subtle way.
My long winded directions may make you think its a PITA but its simple.
I am not responsible for any damages to you or your stove during or after the completion of this project. If your tile shatters like a claymore mine spraying shrapnel into the room, it ain't my fault. I don't think Harman uses any special slate for their product. I used granite which is very stable AFAIK. Been on there a week and is holding out just fine.