Hearth project almost complete

  • Active since 1995, Hearth.com is THE place on the internet for free information and advice about wood stoves, pellet stoves and other energy saving equipment.

    We strive to provide opinions, articles, discussions and history related to Hearth Products and in a more general sense, energy issues.

    We promote the EFFICIENT, RESPONSIBLE, CLEAN and SAFE use of all fuels, whether renewable or fossil.
Status
Not open for further replies.
M

mxd253

Guest
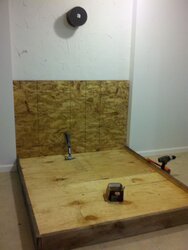
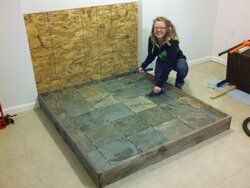
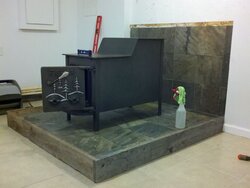
I just wanted to share my project. Ive been working on this in my spare time (which is very little) for the past week or so. I'm projecting completion tomorrow. Just in time for some cool weather to hit! I'm ready to burn some far wood! I do have to admit I had a great assistant helping me also, Thanks babe
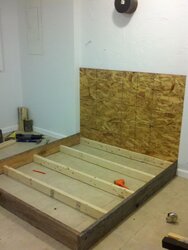
h1.jpg h2.jpg h3.jpg h4.jpg
 
Looks like babe really choked up on that hammer. She does nice work!! Will she load the stove too?
Enjoy the cooler weather folks.
 
I don't mean to rain on the project but what were the guiding specs for the hearth requirements? Does this meet any of the required clearances and hearth specs for this Fisher? The front requirement is clearly not adequate and the rear looks way off, especially if this is a rear-vent stove.

Also, was the slate applied directly to the chipboard with no cement board in between?
 
  • Like
Reactions: ScotO
I don't mean to rain on the project but what were the guiding specs for the hearth requirements? Does this meet any of the required clearances and hearth specs for this Fisher? The front requirement is clearly not adequate and the rear looks way off, especially if this is a rear-vent stove.

Also, was the slate applied directly to the chipboard with no cement board in between?

My guiding specs were based off of the space I had to work with along with as close to the measurements the Owners Manual showed. My front is about an inch over what Fisher listed in their installation guide however the rear of the stove is 8-10in short of their requirements. That is due to the space I had to work with. Last time I checked stone isn't combustible. I am 18-20in from the wall so I feel safe. I chose not to use type II mortar therefore I did not need cement board. With all of the new style tile adhesives on the market there is no better way to lay. Especially on small jobs. AcrylPro is my adhesive of choice, works on almost any clean surface. Best part is no mixing, take the lid off and get at it. Thanks for the concern, however after seeing some of the niggered up stove installs I've seen, I think I'll be okay
 
If concerned about safety it's a good idea to follow the manual and read instructions. The clearances to combustibles are not reduced by a thin veneer of stone tile. This is an illegal install and even violates the use instructions for AcrylPro -

"Do not bond directly to hardwood, Luan plywood, particle board, parquet, cushion or sponge-back vinyl flooring, metal, fiberglass, plastic or OSB panels."
 
  • Like
Reactions: ScotO
My eyes may be decieving me but it looks like a block wall behind the stove. Looks like I can see block lines in it anyway.
 
OSB is between the wall and the stove.
 
No offense mxd, but BeGreen is correct. That is an illegal install on that stove, that wouldn't even be legal on most modern EPA stoves. You did a nice job in terms of the building of it, but your fire code clearances are way off. Especially with the really venting fluepipe. God forbid if your house would catch fire, your insurance would see that install and I'd lay money they wouldn't cover the damage....you and your family 's safety and well-being are our concern here on this site.
 
Thanks for being critical of my work BeGreen and Scotty good or bad. Advice will by my best friend for a while. I am a first timer at this. I'm sure I do have a lot to learn and am eager too. However I have gone far enough with this project that I will do a few highly monitored test runs with safety gear ready. I also appreciate the concern for my home and family's safety. If I feel safe after a few tests, I will using this as backup heat for this winter. I will reconsider design and make correct adjustments asap.
 
OSB is between the wall and the stove.

I stand corrected. That OSB can and may combust even if there is a block wall behind. If it is a block wall you may have better off adhering the tile direct. The security goes betond the tests... Its going to bed feeling good that even if you have a hot fire in the stove that your family and you can sleep well knowing it's safe.
 
Problems will not show up right away. Wood breaks down with continued exposure to high heat and adhesives outgas. This is not a safe setup for this stove. That Fisher is a highly radiant heater and completely unshielded. The hearth "may" be sort of adequate, but the rear clearances and piping are not even close because of the OSB. Stay with us here and let's get you safe. Backup solutions tend become full time with a serious power outage or a long stretch of cold weather.

The back wall may be correctable. Let's start with how you are going to vent this stove.
 
You did a beautiful job but....Gotta agree with scotty and begreen, i have a grandma bear fisher top vented stove. Looks like you have the mamabear,rear vented . She is way too close to the wall friend. The tile will come off that wall in due time , The OSB can combust at that close range. Looks like your about a foot. You'd be better off without the OSB and tile. I think code from block wall alone is 18 inches
 
  • Like
Reactions: mxd253
MXD your hearth looks great! Love the tile selection too! I have to agree with BG and Scotty on this as well. For your family's safety it would be best if you chalked this up to experience and follow code. Better to overbuild than underbuild..

Good Luck and welcome to the forum!
Ray
 
  • Like
Reactions: mxd253
You did a beautiful job but....Gotta agree with scotty and begreen, i have a grandma bear fisher top vented stove. Looks like you have the mamabear,rear vented . She is way too close to the wall friend. The tile will come off that wall in due time , The OSB can combust at that close range. Looks like your about a foot. You'd be better officer without the OSB and tile. I think code from block wall alone is 18 inches

Air gap the back wall, that'll get u to 12". Use double wall pipe to the thimble, that'll get u to 6" on vent. Use a damper.
For the bottom, if you move foward as is, sheild the floor with sheet metal up on some firebricks. Search this site using clearance as keyword.
 
  • Like
Reactions: raybonz and mxd253
Nice hearth you builtand agree with above reply that it looks like block behind the OSB board. If so that would be a quick fix to remove and replace the tile to the block. My parents had the same problem too and the rear vent takes up more room so they had it modified to a top vent to help with floor space. Double wall or triple wall will help you out too. Check out the simple baffle solution "Coaly" has posted on the Fisher thread. Just installed one this weekend on parents Mama Bear.
 
That's good news glad you dropped in on the forum and hope you are too! :)

Ray
 
keep us in the loop. we're not out to discourage your project, but it's important to do it right the first time so that you have peace of mind and we do too.
 
  • Like
Reactions: ScotO
Update: As of today I have had 5 solid fires. Two test runs and three days/nights heating my cabin. I removed the OSB and tile that was attached exposing my block foundation. The stove was moved forward 4" now giving me 22" off the back to the wall. I am still 6" short of what Fisher suggests but I am out of space. I still have 14" of hearth on the front side along with a fireplace approved rug on my tile floor. I got an Imperial Flue Pipe Thermometer which is one of the coolest things ever BTW! I did several tests running the stove up barley into the Over fire range on the thermometer and with my Digital Laser thermometer I spent hours testing different areas on the wall, hearth, area where the flue goes thru the foundation and other areas. I never saw anything over the 200 degree range besides under the stove. Hottest I saw was around the 210-215 degree range and that was only with my flue thermometer in the Over Fire Range. When I operate the stove in the Comfortable Range on the Flue Thermometer the block wall behind stove is avg. 120-130 and under the stove is in the 165-175 range. I dont feel that those temps are too alarming. The only problem I have had is a beginner error. I smoked the house up and set all of my smoke alarms off. Wife wasnt too happy but she did comment later on that she enjoys the heat from the Fisher over electric. So I guess Im back out of the dog house! Let me know if you guys think this info is acceptable, Thanks
 
  • Like
Reactions: raybonz
MXD that's great! The floor temp is a bit warm can you tell me what the stove sits on?

Ray
 
MXD that's great! The floor temp is a bit warm can you tell me what the stove sits on?

Ray
Stove sits directly on the slate tiles. I think I'm going to construct me a little steel plate air gap set up. I read something about that being a good approach to keeping the surface under the stove a bit cooler.
 
  • Like
Reactions: ScotO and raybonz
Like Hilbili suggested a section of sheet metal up on half bricks under the stove would keep the hearth much cooler.

Jon Boy I have never heard of a 18" clearance from a block wall?? If that is the case why 18" from a non-combustible surface? I do think heat will eventually break down the mortar between the blocks, so from a structural standpoint it could be a problem. Being concerned about the mortar I already put heat shields(aluminium diamond plate) up on my block wall behind my Hearthstone H1(it sits about 6" off the basement wall) and the block behind the shield stays cool to the touch.
 
  • Like
Reactions: ScotO
If the slate tiles are still directly glued to the OSB, then you will need more protection there. Attaching a sheet metal plate with an air gap for a bottom heat shield would help. It could be attached to the bottom of the stove with a few nuts for spacers or attached to the legs.
 
MY CDW came with a heatshield which was spaced about 2" from the bottom of the stove. The bluestone hearth never got warm at all so it is very effective.

Ray
 
Maybe fabricate a stainless steel sheet metal sheild for under the stove. The shiny stainless will reflect most of the heat back up and away from the floor, and will drastically drop the temp at the floor......
Glad to see you got some more clearances, try that sheild under the stove, and I bet it will get you the temps you need.
 
Status
Not open for further replies.