How can I check if my liner is insulated?

  • Active since 1995, Hearth.com is THE place on the internet for free information and advice about wood stoves, pellet stoves and other energy saving equipment.

    We strive to provide opinions, articles, discussions and history related to Hearth Products and in a more general sense, energy issues.

    We promote the EFFICIENT, RESPONSIBLE, CLEAN and SAFE use of all fuels, whether renewable or fossil.

Amin1992

Feeling the Heat
Oct 9, 2019
334
PA, USA
Hey guys. So I just got a stainless steel liner installed for my wood stove insert by a very reputable chimney sweep company in the area - they are certified.

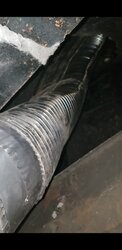
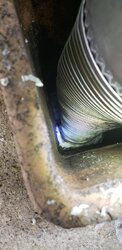
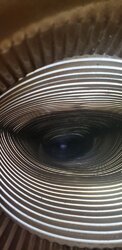
Anyway, after they left I was cleaning up the insert as it was dusty and removed the trim around the unit. I peeked up there and saw raw stainless flue as far up as I could see before it elbowed into the damper area.

What I didn't see though is any insulation... No thermal wrap or wool material anywhere. No block off plate either which is disappointing.

The quote/contract I signed said it would be a stainless liner with insulation.

I can't see anything else from down here so I plan on going on the roof tomorrow. Can you guys tell me what to look for to confirm if this is insulated or not, before I go accusing them of ripping me off?

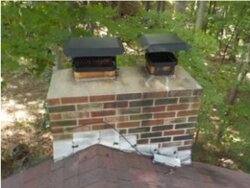
I attached a photo I took on my phone of the liner (they needed to bend it into an oval shape to fit through the damper area). I also attached what the cap looks like, on the left. How do I remove this cap to look in there?

Thanks for the help here guys.
 

Attachments

  • Screenshot_20200808-002135_Video Player.jpg
    Screenshot_20200808-002135_Video Player.jpg
    60.2 KB · Views: 291
  • Screenshot_20200808-003010_Dropbox.jpg
    Screenshot_20200808-003010_Dropbox.jpg
    284.7 KB · Views: 291
Looks un-insulated to me...hold them to their contract!
 
I’m no chimney sweep, but it also looks bent and smushed all to crap. Looks like that would def restrict exhaust, and make it difficult to clean like that. Also pretty sure that crimped end (male end) is supposed to be inside the female end, not overtop of it, so creosote can run back into the stove. As for the cap, those screws are securing it, just unscrew them and it should loosen. Be careful not to crack the flue when u tighten them down again.
 
Last edited:
Does the liner even go to the top?
 
The guy that did mine wrapped it in insulation and then wrapped that in a wire mesh so it didn’t get torn up when he pulled it through.
 
Does not appear insulated. My insulation starts about 18 up the liner from my insert . Also concerning is that the liner does not appear to go all the way up to top of chimney. This will present you with a big challenge with sweeping the liner, as you’d have to remove the insert to do that to get all the soot out.- they are very heavy. Installing liner in that way in no way is best practice.
i was in your shoes before with a crappy insert install. I decided to have it redone by another pro. It’s painful to open the wallet again but I needed to sleep at night. I decided at that time to have installer break outout the old clay liners so new liner could remain round all the way to top of chimney. I also opted for heavy wall liner. The installer asked why- probably doesn’t get that request often. While regular liners are ok, if you ever have the chance to feel thedifference between the two, you realize that heavy wall is a better bet.This second company also insulated the liner.
Id hold this company accountable. They will likely balk at any requests you make. If you’re hitting a wall with them, you might remind them that you have the a ability to share your experiences in online reviews and the like and that you have time on your hands to do so.
 
Does the liner even go to the top?
Good point...if it does, it has some sort of hack termination! (if the chimney top pics are from after the install)
Also, the way the stove adapter is installed is backwards, as was mentioned...I would not light a fire in this thing until things are fixed! (is the adapter stainless steel? It should be...almost looks like it could be galvanized ductwork adapters...it should be stainless STOVE PIPE adapters! Duct is much thinner...and the galvanized coating has poisonous off-gassing when heated over a certain temp...which is much lower than wood stove exhaust!)
 
Last edited:
Hey all thanks for the responses! Sorry should have added that the chimney cap photo is from before install. I haven't been up there yet to inspect the work. They reused my current cap.

Im almost certain the adapter is stainless. Photo was hard to take clearly.

Going to look up top here soon. They put this up in a thunderstorm, and accidentally left shreds of what looks like white wool insulation at the base of the chimney so they must have partially insulated at least?

As for the oval shape, sadly they could not get it to fit the bends in my masonry with the normal 6" round so they had to bend to oval shape to fit in that one section. It apparently reverts back to round beyond the damper area.

I did burn an 8 hour fire yesterday with no draft issues. No smoke. Minimal soot on the glass.

Will report back soon thanks!
 
Looks uninsulated to me and looks like they did a hack job ovalizing it. Go up and pull the top plate that will tell us allot.
 
Looks uninsulated to me and looks like they did a hack job ovalizing it. Go up and pull the top plate that will tell us allot.

How is the top plate attached? Do I need to recaulk?
 
Well just got off the roof, here's my update.

There is insulation, but it's about 1-2 feet down so I can't reach or it see how much is there. Also, there is no top plate... I was able to move the liner back and forth! Very disappointing.

How do I approach the company on this? I appreciate the help.
 

Attachments

  • 20200808_130858.mp4
    9.4 MB
  • 20200808_130700.jpg
    20200808_130700.jpg
    91.4 KB · Views: 261
  • 20200808_130715.jpg
    20200808_130715.jpg
    92.1 KB · Views: 207
To my untrained eye, the insulation seems like it’s loosely “attached” to liner.
 
Well just got off the roof, here's my update.

There is insulation, but it's about 1-2 feet down so I can't reach or it see how much is there. Also, there is no top plate... I was able to move the liner back and forth! Very disappointing.

How do I approach the company on this? I appreciate the help.
That's not an insulated liner...that is a shoddy way of kinda sorta sealing the gap up between the liner and the chimney flue...since that would be a major air leak...but the right way to do it is a blockoff plate on the ceiling of the old fireplace opening, made to fit snug around the liner....and the whole liner needs to be wrapped with an insulation blanket made for this purpose, what is there now does nothing to insulate the liner from cold air, or the existing chimney flue.
And that liner needs to be hung from a top plate...using the correct parts! The top plate is what is supposed to support the whole thing...not the stove! That is one of the most unprofessional installs I have seen on here in a while! I'd make them redo it properly (what you paid for) or they can deal with my lawyer, their choice!
 
Yeah that is a horrible install. I would demand my money back.
 
Last edited:
  • Like
Reactions: Ctwoodtick
I would absolutely demand your money back. If they say that they can Fix it, I would decline and again demand your money back. I wouldn’t want those people anywhere near my chimney as it’s very obvious they couldn’t care less. I would make a bullet point list of the issues that people have brought up here. I would asked to speak with the owner of the business and not even bother with middlemen. If they give you a hard time and say that they did A legit installation, there’s a wealth of knowledge on this forum and people would be more than happy to give you specific code references and what not.
 
It's good you were smart enough to check the install. I wonder how many people end up with a bad job and never know it.

Reminds me of the time I went to an auto dealer for a brake flush and later determined they only replaced what was in the master cylinder rather than bleed out the brake lines (charged me $125). I could tell because the rubber bleeder caps were untouched.

Trust but verify.
 
Last edited:
Reminds me of a house paint job we got last year due to going with the low bidder. I am so sorry you have to deal with this. It's no fun.
 
Thanks all for the support. I sent an email over the weekend to the company with photos and a video. They called me today and said they want to make it right - the manager called and said he agreed with me, that more insulation and a top plate should be there. They are going to email me with an available date to come out and do it better. Fingers crossed.

Thanks everyone
They also need to install a properly ovalized liner. That liner was obviously just crushed by hand. That leads to the kinks and creases you see which can easily lead to early failure or separation. If they don't have an ovalizer they can order an oval liner
 
Also wanted to include this brochure for the liner they installed. It shows that an option for insulating is putting thermal material between the liner and masonry, which I think is what they did.
 

Attachments

  • Forge-Flex-Brochure.pdf
    167.9 KB · Views: 182
Also wanted to include this brochure for the liner they installed. It shows that an option for insulating is putting thermal material between the liner and masonry, which I think is what they did.
The pic you had above showed very little insulation material. Whatever they initially did was hack. The standard would be to wrap the length of the liner itself in special designed foil faced insulation (1/2 inch thick). They then should put over that a special wire mesh over that. Here is a video on it. I’d demand that whoever installs your new liner do it this way.