I HATE INSULATING CEILINGS!!!

  • Active since 1995, Hearth.com is THE place on the internet for free information and advice about wood stoves, pellet stoves and other energy saving equipment.

    We strive to provide opinions, articles, discussions and history related to Hearth Products and in a more general sense, energy issues.

    We promote the EFFICIENT, RESPONSIBLE, CLEAN and SAFE use of all fuels, whether renewable or fossil.
Status
Not open for further replies.
S

ScotO

Guest
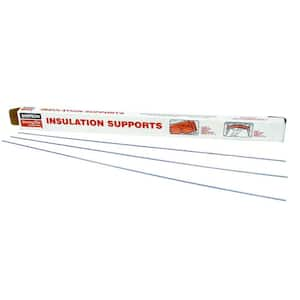
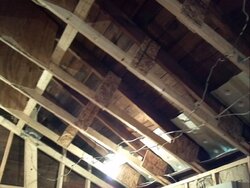
I'm right smack dab in the middle of insulating my cathedral ceiling in our new 'great room'. What an effin' miserable job. Anywho, I have never insulated a cathedral ceiling, but from all I have read you want the underside of the roof to breathe so here is what I am doing. My house was built by my great-great-grandfather and my great-grandfather around 1918. So to make the ceiling cathedral, I had to individually make each roof rafter into a truss, and that was a fun job :rolleyes: (that's for another conversation). Back to the task at hand...... First, I installed vented soffit and a ridge vent on the peak of both roofs (I forgot to mention that there are actually 2 catherdral ceilings in the room). Next I cut out the original dutchlap siding at the soffit and screened the hole with kevlar screen (to keep bees, bats, birds, etc from ever getting into the attic area). Then I installed foam baffles to keep the insulation from blocking the airflow. I then put in a layer of R30 unfaced insulation across the ceiling rafters. I used string to keep that stuff from falling out. Next I put R13 unfaced insulation between each ceiling rafter, again using string as a retainer (around every 8" across the entire ceiling). I plan on using either heavy black plastic or possibly that foil faced 'bubble wrap' as the vapor barrier, taking the time to tape the joints of that stuff. Does this sound about right? Any professional input would be appreciated. I'll post pictures later of this nightmare, I have been avoiding this job like the PLAGUE for over a year now (yes, you read that right), wife wants it done NOW or no more chainsaws and trees for me.....:(
 
I use insulation wire supports. Thin stiff wire that you push up between the rafters. Quick and easy, no stapling and reloading the stapler. A tyvek suit to keep the itchies down. The suits always seem small for me though, and ya sweat a pound or two away.

 
I used these little buggers for the vented soffit for a nice clean look. Various sizes available.


thumbnail.aspx
 
  • Like
Reactions: ScotO
I did a basement ceiling 4 years ago. Miserable job! Had all kinds of piping and such to work around. Nothing like fiberglass raining down on you. Took me 3 sessions to complete it.

If I had to do it again, I would have taken the time to cut 1 inch polystrene, caulked or spray foamed the imperfections, and declared victory. Only R5 and still a PIA but at least would have stopped air flow and wouldn't have been exposed to Cajun-fiberglass rub on my skin.

What you explain sounds right for a roof. I probably would have used metal wires between joists to secure fiberglass in place.
 
  • Like
Reactions: ScotO
Yep, that sounds like more fun than I'd want to have.
Sounds about right, as long as it has space to breathe.
I've avoided jobs only to find that they weren't all that bad once I got to 'em. That one, however, might never get done here.;lol
I'd like to put some more insulation in our attic, but the wife has turned it into a storage space, so that won't get done until we can put that somewhere else.
One job turns into many.:mad:
 
  • Like
Reactions: ScotO and Defiant
Gave up on those metal rods....string is the way to go. Dealing with the misery as best as I can.....find a happy place, Scotty. Find a happy place......

Some pics of my handmade trusses (there are 5/8" gussets on the peaks that are glued and nailed to mate the new ceiling joist to the original roof rafter), also you can see the struts between the rafter and joists. Those baby's are mega-strong, there was 5' of snow on these rafters the winter after I built them from a wind driven nor'Easter we had. Also some pics of the painstakinly slow insulation process and even a picture of the ALIEN that is doing the work! ;)

2012-08-12_15-21-09_652.jpg 2012-08-12_15-20-20_630.jpg 2012-08-11_12-02-38_743.jpg 2012-08-12_15-20-52_803.jpg 2012-08-12_16-14-05_864.jpg
 

Attachments

  • 2012-08-12_15-21-06_566.jpg
    2012-08-12_15-21-06_566.jpg
    142.3 KB · Views: 495
  • Like
Reactions: Thistle and zap
NIOSH respirator is your friend.....much better than paper masks which fog up my bifocals (even the better ones w/exhalation valve most of the time) Old clothes,wash them seperate from the wife's stuff just to be safe ;)
 
  • Like
Reactions: PapaDave and ScotO
I see some ceiling fans in your future! My boss's living is exactly like that and we made a pine beam ( we made it out of 1xs) and installed it at the peak so we didn't have to tape it and it gave us a flat surface to mount the ceiling fans.

Very nice job, you should have plenty of ventilation!
 
  • Like
Reactions: ScotO
I see you have a lot going on there and the rods won't work everywhere. I did a job where the rafters were not evenly spaced, so I used a roll of binding strap. Like the stuff the wrap newspaper bundles in. It worked well.
 
  • Like
Reactions: ScotO
I see some ceiling fans in your future! My boss's living is exactly like that and we made a pine beam ( we made it out of 1xs) and installed it at the peak so we didn't have to tape it and it gave us a flat surface to mount the ceiling fans.

Very nice job, you should have plenty of ventilation!
thanks Jack. We're doing a T&G pine ceiling, and we're going to install hand -hewn decorative rafters every 4' and a hand hewn ridge board, all from the barn I tore down several years ago. I won't be installing that stuff til next summer unless EVERYTHING ELSE goes smoothly on this project, which never happens....I just want to be able to use it for Thanksgiving and Christmas, I can do some of the detail work in late winter/spring. Here's my ceiling, all 600sq ft of it, buried under my horde of tools and supplies!

2012-08-12_17-01-27_199.jpg
 
  • Like
Reactions: Defiant
Wow! That will be great, I hope you have scaffolding!
 
Scotty, you're a better man than I if you can do finish work with a chainsaw.;)
Looks to me like you're doing a GREAT job.
Is the T&G end-matched? If it is, it's VERY easy to put up, since the ends don't need to fall on a stud. I used that when I redid our 3 season porch into a master bedroom. Of course, no matter when you do this......we'll wait for the pics. For a minute.:mad:
 
  • Like
Reactions: ScotO
In central PA the vapor barrier is probably unnecessary, but you will want to make sure the drywall is 'airtight'.
 
It has always been my understanding to install vapor barrier to reduce the movement of moisture from inside the home through the walls where it can condense during cold weather outside. Cooking, showering and even breathing give off vapor. Moisture does move through drywall.
 
  • Like
Reactions: Thistle
Scotty, great job! Now call it a night, Olympics closing ceremonies feature the "Pet Shop Boy's"!
You know you don't want to miss that!;lol
 
You have my utmost sympathy Scotty. I hate it too.

It's going to look fantastic when done, so keep the vision in mind.
 
  • Like
Reactions: ScotO
It has always been my understanding to install vapor barrier to reduce the movement of moisture from inside the home through the walls where it can condense during cold weather outside. Cooking, showering and even breathing give off vapor. Moisture does move through drywall.

Condensation is caused by vapor carried by air movement around sheetgoods and through the structure, very seldom by diffusion through the materials. Most misunderstood problem in building science. Ensure that no conditioned air leaks into the ceiling cavity, and the structure will hold BTUs, and the OP can avoid ice dams. The tiny amount of vapor diffusing through the drywall will be negligible (given that venting he is putting under the deck)
 
In central PA the vapor barrier is probably unnecessary, but you will want to make sure the drywall is 'airtight'.
Woodgeek, its going to be tongue and groove pine ceiling, not drywall. That's the main reason I am putting the vapor barrier up, to keep the condensation to a minimum in the airspace above the insulation, given the fact that the boards will expand and contract with the change of seasons.
 
  • Like
Reactions: Thistle
Sorry, I was unclear about your description of the stackup. Cathedral ceiling with tongue and groove sounds like it could be a big problem regarding air leakage, and resulting problems like icedams and high energy bills. You are totally right that you will want some sort of air barrier in there and know you have to tape it carefully...but it is not clear that bubble wrap or poly would be the right solution....there will be a lot of nail holes. I would spend a little time exploring the building science sites for best practice advice before I put on the finish layer.
 
You'll be fine with the plastic wrap Scotty. The T&G will be a joy compared to drywalling the ceiling. I did my entire addition in T&G. Walls & ceilings. With the exception of the closets, they got drywalled. I used brad nails to install my T&G ceiling & walls, and it went very well. The ceiling already had OSB board on it, so I just siliconed and taped the seams and installed the T&G over that. I finished the boards after, which is a real PITA. 4 coats of satin clear, with a scuff sanding between pairs of coats. Sucks to sand ceilings. I used an orbital sander. It will go up quick, and much more pleasantly than that insulation did.

;-)
 
  • Like
Reactions: ScotO and PapaDave
You'll be fine with the plastic wrap Scotty. The T&G will be a joy compared to drywalling the ceiling. I did my entire addition in T&G. Walls & ceilings. With the exception of the closets, they got drywalled. I used brad nails to install my T&G ceiling & walls, and it went very well. The ceiling already had OSB board on it, so I just siliconed and taped the seams and installed the T&G over that. I finished the boards after, which is a real PITA. 4 coats of satin clear, with a scuff sanding between pairs of coats. Sucks to sand ceilings. I used an orbital sander. It will go up quick, and much more pleasantly than that insulation did.

;-)
Thanks for the re-assurance, Hogz. I'm definitely looking forward to the ceiling install, I will be putting up some heavy mil plastic and taping all joints.
 
Scotty - I have done almost exactly what you are doing with the exception that I used rigid foam and then just stuffed any imperfections with fiberglass. My ceiling is much smaller than you are dealing with, but the pine goes up fast.

A pic while in process: The beam closest is still unfinished.
cabin 002.jpg
 
  • Like
Reactions: ScotO
Status
Not open for further replies.