New hearth & Woodstock Progress Hybrid install

  • Active since 1995, Hearth.com is THE place on the internet for free information and advice about wood stoves, pellet stoves and other energy saving equipment.

    We strive to provide opinions, articles, discussions and history related to Hearth Products and in a more general sense, energy issues.

    We promote the EFFICIENT, RESPONSIBLE, CLEAN and SAFE use of all fuels, whether renewable or fossil.
Status
Not open for further replies.

mliiiwit

Member
Jan 4, 2012
98
Southern KS
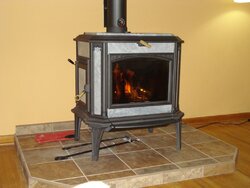
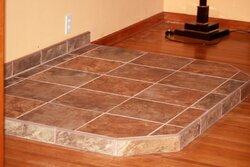
Completed the hearth yesterday and set to pick up the PH from ABF terminal tomorrow morning. Hope to be burning by tomorrow afternoon.

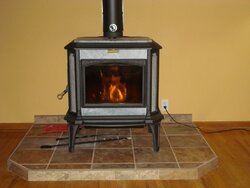
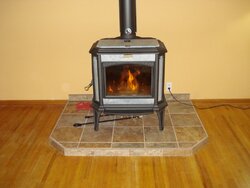
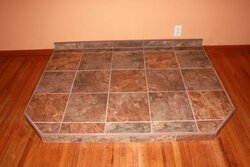
Nothing fancy, just tried to make it look decent. 2 layers 3/4" ply, 2 layers of 1/2" backerboard & the tile. Only 9 small holes in the hardwood floor so minimal restoration if it goes with us when/if we move.

Just as FYI, I should have said " Only 9 small holes in the hardwood floor so minimal floor restoration required if the hearth comes out of the house for the new owner when/if we sell and move". The 9 screws are UNDER the tiles and backer board so some tear out is required but the original hardwood floor is minimally affected.
 

Attachments

  • tile1.jpg
    tile1.jpg
    58 KB · Views: 638
  • tile3.jpg
    tile3.jpg
    52.7 KB · Views: 661
I like it !! Simple, functional, aside from sharp looking :)

Can't wait to see the rest !!
 
That looks great so far. What kind of flooring do you have there if you don't mind me asking? I haven't seen flooring pieces that narrow before. I like it. Must have been tedious to install.
 
fishingpol said:
That looks great so far. What kind of flooring do you have there if you don't mind me asking? I haven't seen flooring pieces that narrow before. I like it. Must have been tedious to install.

The flooring is 3/4" solid oak, never refinished, so has a lot of life left. As for tedious to install? We'd have to ask the guys that did that in 1958 - when the house was built - but I'm betting it was installed without nailers (other than the kind you paid) so, yeah, tedious to us but probably wasn't to them. This is very common flooring in older homes in this area. All 3 homes I've owned in Wichita (built in the 40's & 50's) have had original oak flooring this width. As common as it is, I'm guessing it was the cheapest of the cheapest option back when (wider strips were probably a few cents more per sq ft!). How times have changed.
 
Nice...can't wait to see the stove on it!! I really the woodstock stoves and the PH is really interesting to me technology wise.
 
roundoak16 said:
fishingpol said:
That looks great so far. What kind of flooring do you have there if you don't mind me asking? I haven't seen flooring pieces that narrow before. I like it. Must have been tedious to install.

The flooring is 3/4" solid oak, never refinished, so has a lot of life left. As for tedious to install? We'd have to ask the guys that did that in 1958 - when the house was built - but I'm betting it was installed without nailers (other than the kind you paid) so, yeah, tedious to us but probably wasn't to them. This is very common flooring in older homes in this area. All 3 homes I've owned in Wichita (built in the 40's & 50's) have had original oak flooring this width. As common as it is, I'm guessing it was the cheapest of the cheapest option back when (wider strips were probably a few cents more per sq ft!). How times have changed.


I've got the same kind of wood floor in the den. I love it. It's a classic look :)

Murph2.jpg
 
eclecticcottage said:
Nice...can't wait to see the stove on it!! I really the woodstock stoves and the PH is really interesting to me technology wise.

Thanks eclectic. I am very anxious to see for myself how well the progress performs. We're not in a particularly cold region, but we do live in a 1958 ranch with original windows (a LOT of original windows) & insulation, plus a full brick veneer heat/cold sink wrapping it all up. First and last house I'll own with a brick exterior. My money would probably have been more wisely invested in windows & insulation, but I wanted to start by getting independent of the grid for heat.
 
fishingpol said:
That looks great so far. What kind of flooring do you have there if you don't mind me asking? I haven't seen flooring pieces that narrow before. I like it. Must have been tedious to install.

Thanks fishing. My wife really wanted more tile on the wall (I would like it too) but this install is getting heavy fast with a 700 lb stove. I'm pretty sure the 12' span 2x10 joists will take this with no problem, but I really didn't want to push my luck. Backer board is heavy. And that tile is the heaviest I've ever worked with - or maybe it's just that I'm a few years older than on the last tile job I did! Not sure my body could take doing an entire room again.
 
The PH is installed and burning. No help to call on today but managed to get it done myself with a bit of help from my wife (moving broomsticks and pulling the pallet out from under it). Biggest issue was the hour + learning curve on the front porch. Back end of the trailer is just taller than the front porch so from the trailer to the porch was an easy transition. On into the house was 1 step up but was an easy push up 2x6 ramps by getting the pallet on a couple of 5 ft long 1x6's. Worked broom sticks in between the 1x6's and 2x6's and rolled it right up into the house. Rolled it onto upside-down carpet samples and slid it across the hardwood and rolled it up on the hearth. 2 scissor jacks and a couple of 2x4 blocks on each side and it was off the pallet and then lowered onto the tile. No damage to the stove, the house or myself. Whew!

My first impressions: The bad, and this is nitpickin: 1. That sumbi$*# is heavy. 2. The draft control seems a bit cheesy compared to the one on the Fireview and it operates opposite of the description in the owner's manual. 3. The bottom heatshield #2 was in a separate box and not marked so I missed it first time around. The instructions could use better pics or illustrations. 3. The loading door opening travel seems too limited. I think it opens wider on the Fireview and I've already swung the door into the stop rollpin a few times a bit harder than I'd like. I'll have to get used to that or I suspect that pin won't last too long.

The good: 1. The installation is done! 2. Just a couple of small old pieces of over-seasoned pecan and it's cranking out the heat and the NG furnace is OFF. 3. Had some beautiful "aurora borealis" to watch this evening. 4. It's amazing how quiet this stove is. No draft noise, no fire noise, no heat-up or cool-down "tinking". Just watch and enjoy the heat. 5. My wife loves it for the heat and view. It's a big change from forced air heat. 6. The chihuahua is not in my lap. 7. It's a Woodstock Progress Hybrid sitting on our hearth heating our home.

I expect we'll enjoy this stove for many years.
 
Sounds like it went great! Now..PICS!!
 
VCBurner said:
Are those 2'x2' tyles? Lookin good!

Good luck with the instal and stove pick up!

Thanks! They're actually 12" tiles. It looks a lot better tonight with a burning stove on it.

My wife is the photographer, she said she'll get some pics tomorrow. Sorry! Stay tuned.
 
Looks and sounds great!

However,

2. The draft control seems a bit cheesy compared to the one on the Fireview and it operates opposite of the description in the owner’s manual.

What do you mean opposite direction? That doesn't seem right.
 
Waulie said:
Looks and sounds great!

However,

2. The draft control seems a bit cheesy compared to the one on the Fireview and it operates opposite of the description in the owner’s manual.

What do you mean opposite direction? That doesn't seem right.

The draft control was pointing straight down when the stove arrived from WS. Per the manual, the control is pushed down to close it and lifted up to open it. However, simply looking at the draft while operating the lever, the draft was closed with the handle pointing straigt down and open with the handle pointing straight to the stove door. During my first burn as I closed the draft, it caught then rotated further upward past horizontal to where the handle could then be lifted to open the draft and lowered to close it. Which is what the manual indicates.
 
roundoak16 said:
VCBurner said:
Are those 2'x2' tyles? Lookin good!

Good luck with the instal and stove pick up!

Thanks! They're actually 12" tiles. It looks a lot better tonight with a burning stove on it.

My wife is the photographer, she said she'll get some pics tomorrow. Sorry! Stay tuned.

*taps foot impatiently*

lol :D
 
Pics as promised. We still need to furnish and decorate around it.
 

Attachments

  • DSC03065.jpg
    DSC03065.jpg
    83.8 KB · Views: 344
  • DSC03075.jpg
    DSC03075.jpg
    76.3 KB · Views: 337
  • DSC03076.jpg
    DSC03076.jpg
    77 KB · Views: 328
Yes, it looks great!
 
Status
Not open for further replies.