Show me your tools...

  • Active since 1995, Hearth.com is THE place on the internet for free information and advice about wood stoves, pellet stoves and other energy saving equipment.

    We strive to provide opinions, articles, discussions and history related to Hearth Products and in a more general sense, energy issues.

    We promote the EFFICIENT, RESPONSIBLE, CLEAN and SAFE use of all fuels, whether renewable or fossil.
Status
Not open for further replies.

kofkorn

Feeling the Heat
Dec 3, 2008
371
Central MA
It seems that everyone has their own little tricks and tools for doing their stove maintenance and operation. I thought it would really be a great idea to get as many of them together as possible and share the wealth. I'd love to see and hear all of your little tricks or tools for stove cleaning, pellet vacs, pellet storage etc.

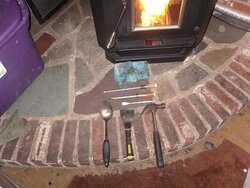
So to start off, I've got a couple of relatively simple tools I use for cleaning:

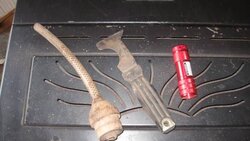
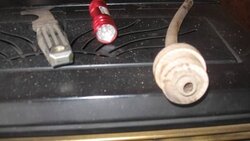
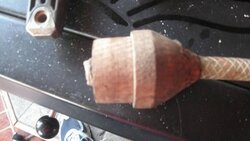
Spatula with the end ground flat. - this lets me scrape the ashes out of the pot while the stove is still running. It keeps my hand from getting singed :)
MAPP torch - good for quick lights. throw a hand full of pellets in the pot and hit it with the torch for 15 seconds or so. Lights right up.
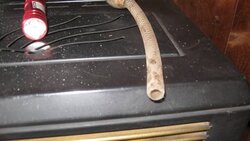
Chisel, Flat screwdriver, putty knife - help to scrape the creosote off the auger tube and burn pot.
Knife - to open the bag and stay near the stove so I'm not trying to hunt for one :)
Flashlight - for my cleaning cause I can't see a thing inside :)

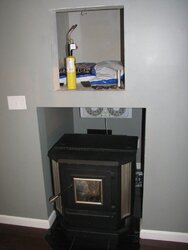
Lastly, I built a whole storage shelf above the stove that lets me store about 8-10 bags of pellets right above the stove, but out of sight. I also put a thermostatically controlled fan above the stove to blow the warm air generated out into the room.

What I am missing is a vacuum attachment that lets me get to all of the nooks and crannies inside the stove.

Love to hear your ideas!
 

Attachments

  • IMG_7282a.jpg
    IMG_7282a.jpg
    132.4 KB · Views: 1,889
  • IMG_7281a.jpg
    IMG_7281a.jpg
    79.1 KB · Views: 1,858
  • IMG_7283a.jpg
    IMG_7283a.jpg
    87.6 KB · Views: 1,872
  • IMG_7285a.jpg
    IMG_7285a.jpg
    52.5 KB · Views: 1,903
I'm a LITTLE surprised by the close-quartered walls around the stove, frankly. I'd think that (even if the walls are heat-resistant Dry Wall), there is a potential hazard there (imho, of course). Not to mention the restriction of radiant heat.........

Of course, it is apparently a Pellet Stove, and I'm not an advocate of those, nor knowledgeable with regard to the limits of safety or the most effective use of those types of stoves, so take THAT into account.

-Soupy1957
 

Attachments

  • Wood Stove With Carpet.jpg
    Wood Stove With Carpet.jpg
    40.7 KB · Views: 1,645
Yeah, I agree on the clearance. It isn't quite code, off by about an inch. My thought was that I could add some tile up the walls to eliminate the issue, but it hasn't been a problem. Even after it's been on high for a long time, I can hold my hand on the side of the stove and the heat on the wall is limited. As to radiant heat, there isn't a whole lot to the sides because of the double wall design. Unfortunately that was really the only place that I could put it that would heat the entire house and not cause any traffic issues. I am able to heat 2500 sq feet on a 2 story cape with no issues through nearly all of the winter conditions here in Mass.

This location used to be the main entry door before we closed it in as an addition.

Thanks for the comments.
 
My secret weapon? A 4" paintbrush to brush ash out of hard to reach places. Gotta make sure the stove is really cold for this though... It really gets in all the hidden places and if you leave the vacuum end in the stove with the vacuum on, it sucks all the ash up pretty good.
 
Just what part of safe clearances aren't understood? It's fine to exceed clearances but not to fudge them by an inch. What may be fine now, may not be fine in the long run. When temps get below zero and the stove is running full out 24/7, watch the temps on the adjacent woodwork and overhead ceiling closely.
 
Since I finally figured out how to post pictures....

Here is what I use.

Painters 5-1 tool. (get at any hardware store) Use as burn pot liner scraper and to chip out the clinkers. I also use it as an ash shovel to sweep them into the ashpan.

LED Flashlight to see what I am missing

Homemade vacuum hose adapter. 1' length of 1/2" braided heavy fuel hose. This is RTV'd into a lathe turned wooden adapter to fit my ash vac. I use it to reach deep into/behind the ash traps and up around the convection tubes. It does a great job of getting into the tight areas. Only problem I have had with it is if I suck up a pellet. It gets blocked up and needs a coat hanger wire to unblock it. It ain't pretty but it works. It was one of those 5 min projects that was temporary 4 years ago. :)

---Nailer---
 

Attachments

  • Stove Tools 001.jpg
    Stove Tools 001.jpg
    35.8 KB · Views: 1,539
  • Stove Tools 003.jpg
    Stove Tools 003.jpg
    30.5 KB · Views: 1,533
  • Stove Tools 004.jpg
    Stove Tools 004.jpg
    26.6 KB · Views: 1,544
  • Stove Tools 005.jpg
    Stove Tools 005.jpg
    27.6 KB · Views: 1,646
Nice looking install!
Like Soupy said those clearances are a bit scary!
All stoves are different. I can not keep my hand on the sides/top/base even running a low flame.
We even have heat shields on the sides. Built more like a wood stove. Plate steel all around.
Book says 9" clearance for sides

Tools:
Sharpened chisel for carbon build up in pot. Clean once per week. Harman Tech suggested a gasket scraper also.
Have a Hepa pleated filter plus a fine dust bag for Shop Vac. Complete cleanup about every ton burned.
Have attachments from old vac..brush and crevis tool
Utility knife down cellar near pellet stash along with 5 gal bucket for hauling fuel upstairs.

Sorry no pictures!
 
nailed_nailer said:
Since I finally figured out how to post pictures....

Here is what I use.

Painters 5-1 tool. (get at any hardware store) Use as burn pot liner scraper and to chip out the clinkers. I also use it as an ash shovel to sweep them into the ashpan.

LED Flashlight to see what I am missing

Homemade vacuum hose adapter. 1' length of 1/2" braided heavy fuel hose. This is RTV'd into a lathe turned wooden adapter to fit my ash vac. I use it to reach deep into/behind the ash traps and up around the convection tubes. It does a great job of getting into the tight areas. Only problem I have had with it is if I suck up a pellet. It gets blocked up and needs a coat hanger wire to unblock it. It ain't pretty but it works. It was one of those 5 min projects that was temporary 4 years ago. :)

---Nailer---

Nailer, Were all gonna want one of them "hand turned vac adapters" now! :) Made with love I bet.
 
j-takeman said:
nailed_nailer said:
Since I finally figured out how to post pictures....

Here is what I use.

Painters 5-1 tool. (get at any hardware store) Use as burn pot liner scraper and to chip out the clinkers. I also use it as an ash shovel to sweep them into the ashpan.

LED Flashlight to see what I am missing

Homemade vacuum hose adapter. 1' length of 1/2" braided heavy fuel hose. This is RTV'd into a lathe turned wooden adapter to fit my ash vac. I use it to reach deep into/behind the ash traps and up around the convection tubes. It does a great job of getting into the tight areas. Only problem I have had with it is if I suck up a pellet. It gets blocked up and needs a coat hanger wire to unblock it. It ain't pretty but it works. It was one of those 5 min projects that was temporary 4 years ago. :)

---Nailer---

Nailer, Were all gonna want one of them "hand turned vac adapters" now! :) Made with love I bet.

I keep finding one of those things next to the bed when I get home after a week on the road... but the darn thing has batteries in it... huh....
 
j-takeman said:
......a lathe turned wooden adapter to fit my ash vac.
---Nailer---

Nailer, Were all gonna want one of them "hand turned vac adapters" now! :)[/quote]

ME TOO! ME TOO! I WANT ONE!! :cheese:
 
You guys give me the inside measurement of your vacuum hoses and your addresses and I'll make you one and send it your way.

They take all of 5 minutes to turn on the lathe.

The one I did was from some leftover red oak I had laying around.

I'll have to come up with the hose to fill any orders. I think my local Car Quest has it by the foot.

---Nailer---
 
I don't think my local building inspector would have approved my installation if it had that little clearance, they go by the specs from the manufacture when checking the system install.

The tools:
P1000397A.JPG

Oops, forgot the toothbrush ;-)

P1000399A.JPG
 
That battery operated gizmo sitting along side the bed is not for cleaning the pellet stove me thinks :bug:

I use a standard putty knife, a small cheapy 1" paint brush and the shop vac.

During off season serious cleaning I may run the hose from my shop air compressor in and blow the pipes out (after turning the exhaust fan on)


Snowy
 
PF100window.jpg
PF100tools.jpg


As you can see my pellet burner door faces the side of the burnpot so extra tools are needed for cleaning.
Hi-intensity book lamp (Fred Meyer) and inspection mirror, to check auger, burnpot, and burnpot holes for being clean.
Home-made white PVC 90 degree shopvac adapter and small shop vac attachments to reach bottom of burn pot.
Bent and pointed gauges of hangar wire to clean burn-pot holes

I use a paint scraper to scrape the burn pot. New blades keep the edge sharp.
The bent aluminum is to help scrape flyash out of the burn pot and the bottom of the fire box.
The jumper wire is to bypass the low pressure switch for troubleshooting.
 
index.php

Tools for the Englander 25-PDVC. First up is a ground/cut-down spatula. VERY useful for daily cleaning. Next is a scoop for cleaning out those little pieces of pellet that fall through the wear plate holes into the bottom of the burnpot, as well as scooping out ash. Old screwdriver has been sharpened to scrape creosote off the feed tube edge. Little hammer is for knocking down creosote and ash from inside the exhaust pipe into the cleanout recepticle. Finally, I made a plug (old rubber drain pipe stopper) to allow direct vacuuming of the stove innards with the pipe blocked off.
 
Hi DonBryce,

Do you disconnect something to install the plug? Does it fit down into the intake below the wear plate?

Love all of the tools guys! I'm gonna have to build one of those adapters that Nailer has. Unfortunately I literally just sold my lathe on Craigslist last month. Guess that's the way it goes with tools, you don't need one until you don't have it :)

As an FYI, I'm looking into widening my install to meet the recommended clearance. Consider the hand slapped.

Keep it up!
 
lordgrinz said:
I don't think my local building inspector would have approved my installation if it had that little clearance, they go by the specs from the manufacture when checking the system install.

The tools:
P1000397A.JPG

Oops, forgot the toothbrush ;-)

P1000399A.JPG

This may be a stupid question,but here it goes. The vac you have,what's the difference between that and a regular shop vac? I've seen them for $159 to over $300.
 
kofkorn said:
Hi DonBryce, Do you disconnect something to install the plug? Does it fit down into the intake below the wear plate?
No, it fits up through the 'T' fitting, after removing the clean-out cap, to block the flue pipe, vertical in my case, straight up into the ceiling. Picture shows my 'soot-sucker' attached to the cleanout 'T'
index.php

The plug is inserted up through the 'T', in the opening after the cleanout cap is removed. BTW, the 'soot sucker', made from an old shop vac, didn't really have enough suction to duplicate the leaf-vacuum effect so nicely documented here by others. At the time, I didn't own a leaf vac...but I do now, so I plan to try this later on in the season. I'll be using some sort of adapter to swage down the leaf vac to fit the hose, then try running both the soot-sucker and the leaf vac to see what will come out....FWIW, here's a link to the old thread on how I built my sootsucker https://www.hearth.com/econtent/index.php/forums/viewthread/36637/
 
Wow, that's impressive. Some serious thought and effort went into that mod. I'll have to look into something similar, as I can't use the leafblower trick either. My cleanout is over an outside patio, and I'd be cleaning all of the ash off of that instead.

Nice work!
 
That large Englander in the tight space would worry me. I know from my neighbor`s stove how much heat it can put out and how hot the exterior can get.
I`d give it my immediate attention .
 
It's being taken care of. Unfortunately it's not a simple fix. This is an old doorway on a structural wall, so I'm pulling a permit and the whole kit and caboodle that goes along with that. Goal is to complete it by early Dec. before the real heating season kicks in.
 
kofkorn said:
It's being taken care of. Unfortunately it's not a simple fix. This is an old doorway on a structural wall, so I'm pulling a permit and the whole kit and caboodle that goes along with that. Goal is to complete it by early Dec. before the real heating season kicks in.
A smart decision indeed ! Best wishes for the remodel job.
 
So I stopped into Lowe's tonight on the way home from work.

I had to pick up something to cut some 1/2" and 5/8" circles in cowhide.

While I was eyeballing plumbing fittings and pipe I noticed some 1/2" OD with 3/8" ID polyethylene tubing

It was $.27 / foot so I bought just over 6' of it.

So If you guys would like a vac adapter tube I can make about a 1/2 dozen or so.

Get me your vacuum hose inside diameter and a mailing address and I will send you one.

---Nailer---
 
Personally, I like the dust pan brush over the paint brush

My "tool kit" contains:

5 gal Rigid Shop vac
Crevice tools
Flathead screwdriver
Philips screwdriver
Small metal brush
4" Pellet Stove brush w/ 8 ft cable
Troybuilt leaf blower w/ assorted fittings
...and of course, the dust pan brush

I can do 90% of the stove maintenance w/ that kit
 
Status
Not open for further replies.