
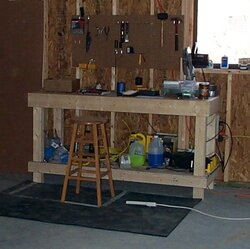
Ok been looking to do this prodject for more than a year. Setting it up to grind chains hold and work on saws the space I have is 8 ft long and 32-36 in wide. Anyone have pics of there's or ideas starting this prodject next weekend daughter is back active in the army and finally moving her stuff out of the garage on thursday.
Work bench
- Thread starter smokinj
- Start date
-
Active since 1995, Hearth.com is THE place on the internet for free information and advice about wood stoves, pellet stoves and other energy saving equipment.
We strive to provide opinions, articles, discussions and history related to Hearth Products and in a more general sense, energy issues.
We promote the EFFICIENT, RESPONSIBLE, CLEAN and SAFE use of all fuels, whether renewable or fossil.
You are using an out of date browser. It may not display this or other websites correctly.
You should upgrade or use an alternative browser.
You should upgrade or use an alternative browser.
- Status
- Not open for further replies.
PAV1
Member
I built mine using this (see link)..and came out awesome...
Only modification i made was I used 2x6"s for the bench top, vs plywood..It is tough as nails..
It will be almost a perfect 8ft wide..and you can rip plywood and shorten the 2X6's to get you right width...
Good luck
http://www.amazon.com/2x4basics-144...ref=sr_1_1?ie=UTF8&s=hi&qid=1266680982&sr=8-1
Only modification i made was I used 2x6"s for the bench top, vs plywood..It is tough as nails..
It will be almost a perfect 8ft wide..and you can rip plywood and shorten the 2X6's to get you right width...
Good luck
http://www.amazon.com/2x4basics-144...ref=sr_1_1?ie=UTF8&s=hi&qid=1266680982&sr=8-1
PAV1 said:I built mine using this (see link)..and came out awesome...
Only modification i made was I used 2x6"s for the bench top, vs plywood..It is tough as nails..
It will be almost a perfect 8ft wide..and you can rip plywood and shorten the 2X6's to get you right width...
Good luck
http://www.amazon.com/2x4basics-144...ref=sr_1_1?ie=UTF8&s=hi&qid=1266680982&sr=8-1
thats funny thats what I got for x-mass on the 2x6's did you use a joiner or just screw them down? any pic's?
the top is where I am strugging with you using any kind of rubber matts or anything like that?
was thinking doubleing 3/4 ply or 4 2x8 and treated lumbar as well?
PAV1
Member
screwed them down on the edges (right into the 2x4 frame...also ran a 2x4 in the middle..like a floor joist..and ran a row of screws down that too...it is strong...no issues unless you are going to drop an engine block on it...
PAV1 said:screwed them down on the edges (right into the 2x4 frame...also ran a 2x4 in the middle..like a floor joist..and ran a row of screws down that too...it is strong...no issues unless you are going to drop an engine block on it...
lol I was just thinking about the joints having a crack in the seems? (any issue's there) I think it would handle the engine block.lol
PAV1
Member
none..i just checked, and I ran them long ways..seams run horizontially across bench, not vertical...for the last row (against wall) I just used a 2x4 to fit in the last area.
Bench is a mess right now, but I will clean up and take a pic..PM me so I remember..
Bench is a mess right now, but I will clean up and take a pic..PM me so I remember..
PAV1 said:none..i just checked, and I ran them long ways..seams run horizontially across bench, not vertical...for the last row (against wall) I just used a 2x4 to fit in the last area.
Bench is a mess right now, but I will clean up and take a pic..PM me so I remember..
cool dont worry about the mess that what its for.
John_M
Minister of Fire
smokin, During the last 30 years or so I have made 40 or 50 workbenches from materials purchased at lumber yards. Some are free standing and moveable, some have shelving built in above or below the bench top, some are built onto the wall.
Here is some of what I have learned: 1) How tall are you? Decide how high you want the bench. Will you be standing or sitting while working on this bench. Will you be sharpening chain and other small tasks or will you be assembling "things"? You probably do not want to go much higher than 24" if you will be working on big things like snowblowers, lawnmowers, wheel barrows, assembling furniture, etc. If you will be standing while working on chain saws and similar tools you probably do not want to higher than 37". My kitchen counters and reloading bench are 37" high, yet I stand at one and sit at the other. Most of my work benches are between 27" and 32" high; 2) The length of a built-in work bench can be as long as your space permits. If the bench is free standing and you will be walking around it, do not go longer than 8'. Any longer makes walking around it very annoying; 3) Use wood efficiently; Do not go deeper than 24" (half sheet of plywood) if the shelf is built onto a wall: If the bench is free standing and you will be working on it from both sides, 4' (full sheet of plywood) is as deep as you will want to go. At 4' you can still easily reach to the center of the bench from front and back sides. One of my work benches is 4'x8' with 4x4 legs, electric outlets, a single shelf, and all kinds of shallow hooks used to hang things. My friends call it my "elephant operating table" and would love to own one.
Shelves: A single shelf is about right for under the top of the bench. The top of the bottom shelf should be at least 16" ( I prefer 18") below the top of the bench because you will probably have a 2x4 frame supporting the top and that will take away 3.5" of those 16". Many of the buckets, containers and other things we use to store things are about 12" high. Five gallon buckets range from 13" to 14.5" high. Trying to maneuver a heavy 5 gal. bucket under a 12" opening is a pain in the butt. If you build two shelves below the top of the bench, one of the shelves will be kind of okay and the other will be so shallow, top to bottom, that you will use many naughty words trying to find things at the back of the shelf. A shallow shelf at head level is okay but at knee level it ain't too much fun.
Work surfaces at top of bench and shelf: 2x4's and 2x6's make strong but uneven work surfaces. I prefer a good quality OSB -Advantec is my favorite. It is at least as strong as plywood, significantly flatter, and easier to work with. The top should be two layers of 3/4" OSB glued together and screwed down to the 2x4 frame. This will easily handle any weight you can place on top of the bench. The shelf has only a single layer of OSB. Build a strong frame of 2x4"s with front to back stringers at 24"on center (o.c.). Purchase a couple sheets of 3/16" or 1/4" (1/4" is better and my favorite) Masonite (pegboard without the holes) for the work surfaces. Masonite sheets are not expensive and are a little bigger than 4'x8'. This will be ripped in half and screwed down to the OSB top and shelf. A couple of screws on each end and a couple in the middle is all you need. These screws just hold the Masonite in place. The surface of the Masonite is shiney, slippery, hard and durable. You will have to countersink the screw holes to drive the flat head screws flush with the surface. One of the many benefits of Masonite is that when you ding it up with drill bits, saws, oil, grease, paint, etc, it is easily replaced and bingo! You now have a new work bench.
Legs and dams: Treated lumber is used for legs in all garage work benches. I like legs to "wrap" the bench top with a 2x6 at each end and middle of the front (and back) and a 2x4 on the side of each end. One picture would be worth a thousand words if I had a camera. 1"x2" pine makes a very nice trim piece for the exposed edges of the OSB. I like to have a "dam" at each corner of any workbence where I will be using small parts and bearings. This dam is located at each corner and will stand proud of or be elevated about 1/8" above the bench top and about 12" long at the front and sides. A dam is especially important if the bench is located near a drain, stairs or a pile of junk. It helps to keep bearings and other small parts from rolling off the bench into a black hole, never, ever, to be found again. Did you ever hear a ball bearing bouncing down 14 steps, one at a time, only to become invisible at the bottom? I have. Ergo the dam.
These are the essentials of what I have learned while building strong, good looking, and frequently copied everyday workbenches. Good luck and have fun in whatever you decide to do. John
John_M
Minister of Fire
smokin, The Masonite cannot be painted. It is too "slippery" to hold paint. It is a medium brown color and I believe (as do all who have seen my benches) it looks very good as-is. John_M
John_M said:smokin, The Masonite cannot be painted. It is too "slippery" to hold paint. It is a medium brown color and I believe (as do all who have seen my benches) it looks very good as-is. John_M
yep John I would not have thought of that....What did you trim it out with?
John_M
Minister of Fire
John_M said:smokin, I use 1'x2" pine to trim around the exposed edges of the top and the shelf. John_M
Thanks John sounds much easier and replaceable that the 2x8 top not to mention jointer glue clamps and still having that edge on the top.....Treated was what I was thinking just because it always seems straighter thanks for your help sure I will have more question as I get into it.. Looking to but in electric and lighting as well.
John_M
Minister of Fire
I tried to edit this into my post but was unable to do so: Frequently, on built-in benches which will be used for work involving small parts, I will build the bench 1/8" higher in the front. This will persuade bearings and other small parts to roll to the back (wall) of the bench if they decide to go for a walk and play hide-and-seek with you. The extra elevation in the front is not noticeable unless/until small parts decide to take a hike. John_M
Edit: Just re-measured some of my built-in benches. They range from 1/8" to 1/4" higher in the front than the back. I cut to 1/8" but different floor elevations, lumber dimensions, etc. account for the difference. Try to achieve a minimum of 1/8" higher in the front.
I use either 1"x2" or 1"x4" pine for trimming the rough edges of the OSB. Which one I use depends upon the exposure I have to cover and the effect I want to create. When I get to that stage I will usually hold up a piece of each to see what it looks like in place.
John_M said:I tried to edit this into my post but was unable to do so: Frequently, on built-in benches which will be used for work involving small parts, I will build the bench 1/8" higher in the front. This will persuade bearings and other small parts to roll to the back (wall) of the bench if they decide to go for a walk and play hide-and-seek with you. The extra elevation in the front is not noticeable unless/until small parts decide to take a hike. John_M
very nice indeed "if you think of anything else please post" THAT IS A SWEEET IDEA!
kevin j
Minister of Fire
I just finished installing 20 ft of office cabinets and countertops in my car garage. Neighbor took them out of some business, $20 for it all.
Doors to control dust, adjustable shelves underneath, and laminate countertops. Not for heavy metal fab or stuff, I do that somewhere else. But they are turning out nice, and the whole project was 2 hrs and total cost of $20
Doors to control dust, adjustable shelves underneath, and laminate countertops. Not for heavy metal fab or stuff, I do that somewhere else. But they are turning out nice, and the whole project was 2 hrs and total cost of $20
John_M
Minister of Fire
kevin j
Minister of Fire
my ex wife already calls me plenty worse ")
the cabs would have been free but he had to 'sell them' to get some salveage value for taxes, etc. cheaper than materials but the big advantage was the time savings for me right now.
anyway, reason I brought it up is that CraigsList usually has lots of stuff advertised. We also have the ReUse center here, there might be something similar in various cities.
They are not strong enough for a farm workbench, or hard use, but I am sort of past those days and interests, so they will be really nice. Just getting the wiring finished up
John_M said:smokin, The Masonite cannot be painted. It is too "slippery" to hold paint. It is a medium brown color and I believe (as do all who have seen my benches) it looks very good as-is. John_M
ok john the masonite work out great and found it in 1/4 in. will post a pic.'s after I get everything mounted(511a) and lighting in.
John_M
Minister of Fire
smokin, I hope you had fun building the bench. Post a photo soon so others can get ideas from your example. I am also curious about how you installed the lighting. Ain't life great! John_M
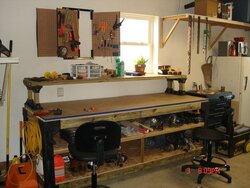
I made 2 like the picture and put them end to end along one garage wall. I think they are 8' long and not sure the depth. I used 2x6 for the upper and lower section with 2x4 braces front to back. I went with plywood for the table surface and it hasn't been an issue. Legs are two 2x4's screwed together to give me a 4x4. Both are very sturdy.
Attachments
John_M
Minister of Fire
wahoo, That is a good looking workbench-nice proportions and strong. Using a 2x6 for top support is a good idea. It gives the top sufficient strength to prevent any sagging and eliminates the need for the center leg. Well done! John_M
John_M said:smokin, I hope you had fun building the bench. Post a photo soon so others can get ideas from your example. I am also curious about how you installed the lighting. Ain't life great! John_M
doing the lighting this weekend and the hard board is very sweet.
- Status
- Not open for further replies.
Similar threads
- Replies
- 0
- Views
- 2K
- Replies
- 13
- Views
- 2K
- Replies
- 16
- Views
- 4K
- Replies
- 110
- Views
- 17K
- Replies
- 78
- Views
- 11K