Help! At the cabin right now trying to install

  • Active since 1995, Hearth.com is THE place on the internet for free information and advice about wood stoves, pellet stoves and other energy saving equipment.

    We strive to provide opinions, articles, discussions and history related to Hearth Products and in a more general sense, energy issues.

    We promote the EFFICIENT, RESPONSIBLE, CLEAN and SAFE use of all fuels, whether renewable or fossil.
Status
Not open for further replies.

cabinner

Member
Aug 2, 2013
120
NY
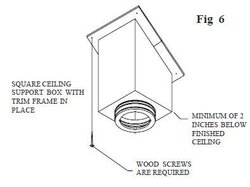
I have a 12/4 pitch and my rafters are 2x6's. My ceiling support box is 11". In order to cut my box at the right pitch I need to cut 4" on angle which means at the lowest part it will be 7" and minus my rafter - 5.5 it is only 1.5" below and my wall finish will be wood 3/4" so instead of having a clearance of 2" from the box I'll have 3/4".. A no no.

The only way I can think of that this will work is if I drop the box so it gains that clearance but then it won't be touching / be flush with the roof over it. If that OK - I can do it.

Help please
 
I think he sold me the wrong size support box.. Unless I'm allowed to install it with out being flush with ceiling.. Please help. Don't want to waste this weekend
 
Sounds like you ordered the wrong box. It is not uncommon for folks to forget to add the ceiling joists to their dimension. It sounds like you need an 18" support box. You should have metal all the way up to the roof decking. It's ok if you don't have enough to bend over the metal on the roof as long as the support box is well anchored on each side with at least 3 - #10 sheet metal screws per side.
 
Thanks begreen.. Very annoying. At least I was able to maneuver the 250lbs slab into place and fill in joints on Wall. Pictures come tomorrow
 
I have a 12/4 pitch and my rafters are 2x6's. My ceiling support box is 11". In order to cut my box at the right pitch I need to cut 4" on angle which means at the lowest part it will be 7" and minus my rafter - 5.5 it is only 1.5" below and my wall finish will be wood 3/4" so instead of having a clearance of 2" from the box I'll have 3/4".. A no no.

The only way I can think of that this will work is if I drop the box so it gains that clearance but then it won't be touching / be flush with the roof over it. If that OK - I can do it.

Help please

Does the support box need to be 2" below the ceiling? I thought proper clearance from the pipe to ceiling was the critical dimension.
 
The support box needs solid anchoring on all faces and once installed. M&G requires that the short face of the support box be at least 2" lower than the ceiling. Installed correctly, the shortest distance from the DVL connector (in this case diagonal distance) to the nearest combustible (ceiling or adjacent exposed joists) needs to be 9" or more.

support box.JPG
 
begreen - I am correct in that I have no way of installing this box correctly according to their specifications?

11" - 4" (for 12/4 pitch) = 7" . Then 7" - 5.5" (for 2x6 rafter) = 1.5" (already under the correct clearance). Then 1.5" - 3/4" ( wood strips that are the wall cover) = 3/4" clearance.... No way.

My math is correct right?
 
You should have metal all the way up to the roof decking

I want to be sure about this because although it seems logical (that you are right!) dura-vent manual does not mention this... I just want to be sure that I cannot really use the box I have by dropping it a bit and not having it as you say "all the way to the roof decking"...

Can you confirm that it must be all the way up and cannot be installed differently?
 
What part of the installation manual are you not understanding?
ROOF SUPPORTED INSTALLATIONS
There are two types of Roof Supported Installations: (1) Using a Square Ceiling
Support Box, and (2) Using a Roof Support.
(1) For a Square Ceiling Support Box installation, make sure that the square box
portion of the Support Box can extend at least 2" below the low side of the finished
ceiling (Fig 19). The Support Box must remain level, and the top edge of the box
must cover the edge of the roof’s decking material.


support box.JPG

Technical Support:

Vacaville, CA
Monday – Friday, 7am – 4pm PST
Tel: 800-835-4429
Fax: 707-446-4740
[email protected]
 
The box has two functions.

1) To provide support for the class A above. For this it needs to be secured to the rafters/joists adequately.

2) To provide the minimum 2" clearance to combustibles, an insulation shield.

This whole concept of extending it to the bottom of the roof deck seems dd. You certainly want enough overlap that the attachment methods between the metal box and the rafters is adequate.

Why didn't you use a cathedral ceiling support? The wing style?
 
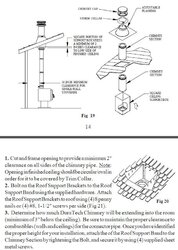
begreen - in this manual they don't indicate something similar (as far as I can see) to what you wrote:

Time for a visit to the eye doctor. ;)
page 14 of the docs you just posted, and figure 20 on page 15.
 
Wow... indeed.

Absolutely right. Thank you begreen. Then I need to make those flaps?

I am installing this with the excel flashing for metal roofs..
 
The flashing doesn't matter. That is the recommended method for greatest strength. I commented on this in post #3 above.
 
Ok.

Then I think I will just go up to where I cover the roof decking - to reduce the risk of making mistakes as this flap seems to be a more advanced thing.
 
I think he sold me the wrong size support box.. Unless I'm allowed to install it with out being flush with ceiling.. Please help. Don't want to waste this weekend
Did he see it? If not then it sounds like you ordered the wrong part!:)
The ceiling box does not need to extend all the way to the roof deck, I prefer it this way but its not a requirement. You simply need to trim enough off of the low side to allow you enough metal for a good anchoring point, making sure not to trim too much. You need 2" protruding into the room on the low side. If you can't get it then the 24" box will be needed. But with a 4/12, there should be plenty of box for this.
 
Hey webby,

as begreen showed - even dura-vent recommends it extending up to the roof deck.... If I do not adhere to that - I can certainly use this 11" box.
 
Making the flaps is going to be very difficult with the metal roof. Unless you plan on pulling the metal roofing off.
 
Good point, I forgot this is a metal roof. In that case, see my comments in post #3 again.
 
I won't install the flaps but I will cover the roof decking..

btw - most show, and manuals suggest, that you should first connect the support box and then make your way down to the stove... It seems much harder to me to do right. Can I instead connect my black pipe from the stove up and then place the support box so it is all level and then connect the support box? obviously I will disconnect the black pipe before install the support box to have room there...
 
No, do it by the book. With the stove in proper place, use a plumb bob to locate the center of the flue outlet. Then set the support box. Install the class A pipe and flashing next, then storm collar. The connector is the final part.
 
I like to place the stove a couple inches further out than required for minimum clearances. Besides the added peace of mind it gives you a little wiggle room for getting the connector pipe just perfect.
 
Do the break-in fires as recommended. Then it should be fine after the first couple hot fires in the stove have baked the paint and it stops smelling. The top of the 17VL is convective. It has an air space between it and the actual stove top. This means that you will have to put the thermo on the front face of the stove.
 
Status
Not open for further replies.