
Countryside Baby Magnum Feeding too fast
- Thread starter brown352
- Start date
-
Active since 1995, Hearth.com is THE place on the internet for free information and advice about wood stoves, pellet stoves and other energy saving equipment.
We strive to provide opinions, articles, discussions and history related to Hearth Products and in a more general sense, energy issues.
We promote the EFFICIENT, RESPONSIBLE, CLEAN and SAFE use of all fuels, whether renewable or fossil. -
Super Cedar firestarters 30% discount Use code Hearth2024 Click here
You are using an out of date browser. It may not display this or other websites correctly.
You should upgrade or use an alternative browser.
You should upgrade or use an alternative browser.
- Status
- Not open for further replies.
Bioburner
Moderator
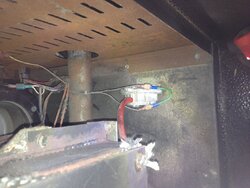
That's the vacuum switch that's supposed to shut things down if low vacuum making poor fire etc. Looks like this stove has had problems for some time.
Bioburner
Moderator
Bioburner
Moderator
Could be the exhaust fan failing. Age of the stove not that it would matter as AES had Chinese make a bunch of them and heard they were scraping them for parts as they had high failure rate.
You don't fix low vacuum you fix the air flow.
It is the air flow that creates the proper vacuum and causes that switch to close and fuel to flow. Any damper needs to be in its track and close to properly adjusted.
As for cleaning the following is one of several methods:
You attach a good strong leaf blower (suction side to the vent, make sure it isn't pointed at any thing you don't want covered in ash) make certain it will stay attached, turn it on then go inside and thump on the fire box rear walls.
That leaf blower will suck anything inside the stove out provided you loosen it up, this includes caramels that were hidden in the air intake by the resident rodent population, various small animals, acorns stored for the winter, insulation used as nesting material, and other stuff.
Then do what Don suggested and replace that combustion blower.
AES products are known to have air flow issues, the previous posters have repeatedly hit on air flow being the problem.
On the off chance that your controller is really wonky (could be, but likely not the case) time the auger and compare it to the stoves timing information for that heat range.
Where would I find this information?On the off chance that your controller is really wonky (could be but likely not the case) time the auger and compare it to the stoves timing information for that heat range.
We've had a US stove pellet stove as our only heat source for 10+ years in all that time only replaced the blower motor.
We bought this one as a secondary heat source to keep the house warmer, and up until now, it was fine, so I'm sorry if I sound like an idiot, but this thing has us baffled.
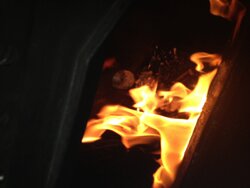
rafmt, I can't get it to burn long enough to get ash now. It USED to throw up sparks when it was burning. We ran a hose through the U area, and was able to move it back and forth. Now, if it lights and burns, it just blackens the pellets and burns out.
What kind of hose did you run thru the top of the upside down U ? Did you drill the hole for the cleaning upgrade?
He ran a thin hose with a small snake that he uses at work. Going to take it outside tomorrow and bring home an air gun, turn it on it's side if need be. We don't have a leaf blower, did use the shop vac on the exhaust a couple of days ago when cleaning. Did not drill the hole. Unsure what size hole to drill. We had a new control panel, swapped it out, didn't make a difference.
We can't upgrade the exhaust blower right now, it will have to wait a few weeks.
We can't upgrade the exhaust blower right now, it will have to wait a few weeks.
rafmt
Member
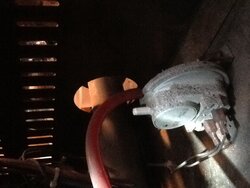
You have a serious leak somewhere. Here's the steps I would do to trouble shoot this one. Obviously either your vacumn switch is bad or either jumpered due to a leak in your stove somewhere. That issue can be tackled after you get the stove burning properly. I would start with the ash pan gasket. Do the dollar bill test around the opening. Not just in a few spots but over the complete gasket. I had to replace mine. I even had to put two layers of gasket on one spot where there was still a leak. Then check the gasket in the door. There is also a gasket on the combustion motor. This is on the same side as your pressure switch.You will see a square plate. Remove the 4 nuts that hold it on. Look at gasket. If it is all there and not missing it is probably sealing properly. Look inside at the impeller blade. Make sure it is spinning free. This also lets you look at the condition of the exhaust. When I first got my stove before I did the modification( ran just like yours) inside that cavity was covered in a black shiny hard covering. Creosote I guess. I have been burning it for 4 months now and inside that area now is clean with a slight cover of soot. Close that back up. Now let's get to the burn pot. There are way to many holes in them. They need to be welded or covered with metal tape. There is a thread showing covering holes in burn pot. I also covered the holes on the side of the burn pot. There are a few more things to do to fine tune the stove but this is a good start. I never have any ash or unburnt pellets above the level of my igniter. The pile you have in your stove is way to much and the flame is awful. A member of this forum wrote " I can burn dirt thru this stove " I was pretty skeptical when I read that. After 4 months of flawless operation. I am starting to think the same. And I paid $200 bucks for it. These steps should get you burning better
My last deep cleaning, I took the stove outside and turned it on it's side...and upside down. Boy did I get some ash! I also did the hole in the horseshoe trick and that helped a lot but after I turned the unit upside down and sideways, the improvement was very noticeable! I still have the original fans. I plan to upgrade the blower in the future as well as the burn pot. Mine throws spark and I have a very active flame. It's been two months since the deep clean.It took me twice cleaning the horseshoe area of this stove. I finally tipped the stove on its side and tapped on the area,while using air and a wire. Mine was very plugged with soot. Carefully check all gaskets for leaks. When pellets drop into your burn pot do sparks fly up? Do you have any up burnt pellets in your burn pot that you have to empty out after running it?
I agree with Scott. This is a poorly designed stove but that said, I can't complain because it throws a lot of heat (300+ air coming from the heat exchanger on setting 4) and maybe because it is NOT a Chinese built unit, it's been trouble free so far. 5 years and counting.
I would never, ever, call AES for anything. The standard answer to all problems is poor fuel or not enough air in the house. They don't take any responsibility for the design of the stove. It's always the customer's fault.
I also did the burn pot mod. Welded up a third of the holes, all at the top of the pot. Wow! I go days between emptying the burn pot and I still have half of my air wash open. Glass stays clean for days. My next mod is to redo the flanges on the burn pot so it is sealed to the frame. The open corners allow a lot of air through. I also see the the flanges are no longer flat. I'll hammer them down before welding up the corners.You have a serious leak somewhere. Here's the steps I would do to trouble shoot this one. Obviously either your vacumn switch is bad or either jumpered due to a leak in your stove somewhere. That issue can be tackled after you get the stove burning properly. I would start with the ash pan gasket. Do the dollar bill test around the opening. Not just in a few spots but over the complete gasket. I had to replace mine. I even had to put two layers of gasket on one spot where there was still a leak. Then check the gasket in the door. There is also a gasket on the combustion motor. This is on the same side as your pressure switch.You will see a square plate. Remove the 4 nuts that hold it on. Look at gasket. If it is all there and not missing it is probably sealing properly. Look inside at the impeller blade. Make sure it is spinning free. This also lets you look at the condition of the exhaust. When I first got my stove before I did the modification( ran just like yours) inside that cavity was covered in a black shiny hard covering. Creosote I guess. I have been burning it for 4 months now and inside that area now is clean with a slight cover of soot. Close that back up. Now let's get to the burn pot. There are way to many holes in them. They need to be welded or covered with metal tape. There is a thread showing covering holes in burn pot. I also covered the holes on the side of the burn pot. There are a few more things to do to fine tune the stove but this is a good start. I never have any ash or unburnt pellets above the level of my igniter. The pile you have in your stove is way to much and the flame is awful. A member of this forum wrote " I can burn dirt thru this stove " I was pretty skeptical when I read that. After 4 months of flawless operation. I am starting to think the same. And I paid $200 bucks for it. These steps should get you burning better
Bioburner
Moderator

rafmt
Member
Last nite I found a spot on my stove that was plugged that I didn't know about. Where the heat exchanger tubes go thru the horse shoe in the upper area of the burn chamber. I pulled the scraper rod out and was able to see where they pass thru. All mine where plugged. I took a hacksaw blade and was able to clean around all the lower set of tubes and poked and prodded the best I could on the upper set. Looks like there is about an eighth of an inch around every heat exchanger tube.i got most of them cleaned out. Seems to help....
rafmt
Member
Did you order gasket from AES, or pick it up somewhere else?
I got the gasket from our local Home Depot. It had a sticky tape on one side.
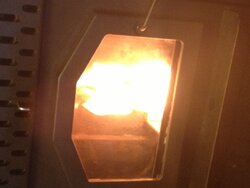
He took the airgun to it. The U was fairly clean from the other cleanings he did. BUT, the air intake had a bunch of crap come out of it, we had already gotten some out of it, but taking the air gun to it really blew it out. He put muffler tape on the top two rows, but will have to weld or use the putty, the tape isn't holding very well. The blower is actually kicking down a notch now instead of blowing at the same speed constantly. Sparks are flying again, the pellets aren't building up in the pot and I think it's actually burning better than it has since we bought it. Thank you all for your advice and help.
Attachments
Bioburner
Moderator
Bioburner
Moderator
I wouldn't leave it that way for long. That is a safety.we didn't touch the switch
Bioburner
Moderator
If there is two spades to hook to no problem as its not polarity specific. Make sure the hose is clear and drawing some vacuum.
rafmt
Member
- Status
- Not open for further replies.
Similar threads
- Replies
- 6
- Views
- 2K
- Replies
- 6
- Views
- 654
- Replies
- 2
- Views
- 666
- Replies
- 7
- Views
- 1K