New hearth and Jotul Oslo

  • Active since 1995, Hearth.com is THE place on the internet for free information and advice about wood stoves, pellet stoves and other energy saving equipment.

    We strive to provide opinions, articles, discussions and history related to Hearth Products and in a more general sense, energy issues.

    We promote the EFFICIENT, RESPONSIBLE, CLEAN and SAFE use of all fuels, whether renewable or fossil.
Status
Not open for further replies.

hfd45178

Member
Sep 25, 2014
12
Dutchess County, NY
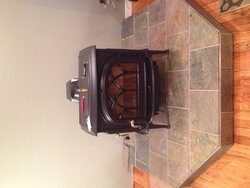
I Ordered a new blue/black f500 Oslo last week and acquired the building permit to get things rolling, so I figured as a wait for the stove to come in I would begin working on my hearth. This is my first wood stove and the first hearth I've built. The hearth consists of a 2x4 base, 3/4 plywood, 3/4 cement board and is topped with 1/2" 12x12 slate tiles. The only thing I have left is to cut and lay the top tiles, the front and sides were finished today. Hopefully next week I can update with pics of the stove set in place. Plan is to go up the wall behind the stove with some sort of rock, but that won't be until next year sometime. Anyhow, here are some pics until the stove arrives.

image.jpg image.jpg image.jpg
 
Last edited by a moderator:
Beware that slate chips easily. Be careful dropping wood or tools on the stone. More brittle than most stones.
 
Off to a good start! Keep us posted.
 
Beware that slate chips easily. Be careful dropping wood or tools on the stone. More brittle than most stones.
Slate can also be quite flakey. Avoid the cheap big box stuff if so.
 
Folks often say slate chips and flakes . . . but honestly I think it depends on the quality of the stone and how it is installed . . . I have yet to see any slate on my hearth break, chip or flake.
 
I'm curious about all those shims you are using? What is the purpose?
 
I have been warned about the ease of chipping of the slate tile, however I think it will be ok as long as I'm careful, or so I hope. To late now anyway lol. The purpose of the shims was just to hold the slate evenly up off the hardwood floor for install. After the mortar set the shims were removed leaving an even 1/4" gap along the bottom.
 
Hearth looks great and you will love the oslo
 
A little update. Finally finished up the hearth and got the Oslo set in place today. That stove absolutely sucks to move. Tomorrow I will be installing the chimney and look forward to some wood heat finally.
 

Attachments

  • image.jpg
    image.jpg
    193.6 KB · Views: 238
That is a beautiful wood stove install. I will be installing an Oslo a year from now.
 
Looks great!
If you edit your phone pic in any way on your phone the pics will post normal view. iphone just edit like rotating 360* then save, android do the same but use the new edited pic the phone saved! Or only take pics to upload here with phone sideways.
 
a
A little update. Finally finished up the hearth and got the Oslo set in place today. That stove absolutely sucks to move. Tomorrow I will be installing the chimney and look forward to some wood heat finally.

A little late. Before you move these stoves remove all the weight you can. Front and side doors, grate, etc.

Looks great!! Like us, you will love the Oslo. Are you doing a straight chimney?
 
image.jpg Finished everything up today and lit the first break in fire. All seems good and actually went pretty smooth. I tried to edit the pics so hopefully they post straight. Chimney is 16.5' and didn't seem to have an issue with draft, atleast as of yet. Chimney goes up 24" and vents through the wall. Definetly wish I thought to remove some weight, but it could have been worst of we didn't have the power stair climber.
 

Attachments

  • image.jpg
    image.jpg
    212.3 KB · Views: 156
It looks really good. I love the colour of the slate with the background wall colour... If that isn't too much of a girl thing to say! ;em

Looks really clean and .. well... warm! Enjoy getting warmer with each break in fire!
 
What the hey.... I'm trimming mine out... 3 years after it was installed!
03abd4c1cea19e4e5ebcc0a6ff5c76d4.jpg
 
Last edited:
Nice looking hearths. I don't recall the hearth spec dimensions. But I left the front a little short to reduce how far it went into the room. It all worked out fine, with the side loading door I never open the front door. Even to clean the glass we just reach in the side. One small Oslo issue is the ash that gets trapped behind the front door.
 
Very nice install. You will love the stove.

On moving the stove a few inches this way or that, a trick I learned here was to put a square piece of sheet metal, like 6"x6", under each leg. It will slide on the sheet metal without too much trouble.
 
Status
Not open for further replies.