at a loss

  • Active since 1995, Hearth.com is THE place on the internet for free information and advice about wood stoves, pellet stoves and other energy saving equipment.

    We strive to provide opinions, articles, discussions and history related to Hearth Products and in a more general sense, energy issues.

    We promote the EFFICIENT, RESPONSIBLE, CLEAN and SAFE use of all fuels, whether renewable or fossil.
Status
Not open for further replies.

Dunit76

New Member
Sep 30, 2015
11
Ohio
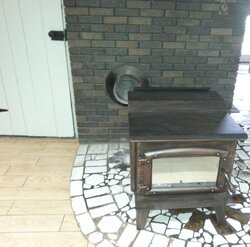
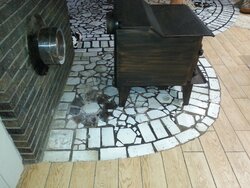
Hello guys I really could use some help with making stove to chimney connection. I bought a new wood burning stove that has a 6" rear flue in the center of the stove. The old stove that I am replacing had the rear flue all the way to the left. This presents the first challenge, in order to keep the stove nice and centered I need to offset it from the wall.

The next problem is that the old stove had an 8" flue. I am not sure of the chimney height but I can tell you it runs from the basement up through the first floor through the attic and out the roof.

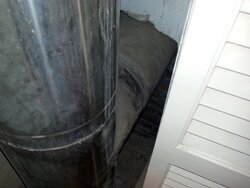
Here's where I am at a loss, the stove pipe is double wall stainless but I am not sure which brand or even how to tell which brand. I have read that certain double wall will not connect to other double wall. The configuration on the old stove ran back through the brick wall to a tee and the straight up. Ideally I would like to find a tee that connected to the 8" and came out to a 6 " but haven't seen one yet. This leads me to believe that I could use a 6" to 8" increaser at the tee to allow me to run 6" to the opening at the brick wall. I am not sure if a 6" to 8" double wall increaser is even produced.

I hope I haven't confused anyone with my questions but I really am at a loss.
 
Welcome. Sounds doable, but we will need to see what you are seeing. Post some pictures of the stove and chimney sides and of the pipe so that we can identify it. You might also check and see if there is a label on the chimney pipe. If so take a shot of that and post it here too.
 
Welcome. Sounds doable, but we will need to see what you are seeing. Post some pictures of the stove and chimney sides and of the pipe so that we can identify it. You might also check and see if there is a label on the chimney pipe. If so take a shot of that and post it here too.


Thank you for the quick reply... I was able to get some pictures hope that helps. Unfortunately it appears that the stove pipe had a label on it at one time but it is gone now.

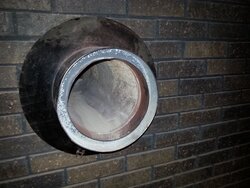
front veiw of new stove.jpg side view of existing flue and new stove.jpg backside of flue through brick wall downstairs.jpg existing flue through brick wall on stove side.jpg
 
Last edited by a moderator:
Thank you for the quick reply... I was able to get some pictures hope that helps. Unfortunately it appears that the stove pipe had a label on it at one time but it is gone now.
Attached Files:
Just reduce it inside but i would also have it inspected by a pro before going any further. Class a chimneys can fail and the should be fully inspected every few years. Another thing you have to watch is to make sure you have enough room on the hearth in front of the stove. In most cases in the us you need 16"
 
Thanks for the pics. I see the offset issue now. To keep things simple one option would be to rotate the stove 45 degrees so that all that is needed to connect the stove is the reducer a 45 elbow and a short connector.

Low rear flue connections like this are always a bit of an issue. Another more costly option would be to have the tee raised to say the 6 ft level so that a top exit flue connection could be made with more wiggle room. This might require changing the stove though.
 
  • Like
Reactions: bholler
Just reduce it inside but i would also have it inspected by a pro before going any further. Class a chimneys can fail and the should be fully inspected every few years. Another thing you have to watch is to make sure you have enough room on the hearth in front of the stove. In most cases in the us you need 16"
Thank you for the reply. I did take a picture measuring the distance from the back of the stove to the wall which is something that I want to reduce. From the picture I posted earlier the back clearance was about 21" to the flue. I was not aware of the clearance needed in the front thank you for pointing that out. I just moved the stove to where it would give me 16" of clearance in the front and its leaving me with 10.5 " from the wall to back of the flue on stove. This appears to make it more of a challenge to get the stove pipe to where it needs to be.
 
I just moved the stove to where it would give me 16" of clearance in the front and its leaving me with 10.5 " from the wall to back of the flue on stove.
Yeah that is pretty tight to get a reducer in and 2 elbows. Also what is behind that brick on the back wall if there is combustible materials behind it you have to worry about that clearance as well
 
Thanks for the pics. I see the offset issue now. To keep things simple one option would be to rotate the stove 45 degrees so that all that is needed to connect the stove is the reducer a 45 elbow and a short connector.

Low rear flue connections like this are always a bit of an issue. Another more costly option would be to have the tee raised to say the 6 ft level so that a top exit flue connection could be made with more wiggle room. This might require changing the stove though.
That is an interesting option never thought about changing the angle of the stove. Do you know if they make a 8" tee that would connect to the existing stove pipe and that has a 6" opening from the tee? I was hoping that this would give me more wiggle room as well. Maybe a double wall slip joint from the existing tee that would allow me to attach the reducer and run 6 " through the wall giving me more wiggle room.
 
Yeah that is pretty tight to get a reducer in and 2 elbows. Also what is behind that brick on the back wall if there is combustible materials behind it you have to worry about that clearance as well
the actual stove pipe is located in a double door closet on the other side. There is nothing in that closet think it was mainly built to hide the stove pipe.
 
That is an interesting option never thought about changing the angle of the stove. Do you know if they make a 8" tee that would connect to the existing stove pipe and that has a 6" opening from the tee? I was hoping that this would give me more wiggle room as well. Maybe a double wall slip joint from the existing tee that would allow me to attach the reducer and run 6 " through the wall giving me more wiggle room.
you need to find out what brand pipe it is untill you do that you cant change the chimney at all. Also just a small point. It is chimney pipe not stove pipe. Stove pipe connects to the chimney
 
  • Like
Reactions: Dunit76
the actual stove pipe is located in a double door closet on the other side. There is nothing in that closet think it was mainly built to hide the stove pipe.
Ok but are there combustible materials behind that brick? if so you need to pay attention the the rear clearance as well as the pipe clearance to that rear wall as well.
 
Welcome to the forum Dunit76. It's hard to tell from your photos if the thimble in your wall and the flue collar on the rear of your stove are the same height. That is an important measurement since you can't make smoke flow downhill! As bholler mentioned it looks like offsetting the stove to center it will push the stove out too far on your hearth extension to meet the clearance requirement out front. Might be tricky getting something to match up with your current set up decor wise.
 
  • Like
Reactions: Dunit76
you need to find out what brand pipe it is untill you do that you cant change the chimney at all. Also just a small point. It is chimney pipe not stove pipe. Stove pipe connects to the chimney
Thanks for pointing this out. I looked for some sort of id on the chimney pipe found none. As for the combustibles on the other side of the wall there is nothing in that closet other than the chimney pipe.
 
As for the combustibles on the other side of the wall there is nothing in that closet other than the chimney pipe.
ok but is the closet combustible or is there framing behind that brick?
 
Welcome to the forum Dunit76. It's hard to tell from your photos if the thimble in your wall and the flue collar on the rear of your stove are the same height. That is an important measurement since you can't make smoke flow downhill! As bholler mentioned it looks like offsetting the stove to center it will push the stove out too far on your hearth extension to meet the clearance requirement out front. Might be tricky getting something to match up with your current set up decor wise.
Thank you, as for the wall thimble I don't believe there is one The 8" pipe just comes straight through the brick wall. I thought about putting one in since I think I seen one that is 8" on one side and 6" on the other.
ok but is the closet combustible or is there framing behind that brick?
there is the second floor framing that the chimney pipe goes through but as for the brick its just a brick wall. the closet is framed as well enclosed with combustible double bi fold doors
 
Welcome to the forum Dunit76. It's hard to tell from your photos if the thimble in your wall and the flue collar on the rear of your stove are the same height. That is an important measurement since you can't make smoke flow downhill! As bholler mentioned it looks like offsetting the stove to center it will push the stove out too far on your hearth extension to meet the clearance requirement out front. Might be tricky getting something to match up with your current set up decor wise.
it does appear that I do have about an 1 1/4 " difference where the pipe in the wall is lower than the stove
 
Here's how I would deal with it. I would open up the concrete/brick to gain some clearance. One, to raise up the chimney so it is barely higher than the stove. Second so you can rotate the chimney so it exits the wall at a 45 degree angle. You will fix a multiple of problems, the stove height issue, the space needed behind the stove for two elbows, the front hearth clearance issue. This is far less aggressive than rebuilding the wall with a higher exit point. The biggest change you would end up with is the need for a larger trim ring. Two guys could do this is about half a days work, so less costly than many other options.
 
  • Like
Reactions: Dunit76
Here's how I would deal with it. I would open up the concrete/brick to gain some clearance. One, to raise up the chimney so it is barely higher than the stove. Second so you can rotate the chimney so it exits the wall at a 45 degree angle. You will fix a multiple of problems, the stove height issue, the space needed behind the stove for two elbows, the front hearth clearance issue. This is far less aggressive than rebuilding the wall with a higher exit point. The biggest change you would end up with is the need for a larger trim ring. Two guys could do this is about half a days work, so less costly than many other options.
Thank you for the input I will definitely look into doing this. Thanks again :)
 
What is the material on the floor past the hearth? Is it wood or tile that looks like wood?
 
Status
Not open for further replies.