Fireview Install Photos

  • Active since 1995, Hearth.com is THE place on the internet for free information and advice about wood stoves, pellet stoves and other energy saving equipment.

    We strive to provide opinions, articles, discussions and history related to Hearth Products and in a more general sense, energy issues.

    We promote the EFFICIENT, RESPONSIBLE, CLEAN and SAFE use of all fuels, whether renewable or fossil.
Status
Not open for further replies.

Vic99

Minister of Fire
Dec 13, 2006
857
MA, Suburb of Lowell
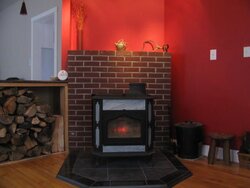
So here's my install. Did some room renovations this summer. Thinking of doing a light sponging technique to get a bit of black in the red wall above the mantel.

I think I may be overdrafting some. Like Jack in another thread, I get peek stove top temps sometimes in the 400s, mostly in the low 500s, but rarely do I hit 600s unless I use lots of pine. After 2-3 hours of climbing it comes down for about 1-2 hours. Then it will stay at 250-300 for 5-6 hours.

Burned 2 seasons with a Hearthstone Homestead. This is my first real season with the Fireview (also burned a bit in March-April last season). I really like the stove. Been trying different techniques that other Fireview owners suggested for Jack. Damped down to .25 or .5 or 1. I seem to get the most heat at .75-1 with CAT engaged, meaning that the stove front and stove top both read similar temps. Damping down to .25 or .5 lengthens the burn, and bumps stove top a bit, but cuts stove front temp by 40%. No surprise. Can't have both long burns and massive amounts of heat. However, I think I could do better.

I want to try to get the long overnight burns peaking and staying in the 600s like Dennis and Todd talk about. I'm on vacation this week, so I want to closely monitor one day to see if it is my wood or if I need a damper.

Wood: The wood I'm using now was seasoned in a holz stack for 1.5 years. It is really a mixture of most of the hard and softwoods you'd find in a New England forest. Probably should have covered it more than I did. Seems that when moisture seeps into the center it breeds mold and other fungi. Haven't tested with moisture meter, but it is obvious a fair amount of the wood is not ideal. Some pieces are perfect. I bought some kiln dried hardwood at a quickie mart (and had to shower to not feel dirty) and plan on burning that after I get a good bed of coals at ~250 degrees stove top.

Overdraft: My flue goes straight back (plumb) about 3 ft, then bends 90 degrees straight up for 28-30 feet. Only one gentle 30 degree twist in the straight up flue pipe. If the kiln dried wood (which I will test with a moisture meter) doesn't do it, I may have to install a damper in the straight back plumb part of the pipe.

Any other thoughts are welcome. Thanks.
 

Attachments

  • IMG_1478.jpg
    IMG_1478.jpg
    30.2 KB · Views: 743
Vic nice setup, looks real comfortable. What length wood is that?

zap
 
Vic., the installation looks great and I'm delighted that you're pleased with the stove. I've been really gettin' into the zen of operating the Classic in my studio, too.

!I love the color of the walls. If you have some sheetrock to paint up you might like the technique of "dragging" to distress the vibrancy of the walls. Play with glazes, a deepened variation of the red would be interesting. I dragged the walls in our living room with coarse steel wool and the effect is subtle and uninsistant. Takes more attention to detail than spongeing but the effect is more luxe.)
 
Very nice install. I might have to copy that wood box also. What kind of temps do you see when you leave it at #1 for whole burn? Keep playing with your air settings, you might need to burn at 1 or a smidge over.
 
Thanks everyone. There was originally a wall where the wood box is. It divided two 15x15 rooms. Took down the wall and now I have one 30 x15 room with a short countertop bar. Countertop was my buddy's idea. Wood storage was my idea. Box is about 3 feet high, 3 feet long, and 2 feet deep. Made of sugar maple for durability.

Bobbin: Really had to sell my wife hard on the red. She loves it now. Honestly it took SIX coats to lay properly on brand new sheet rock with a skim coat. Beige on the other walls took only 2 coats. May not sponge exactly, just an easy way to say I might use some faux-type technique. Don't want bold, just subtle. Red is bold enough. Tough to see in the photo, but I want it to tie into the small black and red light hanging over the bar.

Zap: Most of my splits are between 14 and 18 inches. Now that I have a Fireview, I'm aiming for 16-17 inches. Although I fell, buck and split about 1/2 of my wood, the other half comes from scrounging already bucked, so I get all kinds of weird lengths.

Todd: I must say I've only burned at 1 for the duration only a couple of times. Got mid to high 400s. Didn't measure the front, but I imagine it would be higher than that. Today I burned at about .75-.8. first fire from a 120 degree start, no coals peaked at 550 stovetop. Similar on front corner iron around window. Loaded 8 hrs later at 300. Not sure of peak. Loading again 7.5 hrs later (1 a.m.) at 300. Stove room temp stayed 72-73 today.

Going to try .75 again right now for overnight because it is going to be ~20 F and windy tonight and I'll be up in 7 hrs anyway to reload. May try kiln dried tomorrow (Tuesday) on good coals.

Point of interest. Just cleaned the CAT 2 days ago.
 
Nice looking install Vic.

I see a few pretty good sized splits in your woodbox. If I use large splits, I'll put one in rear bottom then fill with more small/medium sized splits. But that also is dependent upon what type of wood I use. The long burning hardwoods are best and these are what will get the longer burns. If we have any oak, that for sure will go in the bottom rear of the stove. At present, we're loading with either soft maple or elm in bottom front and then filling the rest with ash for overnight. During the daytime we burning 3 splits at a time (usually) and those are either soft maple or elm.

Keep experimenting.
 
Vic,

Nice install! The firewood box is a nice Idea..... something to look into.

I am a first year fireview burner. I have found larger splits ( I'm a hardwood burner) placed in the back of the stove give me the best coals in the morning for getting the stove up and burning in the morning.

I have a relatively short stove pipe leading to a tall chimney sitting ontop of a very windy mountain with no surrounding trees. I had some run-away fires with my last stove. I installed a flu damper with the fireview but have not needed it. I can really damp down the stove when I need to.

Really windy days with the stove at 0.75 and a full load of hardwood I can get peak surface temps of 600. Usually running temps (2-3 splits) 400-500 degrees.

The prolonged heat retention of the soapstone and long burns have converted me to a 24/7 burner. I never got close to this with my old stove and was constantly building fires. The house has never been so warm.

Rick D.
 
9:30 a.m. started the burn with kiln dried red oak and cherry that registered between 18-22% moisture. Mostly medium sized splits, some small. Filled firebox after taking some coals out and leaving reasonable amount of good coals. Loaded at stovetop temp 255.

After 15 minutes engaged CAT at 1, gradually crept down to 0.8. In 1 hr 20 minutes peaked at 520F stovetop. Started dropping for 30 minutes, so bumped air back up to 1 with CAT still on. Slowly started to climb over 2 hours and peaked at 505.

Now its 5 hours from that reload, still have air at 1, stovetop 445 (been slowly failing for an hour). Nearly whole time top corner window of iron frame has been in 400s. Cat glowed some at start, but mostly not noticeable.

Been between 15-20 F outside with constant light to mod wind. House temp has been VERY stable at 71-72 for stove room. High 60s and stable elsewhere. Continue to monitor. Will try again with my HH seasoned wood this afternoon into evening to compare.

Dennis: I do put biggest split in back bottom. Thanks.
 
Looks great. Don't sponge! The wall looks awesome as is (IMHO)
 
I think you are doing decently well as far as temps. I do indeed see some really big stuff in your woodbox, some of which I might even split into 3 sections on my stove, and my stove is a 3.0 CF firebox. I think if you are really striving for that 600 mark, try filling with some smaller pieces, loading north-south, and stuffing her completely full.

If you are able to get an overnight burn at all, I don't think you are in need of a pipe damper. I don't think this would drive your temps any higher.
 
I think you need to start out with more air when you engage Vic. Maybe try 1.25 and leave it there til she climbs up to 600 then turn it down, it may take 30-45 minutes.

When I got home from work today at 4pm, my stove was down to 200 with the air set for a long burn at .75, (about 11 hours). There were plenty of coals so I wanted to have a quick hot short burn til bed time reload. I raked the coals forward, placed 3 medium splits of Locust and 1 Elm, waited 15 minutes to engage, engaged with the air at 1.25 and left it. The stove climbed to 675 in 45 minutes so I turned it down to 1 to let her cruise, currently 5:45 stove top 550 and house temp rose 4 degrees. I should be down to a good coal bed around 8pm for a full load overnight burn.
 
Very cool, Todd. I'll try that Wednesday or Thursday when I can properly watch it.

Currently burning my own wood to compare to the kiln dried. Seem to be doing alright, but it's only been 3 hours. I peaked at 530, now slowly going down. At 495 now. Front of stove is still giving decent heat with air at 0.8.

I wonder if part of my issue was waiting too long to clean the CAT.
 
When you cleaned the cat was there a lot of fly ash in it? I get some fly ash on the inside fire box side of the cat especially when I burn Black Locust (must have high ash content with that thick bark). I can tell when it's time to clean because the draft goes down and it seems to take more and more air to keep it up to temp. Usually I clean the cat about every cord of wood burned. Usually just brush it off with a paint brush or take it outside and blow it out with some of my own hot air.
 
Status
Not open for further replies.