Liner self-install specifics, need a little newby help...

  • Active since 1995, Hearth.com is THE place on the internet for free information and advice about wood stoves, pellet stoves and other energy saving equipment.

    We strive to provide opinions, articles, discussions and history related to Hearth Products and in a more general sense, energy issues.

    We promote the EFFICIENT, RESPONSIBLE, CLEAN and SAFE use of all fuels, whether renewable or fossil.
Status
Not open for further replies.

tickbitty

Minister of Fire
Feb 21, 2008
1,567
VA
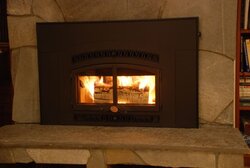
The handyman friend who will be installing our insert has not done this kind of thing before, but he's handier than I am and has tools etc. We have just looked over all the components.

The liner kit says to install per manufacturers specs, though it didn't seem to come with any. - will call them tomorrow because they are not open today.

Couple particular questions maybe someone can help with:

The collar/adapter that will connect to the liner and go into the stove - looks like it will need a notch cut out where the damper comes through, and the inside of the stove collar has one stop on one side to keep the adapter from going in too far. Does the whole thing get cemented in there with stove cement to seal it in there solid or should it sit looser?

Where the liner attaches to that same collar, is that done with screws, and does it need cement or sealant too? Assuming that attachment is done last.

At the top of the chimney, we have a flat plate that will sit on the chimney and the liner attaches to the inside of that, near the cap. The top of my chimney is not totally flat as it's got cement on it. Should he gunk up the bottom with a whole lot of silicone and then use some screws too? Is there something else that we should keep in mind when sealing that plate on there?

It appears that our continuous damper has bricks right on top of it and when he cuts the damper to get the liner through, a couple of the bricks will have to be removed to make room. Is that OK? We will install the little plate about the fireplace not being suitable for regular fires, yada yada.
 
Does your chimney have clay tile sticking out of the top? We usually have a tile to seal the plate to, if not, bend the plate to match the surface and seal with silicone. Removing some fire bricks around the damper won't be a problem. Hope it goes well
 
Couple particular questions maybe someone can help with:

The collar/adapter that will connect to the liner and go into the stove - looks like it will need a notch cut out where the damper comes through, and the inside of the stove collar has one stop on one side to keep the adapter from going in too far. Does the whole thing get cemented in there with stove cement to seal it in there solid or should it sit looser?

What insert are you installing? Regency & Hampton inserts have 3 small "L" brackets that get attached to the appliance adapter & the top of the unit.
Some of the Jotul units have a pin-type mechanism to secure the adapter.
You can seal it with stove gasket if you'd like, but you don't have to. It won't leak smoke out, it'll draw air in

Where the liner attaches to that same collar, is that done with screws, and does it need cement or sealant too? Assuming that attachment is done last.

Stainless Steel Zip Screws or rivets will work, & a sealant is not required.
The last attachment will be the adapter to the unit.
Attach the adapter to the liner BEFORE that.

At the top of the chimney, we have a flat plate that will sit on the chimney and the liner attaches to the inside of that, near the cap. The top of my chimney is not totally flat as it's got cement on it. Should he gunk up the bottom with a whole lot of silicone and then use some screws too? Is there something else that we should keep in mind when sealing that plate on there?

You don't have a flue tile exiting the mudcap?
If you don't, I'd use RTV to seal the plate & tapcons to anchor it.

It appears that our continuous damper has bricks right on top of it and when he cuts the damper to get the liner through, a couple of the bricks will have to be removed to make room. Is that OK? We will install the little plate about the fireplace not being suitable for regular fires, yada yada.

Removal of some of the bricks is generally OK unless there's a chance of some framing members in
the immediate area, but sometimes this can be hard to deduce...
 
webby3650 said:
Does your chimney have clay tile sticking out of the top? We usually have a tile to seal the plate to, if not, bend the plate to match the surface and seal with silicone. Removing some fire bricks around the damper won't be a problem. Hope it goes well

Thank you for the reply:
No tile sticking out, in fact there's a layer of two bricks on top of the top tile. This is the top of the chimney, not exactly a flat surface!

1412xxg.jpg
 
DAKSY said:
Couple particular questions maybe someone can help with:

The collar/adapter that will connect to the liner and go into the stove - looks like it will need a notch cut out where the damper comes through, and the inside of the stove collar has one stop on one side to keep the adapter from going in too far. Does the whole thing get cemented in there with stove cement to seal it in there solid or should it sit looser?

What insert are you installing? Regency & Hampton inserts have 3 small "L" brackets that get attached to the appliance adapter & the top of the unit.
Some of the Jotul units have a pin-type mechanism to secure the adapter.
You can seal it with stove gasket if you'd like, but you don't have to. It won't leak smoke out, it'll draw air in

Where the liner attaches to that same collar, is that done with screws, and does it need cement or sealant too? Assuming that attachment is done last.

Stainless Steel Zip Screws or rivets will work, & a sealant is not required.
The last attachment will be the adapter to the unit.
Attach the adapter to the liner BEFORE that.

At the top of the chimney, we have a flat plate that will sit on the chimney and the liner attaches to the inside of that, near the cap. The top of my chimney is not totally flat as it's got cement on it. Should he gunk up the bottom with a whole lot of silicone and then use some screws too? Is there something else that we should keep in mind when sealing that plate on there?

You don't have a flue tile exiting the mudcap?
If you don't, I'd use RTV to seal the plate & tapcons to anchor it.

It appears that our continuous damper has bricks right on top of it and when he cuts the damper to get the liner through, a couple of the bricks will have to be removed to make room. Is that OK? We will install the little plate about the fireplace not being suitable for regular fires, yada yada.

Removal of some of the bricks is generally OK unless there's a chance of some framing members in
the immediate area, but sometimes this can be hard to deduce...

Thanks Daksy. I am installing a Lopi Republic 1750i. Maybe I can get a cell phone pic to attach in a minute...
So it just sits in there then? There doesn't seem to be any bracket except a stop on one side.

No tile exiting the top - see pic just above -- Will have to look up what RTV is but tapcons are screws yes? (sorry - not so familiar with the terminology)

Almost sure that there won't be framing members where the bricks come out - this house was built by the mason who lived in it in 1953 so I am pretty sure it will just be bricks, least I hope that's the case! Thanks for all the help. You are just great!
 
Looks like someone has added on to your chimney in the past, with some simple sheet metal tools you can bend that top plate to match the crown of your chimney, then use RTV silicone to seal it.
 
Pics of top of insert: sorry, these are awful, cell phone won't do much in the way of closeups.

14tr37s.jpg
2yuk8x3.jpg


s5xm2r.jpg


First pic on top is an attempt to show how the damper arm comes in pretty far up the collar
Second pic on top shows the collar I will be inserting and attaching the liner to.

Third pic is just another image showing the damper and the hole, the stop on the lower side of the pic is the only one, it is at the bottom of the insert opening and is about 1/2" or more lower than the damper arm is.
 
webby3650 said:
Looks like someone has added on to your chimney in the past, with some simple sheet metal tools you can bend that top plate to match the crown of your chimney, then use RTV silicone to seal it.
Thank you, I hope that will work!
Not sure about the chimney, here's the "whole" thing (with cap that will be removed) and it all looks like it was done at once. Got a little spalling on the exterior that might need to be dealt with soon. The tree in the background is a giant dying maple that will probably be next yrs firewood.

11rvw3c.jpg
 
Maybe when the mason was building it he was going for the old English look, not going by code, this is why it is very important to do a good inspection of the fireplace while doing the install. When you remove the firebrick, take a good look for wood framing in there, you should see none. Some masons have their own ideas and don't bother looking up codes. I think there was a pic on here recently of a house fire that was caused by exposed framework in the fireplace.
 
Yikes! There probably wasn't much in the way of code in 1953. Yes, thanks and we will check but I have had cameras up and down it and see only bricks and tiles, the tile is in great shape and the bricks are OK but not great, occasional cracked ones in the firebox/grate. We are trying to do everything we can to make this as safe as possible which is why we are doing a full insulated liner on an interior chimney - the professional installers around here who wanted to charge $1500 to do it said that an insulated liner was a waste of money etc but we figured better safe than sorry and spent a bit more on the liner but that leaves us with our handyman to figure the install out ourselves. With a bunch of help from you guys at hearth.com.
 
tickbitty said:
Yikes! There probably wasn't much in the way of code in 1953. Yes, thanks and we will check but I have had cameras up and down it and see only bricks and tiles, the tile is in great shape and the bricks are OK but not great, occasional cracked ones in the firebox/grate. We are trying to do everything we can to make this as safe as possible which is why we are doing a full insulated liner on an interior chimney - the professional installers around here who wanted to charge $1500 to do it said that an insulated liner was a waste of money etc but we figured better safe than sorry and spent a bit more on the liner but that leaves us with our handyman to figure the install out ourselves. With a bunch of help from you guys at hearth.com.
You might be surprised when some codes came along, these were ignored then and often still are. Cracked firebrick aren't going to be a concern for you, you are creating a new firebox by installing an insert. You want to make sure there is nothing flammable behind them, this is very unlikely by the way. I bet the installers that told you the insulation was a waste of money aren't sweeps as well are they? I love sweeping insulated liners! They come so clean, and have very little build up, good choice.
 
You're right, they are not sweeps. I didn't buy my stove from them because they first denied it existed though they supposedly carry that line but they only display a couple different lines... the dealer we got it from is an hour away but had it in stock, we were trying to get it in 2009 for the tax refund for that year, so now we have accomplished that and hopefully we;ll be burning wood in a week or so which can;t be too soon for me! It's getting cold down here (for VA that is)

Only one of the local pro sweep companies does installs and again it was upwards of $1500, the other large sweep company doesn't do installs and neither do any of the independent guys I have talked to. I have seen pleas on craigslist in Richmond (an hour west of me) looking for someone to install a woodstove, if any of the independent guys would do good safe installs they would probably make a killing.

You are right about the codes too I am sure, now that I think about it, I live a couple miles from Jamestown where they imposed such codes WAY back - in 1662!
"The 1662 Town Act specified that each county in Virginia was o construct a brick building measuring 20 by 40 feet at Jamestown. Existing frame structures were to be replaced with brick buildings, which would lend Jamestown a greater appearance of permanency and adhere to fire and building codes prevalent in English towns. Additionally, individuals who undertook construction themselves would be compensated by the government."
 
mellow said:
Wow, learned something new, I didn't think the new epa stoves used top dampers, thought it was all done by primary/secondary air controls. Looks like your having fun!

Lopi features a "bypass damper" on some models. When opened, this allows the smoke to bypass the baffle and go straight up the flue. This allows for smokeless restarts and for easy cleaning when sweeping. Once the load of wood is charred/engaged, you close the bypass damper and the secondaries really take off! The bypass stays close for the duration of a burn cycle.
 
Hi Mellow, and thanks Pagey. It's a fairly rudimentary thing... just a rectangular/square damper that has a loop you can barely see in the one image with the adaptor, where the insert will extend out. There's a tool that you use to move it in or out when the stove is hot. I would think that on the level below the damper, where the rectangular opening from the stove is, the creosote would end up piling up some when you sweep, though I guess much of it would fall in the hole. But I guess it helps with sweeping and also with starts, so you don't have to leave the door open when you are starting the stove.

My handyman is still doubting what I told him about how the liner attaches to the stove. The liner is attached to the adaptor with screws to clamp it on, and then the adaptor is just held into the stove collar by gravity I guess? He keeps asking me aren't we trying to get some kind of good seal. He's going to cut out my fireplace damper tomorrow and knock out a couple bricks that are there in the smoke shelf I guess right on the damper, and we will help him feed the liner down next weekend. I am itching to get burning!
 
Was it set up for that? Mine doesn't have any holes or anything for that and I don't really want to drill any inappropriate ones. Suppose I should call Lopi. Thanks for the hint!

(There was a baggie with some screws and three small L brackets but nothing says what it goes to. I was assuming it goes to the surround, which had to be ordered and we don't have yet. There were fiberglass strips for sealing the surround plate on as well, and the surround instructions do say something about brackets though they don't look in the illustration like the ones in the baggie. The only other thing in the baggie is the little plate to mount in the fireplace saying it will be non-functional.)
 
Well, realized I can't call Lopi... that's what they have dealers for. Will talk to mine tomorrow, but not sure they will have my answer, the woodstoves were a very small part of the store. We'll see. Gotta say, with that used Englander that I got, not only was it a great used stove for a great price, they provided as much product support as anyone could ever expect even on a new stove. It was probably an 8 or 10 yr old stove, too. Course I ended up learning that that stove would not work on our hearth, but if they had one that was a bit bigger than their only current insert model, I sure would have been interested!
(I bet some of the other stoves you recommended might have worked too but I ended up with such specific clearances etc that I kinda had to stick with models that had all the info/manuals and stuff available on the web - wanted to avoid bringing home yet another that didn't work!)
 
I doubt you will get anywhere with Lopi, the dealer will tell you how he does it, whoever said it just sits there and gravity holds it in is right, there might be other ways to do it but this way is fine. You would be surprised how well the liner seats, get the liner down and adapted to your stove, then give it a push down from the top, seal or screw down the top plate. After it's done I bet you can't pull that liner out of the top of the stove. I don't think Travis Ind. would want anyone to drill and tap the top of their stoves.
 
Thanks Webby. Will talk to dealer tomorrow. Realized when I went on to Lopi's website that there is no contact info on there at all!
Good to know that gravity works though! lol! When I went onto their website again I did discover that they have a bunch of videos I am checking out now. Haven't learned anything earth shattering yet but it is nice to see all that though. The guy does SIT on the open door frame and take his feet off the floor to show how strong the hinges are though... that was a bit shocking!
 
Tickbitty,

I just recently installed a lopi insert, and also wondered about the brackets. The "licensed" installer I used assured me that they were not necessary and once I helped him seat the adaptor in place I could see why.
Gravity totally will hold that piece in tight. Besides there was no room to install the brackets anyway. Since the adaptor fits in about 2" as I recall the little L brackets don't seem to add much besides holes in the adaptor and stove. I did need to cut a slight notch in the adaptor so the bypass lever would slide smoothly without touching. Without the front plate on you could see a bit of flame through the bypass slot when first burning. The installer said that would seal quickly and within 24 hours he was right. There was never any smoke. I also had to knock out fire bricks for the flex adaptor to fit right. I ended up using double wall pipe from the adaptor on up as it was similarly priced to insulated stove pipe.

Hope that helps.

By the way, it has been awesome, burning 24/7 for 4 weeks now and the oil furnace hasn't been on since!!
 

Attachments

  • DSC_9243.jpg
    DSC_9243.jpg
    30.9 KB · Views: 407
You screw the L brackets to the stove and then to the adaptor. These L brackets hold the liner in place for when you clean it, if your brush is tight or you have a bent in your pipe and you have to give it a good yank you will pull the liner right off the stove. I service and install the Travis line of stoves (lopi avalon and fireplace ext.) The holes in the top will not affect a thing since that is just a shield. We furnace cement the connection to the stove and the adaptor to the liner, just something I do for a good seal. I install the adaptor after the liner is installed so I don't bugger up the edge on the way down. Another tip is to tie a rope in a couple half hitches to the liner incase is gets stuck on the way down the guy on the bottom can give it alittle help.
 
THank you Skyline and woodhound! Skyline, that install looks toasty! Makes me warm just looking at it!

Woodhound, so you DO recommend drilling screws into the top? And cementing as well? Huh! Well, I will check with the dealer just the same. But it's interesting what different responses I am getting! Wow. Thank you guys for the input and I will update if I get any new info.
 
You can screw into the top and it won't hurt a thing on a lopi, like i said thats just a shield around the firebox. That's the way they tell us to do it per instructions on liners. That bag of L brackets and self tapping screws is all the stuff you need to install. Predrill the L brackets on the stove before install to make it easier once stove is in the hole. I cement it for a nice sealed connection, that's the way I was trained.
 
Status
Not open for further replies.