S
SeaSky
Guest
My observations presented here are a thank you for everyone's generosity and contributions to our collective experience--you get quite an education on this site! I hope the following is helpful.
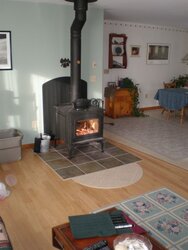
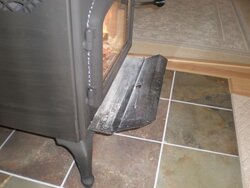
There has been occasionally some curiously about the decently priced Napoleon stoves and I wanted to give a report (I apologize for the length!) as to my impressions from a modestly experienced wood burner. As a side note: some might remember a concern I had about my hearth construction posted a few months ago, that the super hot radiant heat from the secondary burn was heating up the outer edges of my hearth and new wood floor. The hearth is 53 x 53 inches sq. I made a four inch removable heat shield that attaches to the ash shelf and added a hearth rug to reflect and dissipate the radiant heat on the flooring itself—worked like a charm for those who might have been curious. My original stove was a Lopi Parlor stove. Lopi makes a super stove and never, ever had any trouble with it…it was just too small for overnight burns. My home is 1200 sq ft and is well insulated. The stack is mostly straight up about 18-20 ft high. My wood is oak left to bake in sun and wind for at least two years—winter brings it into my wood shed I built last year.
To fix this burn-time problem I had intended to buy the bigger Endeavor but the price had just exploded in the past year or so as we all know. Fortunately I found a good stove shop in central Maine who offered other less expensive but viable alternatives. As a side note, I absolutely believe in supporting these small shops as any extra costs are returned ten times over in good advice and installation. The owner suggested the Napoleon 1400PL. It is an ordinary looking steel stove that has lots of convection chambers to heat air so it can circulate around the house. The size was perfect (about 2+ cu ft) as I wanted to load mostly N-S but sometimes E-W too. I never minded shoveling out ash nor did I want an “unauthorized” air leak, so I opted not to go with the ash draw option. I wanted also to have the option to cook on it as well so I liked the flat top.
As the price of the Napoleon is very reasonable, I looked it over very carefully as against the other higher end products. A difference that stood out was the thinner 3/16’ firebox walls on the side and bottom vs. the thicker walls of the Lopi. But the front of the Napoleon is quite thick and the top is immensely thick with double plating. However, the entire interior of the Napoleon is bricked up, right to the top, so no metal is directly exposed anyway. The welds look clean and neat. Also the air control strapping on the Nap appeared fairly light weight too. The thin strapping question I had regarding the air control I now believe prevents jamming from expansion with wildly changing temperature differentials. My stove installer sang praises for the stove as he lived with the 1900 model for many years. I should mention that he has been in the business for over 20 years and in my opinion is the most competent installer that I’ve met in this area of Maine. So the money I paid to both my stove shop and installer is really the cheapest insurance to get things right the first time. (I have a coveted “black book” of great, competent contractors whom I treat like gold…and I always pay them prompto!)
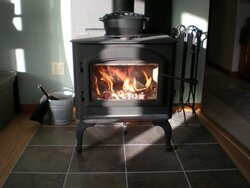
Now about the stove: functionally, this stove exceeded my expectations. It is the easiest dang thing to get burning (I am a “top down” fire-starter dude). It heats up fast and seemingly effortless. The secondaries kick on in no time and fill the box with an ungodly amount of heat that just pours out of the glass. My stack starts burning clean in minutes of start up, so my neighbors really don’t even know when I’m burning. With all that air going to secondary burn in the Nap, I had to learn to anticipate cutting it back before it starts to simulate the interior of the sun. Like any stove, once I got the knack of it, controlling the temperature was no problem. After it comes down from its high of about 750-800 deg or so stack probe temp, it cruises about 500-550 before the wood chemically breaks down. As we speak both the strove-top and probe stack are about 500 (assuming the cheapo stove top one is accurate!) But then all that red glowing wood radiates heats for hours and hours, albeit at lower temps, so I am very surprisingly getting an honest 12 hour burn—with a clean glass as well. That is, I am left with a stove-top of about 200 or so with generous embers to quickly get a fire going again. My home is still plenty warm in the morning too.
The convection chambers do a nice job of heating the air so it circulates around the house as my bedrooms at the other end are just a bit cooler, but still comfortable. The oft complained about ceramic baffles are not a problem in my opinion. They do indeed light-up like a glow-plug as another member mentioned. I just don’t bump it by overloading or when using my ash rake. I will however buy a replacement pair in case of a really stupid accident on my part. The bottom line, although I still occasionally get that "stove lust" for fancier looking higher end products, you get a lot of value in this product because it delivers performance. No doubt, its success has everything to do with the whole of the system; the stove, installer, stack/draft, home architecture, and nice dry wood. But it has been so easy running this beast that I am burning my usual four days week now with minimal fuss…and I just hate letting it get cold on Monday; however, to burn mid week, I need a bigger wood shed…oh, no…another project!
Finally, I am impressed with the generosity of the time provided by the moderators and members to help problem solve all the issues that are presented on this site, not to ignore the riotous humor that is (trust me) mightily enjoyed by all—even, I am sure, by we “poor victims!”
Eric
There has been occasionally some curiously about the decently priced Napoleon stoves and I wanted to give a report (I apologize for the length!) as to my impressions from a modestly experienced wood burner. As a side note: some might remember a concern I had about my hearth construction posted a few months ago, that the super hot radiant heat from the secondary burn was heating up the outer edges of my hearth and new wood floor. The hearth is 53 x 53 inches sq. I made a four inch removable heat shield that attaches to the ash shelf and added a hearth rug to reflect and dissipate the radiant heat on the flooring itself—worked like a charm for those who might have been curious. My original stove was a Lopi Parlor stove. Lopi makes a super stove and never, ever had any trouble with it…it was just too small for overnight burns. My home is 1200 sq ft and is well insulated. The stack is mostly straight up about 18-20 ft high. My wood is oak left to bake in sun and wind for at least two years—winter brings it into my wood shed I built last year.
To fix this burn-time problem I had intended to buy the bigger Endeavor but the price had just exploded in the past year or so as we all know. Fortunately I found a good stove shop in central Maine who offered other less expensive but viable alternatives. As a side note, I absolutely believe in supporting these small shops as any extra costs are returned ten times over in good advice and installation. The owner suggested the Napoleon 1400PL. It is an ordinary looking steel stove that has lots of convection chambers to heat air so it can circulate around the house. The size was perfect (about 2+ cu ft) as I wanted to load mostly N-S but sometimes E-W too. I never minded shoveling out ash nor did I want an “unauthorized” air leak, so I opted not to go with the ash draw option. I wanted also to have the option to cook on it as well so I liked the flat top.
As the price of the Napoleon is very reasonable, I looked it over very carefully as against the other higher end products. A difference that stood out was the thinner 3/16’ firebox walls on the side and bottom vs. the thicker walls of the Lopi. But the front of the Napoleon is quite thick and the top is immensely thick with double plating. However, the entire interior of the Napoleon is bricked up, right to the top, so no metal is directly exposed anyway. The welds look clean and neat. Also the air control strapping on the Nap appeared fairly light weight too. The thin strapping question I had regarding the air control I now believe prevents jamming from expansion with wildly changing temperature differentials. My stove installer sang praises for the stove as he lived with the 1900 model for many years. I should mention that he has been in the business for over 20 years and in my opinion is the most competent installer that I’ve met in this area of Maine. So the money I paid to both my stove shop and installer is really the cheapest insurance to get things right the first time. (I have a coveted “black book” of great, competent contractors whom I treat like gold…and I always pay them prompto!)
Now about the stove: functionally, this stove exceeded my expectations. It is the easiest dang thing to get burning (I am a “top down” fire-starter dude). It heats up fast and seemingly effortless. The secondaries kick on in no time and fill the box with an ungodly amount of heat that just pours out of the glass. My stack starts burning clean in minutes of start up, so my neighbors really don’t even know when I’m burning. With all that air going to secondary burn in the Nap, I had to learn to anticipate cutting it back before it starts to simulate the interior of the sun. Like any stove, once I got the knack of it, controlling the temperature was no problem. After it comes down from its high of about 750-800 deg or so stack probe temp, it cruises about 500-550 before the wood chemically breaks down. As we speak both the strove-top and probe stack are about 500 (assuming the cheapo stove top one is accurate!) But then all that red glowing wood radiates heats for hours and hours, albeit at lower temps, so I am very surprisingly getting an honest 12 hour burn—with a clean glass as well. That is, I am left with a stove-top of about 200 or so with generous embers to quickly get a fire going again. My home is still plenty warm in the morning too.
The convection chambers do a nice job of heating the air so it circulates around the house as my bedrooms at the other end are just a bit cooler, but still comfortable. The oft complained about ceramic baffles are not a problem in my opinion. They do indeed light-up like a glow-plug as another member mentioned. I just don’t bump it by overloading or when using my ash rake. I will however buy a replacement pair in case of a really stupid accident on my part. The bottom line, although I still occasionally get that "stove lust" for fancier looking higher end products, you get a lot of value in this product because it delivers performance. No doubt, its success has everything to do with the whole of the system; the stove, installer, stack/draft, home architecture, and nice dry wood. But it has been so easy running this beast that I am burning my usual four days week now with minimal fuss…and I just hate letting it get cold on Monday; however, to burn mid week, I need a bigger wood shed…oh, no…another project!
Finally, I am impressed with the generosity of the time provided by the moderators and members to help problem solve all the issues that are presented on this site, not to ignore the riotous humor that is (trust me) mightily enjoyed by all—even, I am sure, by we “poor victims!”
Eric