First of all, you shouldn't be using high-temp silicone ('gasket-maker') to secure your clean-out tee to the outlet pipe of the stove. You will have to remove that tee fairly often to run the brush up the pipe to clean the flue pipe, probably every ton or so of pellets. The proper thing to do (in your situation which is similar to mine, where my pellet stove is sitting on the raised apron on front of a fireplace and connects to a 4 inch flexible pipe that runs up the existing, lined flue) is to drill a hole through the clean-out tee about 1 inch in from the end, position the tee where you want it on the stove outlet, mark the hole, take the tee off and drill a pilot hole for a sheet metal screw long enough to go through the stove pipe. The tee should slip cleanly and maybe even a little snugly over that outlet pipe. If you are really keen or paranoid you could have a couple of screws, opposite one another, but that I think is silly in a horizontal connection like this. You use sticky-sided aluminum duct tape wrapped around the junction of the tee and the stove outlet to make sure it is airtight, just as you should do for the little cleanup cup at the bottom of the tee. The silicone should be used (and probably with aluminum tape) in all connections that will never be taken apart and you never want to come apart, particularly vertical runs.
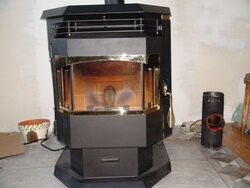
I bought this 'heilsa' (Quality Craft Ltd. QCPS-28000) from Canadian Tire (their cat. #64-2838-4) to replace a Jamestown J-1000 put into service in '94. It was getting a little finicky, and I was always a little annoyed by its small hopper and also the frequency that it needed to be cleaned because of limited ash holding capacity. However, the Jamestown taught me a lot about pellet stoves and particularly how they should be designed and set up.
For anyone not interested in the gory details I will give below, I will tell you up front that I made a big mistake in buying that heilsa. It is poorly designed and poorly made and there is a reason that it sells (well at CTC) for $1299 before tax, about $300 less than even the next cheapest pellet stove. Unless you really like a challenge, or are dumb enough (I guess I'm both) you should avoid this stove like the plague. In the end I turned this into a project (I still question that decision) but I do have a lot of tools and equipment and fairly good background to tackle this project. Most people either aren't interested or not capable of buying a new device, then repairing, redesigning and rejigging it.
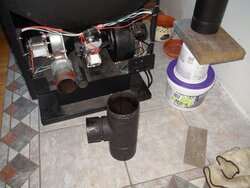
The first big problem I encountered was when I slipped the existing clean-out tee (a reducing tee with 4 inch top and bottom and 3 inch ID to the stove) over the stove outlet pipe. It was clearly a really sloppy fit and when I measured the pipe diameter I discovered this stove's first deficiency, namely the outlet pipe was undersized. It should have been 3 inch OD (76 mm, as stated in the rather crappy manual) but it was instead 74 mm (about 2 and seven-eights to 2 and fifteen-sixteenths). That may not sound like a lot but I smiled when I saw your photo of the disassembled tee and noticed how much silicone you had to slobber on the junction to get it tight. As I say above, the clean-out tee should have slid on fairly cleanly, or even a little snugly. I went around to stove suppliers to see if I could buy an adapter to fit that outlet pipe but of course there are none. At that point (taking leave of my senses) I went to a metal supplier, bought a section of thick-walled stainless pipe of 3 inch OD, disconnected the existing outlet pipe from the blower housing, cut the old outlet pipe back to the square pipe (and tidied it up) with an angle grinder and bronzed the new stainless pipe onto it. Put it together, slobbered silicone back over the connection to the blower housing, and Bob's your uncle.
Well, not quite. The stove has an electric heater that serves as most of the bottom of the fire pot and will start the pellets burning, but as soon as the flames started I knew I was in deep trouble. In pellet stove terminology you have to recognize and correct a "lazy" flame, which is what you see in fireplaces and conventional wood stoves. Pellet stoves should run more like a blacksmith's forge, the air being drawn over the burning pellets giving an aggressive, "sharp" flame with even hints of blue at the base of the flames. The heilsa's flame was down right lethargic. The pellets built up in the fire pot, started up the delivery shoot and I shut it down. Disconnected the clean-out tee, disconnected the blower assembly and saw that the impeller (the "fan" used in these rigs to move the air through the stove and force it up the flue) was too deep in the housing. I also saw that the motor was running ridiculously slowly (digital tach gave about 1,000 rpm) but I machined a little extension to move the impeller closer to the housing's mouth, and, of course that didn't help at all. The unit was essentially not moving air. The motor was running far too slowly to drive what is essentially a centrifugal air pump (pellet stoves I believe use only these impellers and never have either propeller or squirrel-cage fans in the exhaust blower). I ripped apart the old Jamestown, and jigged up its blower motor for the helisa, and that of course did move air. My first guess is that my heilsa (and I assume many or all others of this model or assembly run) had a 220 volt blower motor (shaded pole) and not a 110V.
Now in the Jamestown (I assume in any good pellet stove) you need some way to fine tune how much air is being drawn through the stove because too much air over the burning pellets isn't desirable. The Jamestown has a gas engine-like throttle butterfly in the intake pipe. For the heilsa I rigged up with a little machining a 1 inch brass gate valve to allow me to control the air flow. Now the stove burns properly but the lowest pellet delivery setting is for me far too high. I'm at this point using softwood pellets of average length about three quarters of an inch and the stove goes through a 40 pound bag in about 14 hours, maybe a bit longer. The circuit board doesn't appear to have any trimmer pots that will allow controlling the timer that regulates the pellet feed motor and so I will have to rip that apart and see whether I can jig the circuitry to increase the pulse intervals to the feed motor.
OOPS -> [cont'd]


")
