Everything Fisher

  • Active since 1995, Hearth.com is THE place on the internet for free information and advice about wood stoves, pellet stoves and other energy saving equipment.

    We strive to provide opinions, articles, discussions and history related to Hearth Products and in a more general sense, energy issues.

    We promote the EFFICIENT, RESPONSIBLE, CLEAN and SAFE use of all fuels, whether renewable or fossil.
Status
Not open for further replies.
UM, I mentioned a left hand door two posts above. They are not common, but they aren't rare either. Here's a little more rare early lefty with pipe cap dampers.

The Owners Manual is at Hearth Wiki on this website. Under Fisher Stoves. Make sure you get the right manual. There is an older one there for the stoves like the one you have pictured. It covers all the single door stoves as well as the double doors. The second manual is for the later Model III (arched top doors) Grandma and Grandpa only.
 

Attachments

  • older fisher conn..jpg
    older fisher conn..jpg
    7.3 KB · Views: 1,679
  • older fisher conn. 2.jpg
    older fisher conn. 2.jpg
    5.6 KB · Views: 1,578
Thanks. The owners manual that I downloaded earlier works. The Grandma that I have does not have arched top doors. The owners of the Mama wants $250 for it and 8 ft. of triple wall pipe. I am pretty sure that I am going to buy it tomorrow. My woodshop is 13' by 30' so I feel that the Mama will work. Thanks again for this info.
 
Coaly, I am having an issue with my Grandma. The lower hinge on the left side is worn and loose to the point the door will rock on the sealing surface. Is there a way to repair? I searched all over and haven't found an answer.
 
A dab of high temperature grease at the beginning of the season on all moving parts is the answer!

Once it's too late, not a big deal;

If the door is the later type with removable pin, pull the pin to see if the pin is also worn thinner than it's supposed to be. Replacing the pin (or all the pins) will take up some slack. If the hole is worn out of round causing the loose fit, drill the hole out larger to make it round again. Drill both, the door and the hinge on the stove. Be careful to center the hole where the center of the hole had been. Find a bolt of the larger diameter that will work in the new larger hole. Preferably with threads starting lower on the bolt, so you have a smooth shank long enough from under the head to the start of the threads. Cut it off, the same length as the old pins. Grind the head round to match a hinge pin. This is easier than finding a replacement rivet of the larger size for the new oversize hole. I grind them by hand and when the hex points are gone, chuck it in a hand drill, and run the drill slowly while forming the head to match the original pin on a bench grinder. There are the normal 3/8 rivets and larger size rivets on eBay found by searching "fisher stove" that will work without making your own from a bolt. Old hardware store somtimes have these solid rivets as well. I use an old bolt the correct diameter, and you can't tell the difference when I'm done. If you would need an oversize pin made, let me know what size drill bit you drilled both the door and hinge plate with. Not a problem to make you one.

If the doors are the early type with pressed in pins, you need to make a pin with a shoulder, being the correct size for the door, and the correct size for the new oversize hole in the hinge welded on the stove.

I have a lathe to turn a bolt into a stepped pin if need be. Most doors have the removable pins that are simply solid rivets that were made to be heated and the straight end formed by peening it round while red hot. If it's a collector type door, like a 76 Star with pressed pins that you don't want to chance removing and driving a new pin, you drill the bottom hinge plate only, and make a bushing for the hinge plate to fit the old pin.

Grease the hinges where they support the weight of the door, and grease the pin as well!
No more wear.

It's important to try to get grease on the handle shaft where it goes through the door as well. You don't want wear of the door hole causing the handle to be loose and leak around the shaft. Once this happens, I need the door to remove the handle by grinding off the welded washer inside on the handle. I drill the door hole back round again, and make a bushing to fit the new hole, and the handle shaft. Once together, a new washer is welded on the handle shaft. Not a big deal, but a lathe is required unless you can find a bushing locally the correct size.
 
Hi everyone. I hope I am not butting in here but I have a few questions about a newly acquired Grandma Bear. It is in excellent condition and is ready to be installed. We have bought the double insulated duravent and will be installing into a corner. The stove is a rear vent. The pipe will be going up through the second floor and directly through the roof. The only bend is the elbow attached to the back of the stove. Do we need a damper? We will be trying to get a screen to use occasionally. We will be installing a sheet metal heat shield to the entire corner of wall using one inch ceramic spacers. How high off the floor should it be raised for proper air circulation? One more question. The stove came with a tattered gasket attached to the door. We were going to replace it but after reading the prior posts I am not sure if we should. Should we just remove it completely and clean out the grooves?

Thanks for keeping up such a great forum.
 
kandk502 said:
Hi everyone. I hope I am not butting in here but I have a few questions about a newly acquired Grandma Bear. It is in excellent condition and is ready to be installed. We have bought the double insulated duravent and will be installing into a corner. The stove is a rear vent. The pipe will be going up through the second floor and directly through the roof. The only bend is the elbow attached to the back of the stove. Do we need a damper? We will be trying to get a screen to use occasionally. We will be installing a sheet metal heat shield to the entire corner of wall using one inch ceramic spacers. How high off the floor should it be raised for proper air circulation? One more question. The stove came with a tattered gasket attached to the door. We were going to replace it but after reading the prior posts I am not sure if we should. Should we just remove it completely and clean out the grooves?

Thanks for keeping up such a great forum.

OOOPs...forgot one thing. How much clearance to the walls will we have with the sheet metal heat shield?
 
Welcome to the Forums;
Yes, you need a damper in the flue. This thread covers operation of the damper with screen in place. No gasket is required, clean it off as well as possible. Sometimes they are added to make up for door hinge looseness, if they don't seal well, other factors could be the problem. A loose fit is easily cured with a THIN flat gasket material if necessary. It does make it quieter closing the doors. Most seal very well without.
The rear outlet was designed, and best used in a hearth front installation with the pipe going back through a hearth block off plate, and up the flue.
All unlisted stoves would have a clearance of 36 inches to a combustible. The manuals for your stove are in the Hearth Wiki section under Fisher Stoves. Read up on the Solid Fuel Codes (NFPA 211) for reduced clearances and shields. When the minimum pipe clearance isn't possible, double wall pipe is required. Heat shields can be added as well. Mounting location of spacers and minimum air space at the bottom of shields are also covered in the codes. Not really Fisher "only" related, so you may be better off searching the forum for clearance and codes for connecting pipes and chimneys.
 
coaly said:
Welcome to the Forums;
Yes, you need a damper in the flue. This thread covers operation of the damper with screen in place. No gasket is required, clean it off as well as possible. Sometimes they are added to make up for door hinge looseness, if they don't seal well, other factors could be the problem. A loose fit is easily cured with a THIN flat gasket material if necessary. It does make it quieter closing the doors. Most seal very well without.
The rear outlet was designed, and best used in a hearth front installation with the pipe going back through a hearth block off plate, and up the flue.
All unlisted stoves would have a clearance of 36 inches to a combustible. The manuals for your stove are in the Hearth Wiki section under Fisher Stoves. Read up on the Solid Fuel Codes (NFPA 211) for reduced clearances and shields. When the minimum pipe clearance isn't possible, double wall pipe is required. Heat shields can be added as well. Mounting location of spacers and minimum air space at the bottom of shields are also covered in the codes. Not really Fisher "only" related, so you may be better off searching the forum for clearance and codes for connecting pipes and chimneys.

Thanks so much for the help. I got all of the remaining gasket off the doors and they close beautifully. After reading NFPA 211 we decided to make a concrete hearth for the stove. We had originally planned on using one of the stove boards from Tractor Supply but I don't feel comfortable with it. We decided to skip the screen altogether. I dont think we would use it enough to justify a damper plus it would need a place to store when not in use. There is already so much other stuff being brought in to the room (wood, fireplace tools, etc) that the screen would be a hassle and alot of wasted wood. From the codes it sounds like we will have a clearance around a foot if we use sheet metal shield and spacers and double pipe. Still not sure on how high to put shield. The stove will go on a 3inch slab...I know the shield must be up at least an inch but should it clear the top of the hearth slab? I couldnt find an exact answer in the codes.
 
Yes, the shield needs to be above the slab or hearth surface. That would be the minimum required spacing at floor. This space at the bottom allows the heated air behind the shield to naturally rise from behind it, allowing the cooler air at floor level to go into the air space behind the shield. This creates a natural chimney effect keeping the wall behind it cool. Keep the cob webs clean in this airspace behind the shield for good air flow as well.
A damper in the stack is required with or without open door / screen burning. Otherwise most of the heat is going right up the chimney. Especially if you don't have a stove with a smoke shelf baffle inside. You will find, depending on the draft of the chimney, that the open hole in the damper center when closed is about right for a normal draft once the fire is established and the front intakes are cracked open for the night. Insulated chimneys draft very well, so you will probably find as soon as the fire is started, you can close it partially, and close it fully once the fire is fully engulfed. The colder outside, the stronger the draft, so you will find the stove burns harder naturally even with the damper fully closed on very cold nights. Not a bad thing. I only burn Fishers with the inside smoke shelf baffle, something not found on all models, and I use a stack damper with them as well. The owners manual instructs to control the burn with the air intake dampers, leaving the stack damper open. It only mentions the use of the damper during screen use. However, I have a Simpson Dura Vent Insulated straight up chimney that drafts very well, so closing the damper fully still drafts well enough to keep the stack temperatures from creating a creosote problem. All installations are different, so I assume the manuals are written to cover the worst case drafting scenario.

People add door gaskets to these stoves since most stove doors require them to seal. They never saw a stove door without one, so they think they are missing one.

The main reason for using the double door fireplace model is allowing you the view of the fire. That is the reason for the larger 8 inch chimney. If you only need occasional heat from it, you would be much better off with a single door stove and 6 inch chimney. Depending on the heating area, hopefully more than 2000 square feet, you have a lot of stove there for being that far south. A Papa Bear would probably drive you out. Depending on insulation, a Mama or even Baby might be just right for your heating needs. I heat 1848 s.f. in NE PA with half the stove you've got there. It stays below freezing normally for a week at a time. With abnormal cold it can stay below freezing for a month at a time. I'm comfortable with a 6 inch chimney. You may be able to roast peanuts in the room with that stove.
 
Thanks again. We can't wait to finish hooking the stove up. The temps have been very cold here (Cumberland Plateau), last week we were in single digits and teens. We have a 100 yr old house that is about 3600 sq foot with 11 foot ceilings. It is a two story with a very open floor plan. We were hoping to be able to take the strain off of the gas furnace...would be great to be able to shut that thing off! We have 16 acres of hardwood to fuel the beast and an able-bodied 16 yr old to help with the wood. If all goes correctly, next weekend we will be sitting in the diningroom feeling the heat. Next project will be hooking up the Home Enterprise cookstove in the kitchen. Its a gorgeous little cast iron stove in great shape. All we have to do is purchase the stove pipe and we are good. Simple set up there....straight up and out the lower roof on the first floor. With many oil lamps, a stock pile of food and wood heat we will be ready if we get a nasty ice storm.

Thanks again for your help and we will let you know if we can roast peanuts in here! I hope so...I am a Massachusetts transplant here in TN....I hate the cold!
 
So I have a Fisher in the home we bought in March - looks like a GrandMa Bear. I believe it is one of the original double door models from 1976 as it has the pine trees and stars on the straight doors. My question is what do the markings on the inside of the doors tell me. on the left hand side it has GM-006-L. The right hand side I cannot make out just yet.

I will replace it as it seems to create a lot of creosote and smoke- compared to a new Vermont Casting. But I may use it for my garage/shop.

Thanks
Pic below


Attachments

  • DSC_0526.jpg
    DSC_0526.jpg
    160.7 KB · Views: 1,447
Welcome to the forum,
I don't know what the 006 is, could be employee number or foundry number? Fisher had the doors cast by a number of foundries. Is the 006 between the GM & L or is it somewhere else on the door?
GM is for Grandma. L for Left door. The right door will be marked GM R. Anything else is foundry markings.
I'd guess yours to be a 1977. The doors are drilled completely through with rivet heads at the top. The early ones had pins pressed into the doors and the door hinges on top were not drilled through. 1976 had a 76 in the star. Yours is just after that, but before the stars were removed.
 
Yes it is between the GM and the L
Left doors is GM-006-L
Right door is GM-006-R

Wow Coaly you know your Fisher's - the house was built in 77 so it was probably brought in new. So what is Bob Fisher up to now? Is he still around?

thanks
 
He's "Makin' hay when the sun shines", literally. Collects tractors too. My old hobby!

Gotta be careful around me using the word "original".

The first single door stoves were all welded with three piece tops. Later, a bending brake was used to bend the tops from a single sheet of 5/16 steel plate. When the Fisher's decided to start making the double door stoves in 76, the "original" was made with 3 pieces since a larger bending brake was probably needed for a much wider piece of steel. Once the double door series went into production, they all had bent one piece tops. So here's my latest acquisition for my collection; A true "original" Grandpa Bear. Notice the 3 piece welded top, solid ball handles, (the patent was written to use gravity to keep the door handles tight) Baxter's 4 finned dampers, 76 "lift off" doors with pressed pins.

My sig line should be "My Grandpa's older than your Grandpa" :cheese:
 

Attachments

  • 76_Grandpa_3_piece_top.jpg
    76_Grandpa_3_piece_top.jpg
    48.3 KB · Views: 1,412
  • 76_Grandpa_3_piece_top_2.jpg
    76_Grandpa_3_piece_top_2.jpg
    45.3 KB · Views: 1,372
Hello everyone. We have installed a grandma bear and have just started using it. We are a little nervous about overloading the stove. Could anyone out there give us some recommendations?
 
As long as the chimney is clean, the clearances to combustibles are correct, and the installation is up to code;

1.) You should have a damper installed in the flue pipe. Close it to slow down the fire.

2.) By controlling the air going in the intake dampers, you control the fire. You can close them fully, putting the fire out. The size of the fuel load doesn't matter, it's how much air you give it to overheat it.

Did you find the owners manual for your stove in Hearth Wiki and read it first? This should answer any questions or fears.

Light it in the morning so you can be with it all day to know where to set the air dampers overnight. Just cracked usually is enough to burn all night without getting too hot, and you should have enough coals or glowing wood to rake around and reload in the morning.
 
Hi Coley and other Fisher experts,

Thank you so much for all the information you've posted. I read this thread and related links for a few hours, and I am still unsure about a couple of things:

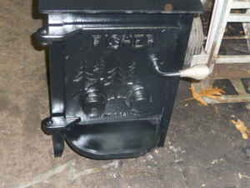
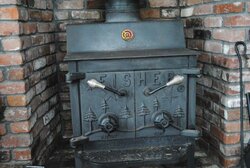
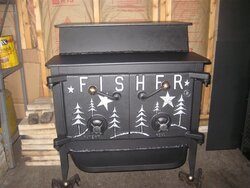
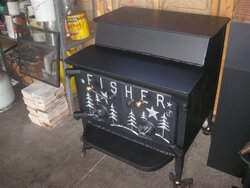
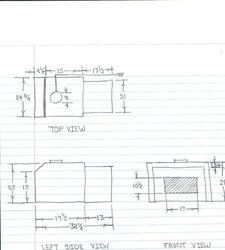
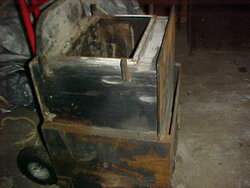
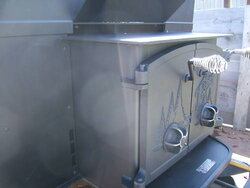
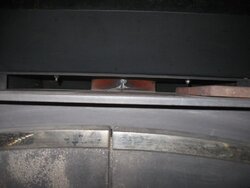
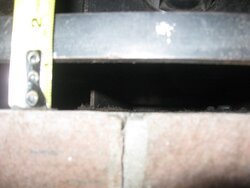
1) MODEL: the Fisher insert I have, which was already installed in the house's fire place, has an 8" flu, double doors, but it's 24 1/2" across the top plate (not 25 1/2 like Grandma Bear) and about 30" - 31" long (hard to measure very exactly without removing the insert - the inside dimension from back wall above the bricks to front wall inside door is 28 5/8", and the top plate sticks out 2" past that. If the back wall is 1/4" thick, that would make the stove's top plate just under 31" long). Counting in bricks, it has 4 lined in the back, and 6 lining each side wall. It does not have a fire grid, glass front, or more a modern door that opens in two stages to avoid back draft. Also, the top plate is flat all the way from front to back. The doors have the classic design with the brass-colored pine trees and tilted Fisher name, and also a frame with same color, about 1" wide. ( I don't know that it's actual brass, the color looks too yellow to be steel, and too silvery to be brass, and I suppose brass melts too easily for an insert door). Also, the doors are not square, they are arched at the top. The whole thing is in top condition, and has probably seen little use. Would you guys know what exact model this is?!? And where the manual is?

2) OPTIMIZING EFFICIENCY. Denver has pretty sunny winters where solar heat makes a lot of sense. I work in solar thermal, and I'm about to retrofit our typical combination solar thermal system in the house. This will take care of 70% of the total hot water and space heating for the house. However, for the remaining 30%, we do get bad winter storms where the solar is useless, and I have cords of wood in the yard (some cut, some on the trees, some hard, some soft). I want to use this stove as a backup. I do have a baseboard heating system as a secondary backup, but the boiler is probably less efficient than the insert, and is half dead anyhow! It sounds like this stove can work pretty good, up to 65% - 70% efficiency if done right. Also, efficiency is meaningful because Denver has a very real smog problem. I grew up with open-fire chimneys and don't have any know-how with wood stoves. I did find one helpful post saying to get the thing cranking to 550 with 3 full turns on both dampers, then close 2 turns , and when it gets hot 500F again, close it to 1/4 or 1/2 turn to run a long time at 350-450F. Is this the most efficient way to use this stove? Is there somekind of link somewhere that would carefully analyse how these insert run most efficient and give "insert for dummies" how-to instructions? To maximize efficiency, how much wood do you load in the insert, and how open should the dampers be?

We love this insert. It seems Fisher did to wood burning what Job's first Apples did to the IBM DOS logic: from 5% to 65% perfect over night!
 
Welcome to the forums!
First, you have an Insert. Fisher Fireplace Insert is the model name.

They are normally 24 3/4 across the top plate, however since many welding shops were licensed to fabricate and sell them, you will find small variances from one builder to another. Most of them are that exact measurement.

Doors were available in black cast iron as standard, brass plated or nickle plated was $50 more. Later brass plated doors with glass became the "Honey Bear Insert"

They only use the same size doors as Grandma Bear Fireplace Series stoves.

If you send your email address to [email protected], I'll send you the owners manual in pdf format. It gives operation instructions as well. 1/2 to 3/4 load of wood with the air dampers just cracked give you the longest burn. As you need more heat, give it more air. No one can give you the exact number of turns since all chimneys will draw differently.

Below are the measurements of the Insert. The only dimension missing is the angle of the top back corner. The back of the stove has a slope from 22" high down to 12" high over 4 1/2" to fit most fireplace hearths.
 

Attachments

  • Insert drawing.jpg
    Insert drawing.jpg
    25.1 KB · Views: 1,514
Those are some Looooong stoves. You could put a yule log in there!
It's deceiving, when you see one of those on a hearth and then open it up it's twice as deep as it looks! A friend of mine rented a house with one and refused to use it because she thought it looked like a person could fit in it.
 
They look even bigger when you move them.

Notice the three rectangular holes in the surround. A blower can be hung on each side, and this blows out across the front at top. 3/4 of the stove is hidded in the fireplace. Their size is deceiving.
 

Attachments

  • Insert Firebox 10-28-80.jpg
    Insert Firebox 10-28-80.jpg
    27.5 KB · Views: 1,602
  • Insert on it's back 2.jpg
    Insert on it's back 2.jpg
    25.1 KB · Views: 1,576
  • Insert Left Side 10-28-80.jpg
    Insert Left Side 10-28-80.jpg
    17.7 KB · Views: 1,554
Thank you Paul, this is indeed my insert! Attached is a front view picture. Thank you as well for the manual, which I've printed and read. I've got more questions now!

You mention this other model variation came with glass doors. I wasn't sure if you meant they would work on my exact model. If it is the case, I am interested in buying glass doors and selling the ones I have (in that order). How hard is it to find these? Also, can you confirm if my stove doors are nickel or brass, and if there is a big price difference between this and the glass version.

The stove top is 24 3/8" across, not 24 3/4". There is 1 1/4" of clearance from the ash fender to the fireplace hearth, and the insert stands a total of 20 1/8", not the 21" on your diagram. Does this affect anything?

There is a gap of 1 1/2" between the stove top and the lintel - I'm showing the detail of this in an attached picture. In this gap, you can clearly see the flu, which has a small crack in the front, where it was apparently poorly welded. Is the 1 1/2" gap good for heat circulation? I noticed it was covered with a metal strip on some pictures from you and on the manual's front-page diagram. Is the small flu crack an issue in terms of fumes / gases? I don't notice any leaks or fumes, and I have enough bad windows in the place that a little CO/CO2 is probably not a big issue. But we'll eventually get those windows changed to high-eff ones.

Many bricks are cracked and have gaps between them. From reading other posts, these bricks seem to be standard. I can go to a hardware store and find this size?

Finally, on the diagonal 6" metal strip coming out and up from the lintel, someone added a loose 11"-wide piece. What do you think it does?

I'm considering sticking a stirling engine fan on top of the stove front, to help heat distribution in the room. The heat currently drifts upstairs due to the close-by staircase, and leaves the basement pretty cool. I also noticed your picture with the 3 rectangular holes, and suggestions for fan. This sounds even better with 2/3 of the insert hidden inside the firebox, and cutting the holes wouldn't be difficult. How the heck would I hook up a fan into holes this small?

We bought this home through a foreclosure process, and bodies have been falling out of every closet... The chimney flu & chase both had issues which I fixed, no creosote in the flu, but I really don't know how to evaluate the insert installation.
 

Attachments

  • FI top frt gap.jpg
    FI top frt gap.jpg
    70.7 KB · Views: 1,537
  • FI whole.jpg
    FI whole.jpg
    104.9 KB · Views: 1,493
tickbitty said:
Those are some Looooong stoves. You could put a yule log in there!
It's deceiving, when you see one of those on a hearth and then open it up it's twice as deep as it looks! A friend of mine rented a house with one and refused to use it because she thought it looked like a person could fit in it.

Perhaps this is in fact the choice burial stove!
 
I've thought of that. My legs wouldn't have to be broken.

Thanks for posting your Insert pictures. The chain controlled damper makes it an early one. 1980 started the UL listing tag and lever type damper control.

I can't tell from the pics if the insert is raised 1 1/2 inches off the masonry floor of the hearth. This is where the circulating intake air comes from to convect around the back of the box and out the front air slot. Any small fan blowing in there forces the heat out at the top and makes a huge difference. Your older style is shown on page 11, post #222 in this thread. It's almost impossible to find the old style blower that forces air into the entire air space under the older inserts. Photos below are the "box fan" that was sold to mount on the front of newer face cover with rectangular holes on each side. They were variable speed controlled too.
The third photo in previous post above shows the slots cut into the surround face for the blower. They are on each side, so dual blowers could be used. In a power failure they convect fairly well naturally. Much more efficient with a blower.

You have a nickel plated door. They were $50 more when new for the option. The discoloration will clean up with metal polish for brass or nickel. I prefer Maas Metal Polish since it's good for ALL metals. I think the contaminents in the air burn onto the surface and make it look like it's been in a smokers home. (or it was) They get a golden residue cooked on. No doubt dust and smoke particles from itself when the doors are opened and closed ?

The angled sheet metal deflector is to prevent heat from rising under a combustible mantle.

Fire bricks are cheap, available at masonry supply stores around here. Maybe different in other parts of the country.

For glass Honey Bear doors you would need to find a Honey Bear Insert for sale. Different air intakes under the doors for an air wash over the glass. No intakes on glass doors. Different stove.
Finest Fishers Blower 1.jpgInsert w blower 3.jpg
 

Attachments

  • Finest Fishers Blower 2.jpg
    Finest Fishers Blower 2.jpg
    20.2 KB · Views: 332
Thanks again Paul for all the transfer of knowledge.

Attached are pictures of the lower front, and under the insert. It's just under 1 1/4" of clearance. I'm feeling pretty lazy about adding a 1/4" to reach the recommended 1 1/2". It's conveying pretty well as is. I wonder if I can find a way to fan air in there, and could work a little bit of sheet metal. I did remove all the dust build up, and that's just about doubled the clearance!

Had to stick a hand-held light in there, as the camera's flash wasn't getting under the insert - hence the yellowish picture. Notice the side hole cut in the metal, pretty far back on the right hand side. It's enabling air to go on the sides, between the back half of the insert and the old firebox. The same long rectangular hole exists ont he left-hand side as well, although not in the picture. This is a good thing, right?

Tonight I loaded the pig to about 1/5 capacity, with dirty old 2x4s & a larger log piece, tuned the front dampers down to under a 1/2 turn, and it was burning steady for 4 hours, warming up the house nicely. Just turned it off and it looks like like I'll have a few coals left over tomorrow.
 

Attachments

  • FI bottom.jpg
    FI bottom.jpg
    53.1 KB · Views: 1,362
  • FI under.jpg
    FI under.jpg
    70.7 KB · Views: 1,364
Status
Not open for further replies.