
Hello All,
I'd posted this as a reply in another topic and the moderator BeGreen asked me to post it as an original topic. I've added a bit more info.
I’ve been lurking for a while gathering information, making plans, finding new info, revising plans… ad infinitum it seemed at times. The time has finally come when it has all nearly reached a finish. The hearth is built, my VC Defiant I stove is in place, and the house is warmer! Thank you all for your valuable help.
My stove is a VC Defiant I with the original 1 piece fireback. I found it by a nationwide craigslist search using google to search within the craiglist.org domain. I found this stove for sale in Vermont for $250. I live in NE Ohio and VT isn't that much of a drive. I made the round trip in one day bringing the stove back in the back of my Honda CRV. With the legs removed it fit with an inch or so to spare.
Once back I found the fireback was cracked. Since I'm on a tight budget I decided to used it for this winter and seal the crack with stove mortar. I'll rebuild it in the summer of 2011.
Here is what I did for the installation…
I had problems gathering some firm information about the R values for my stove so I made the best estimation I could adding what I thought were decent safety margins. I did the same for wall clearances since the Defiant I manual wasn’t all that clear and I was unable to get a copy of the Installation and Planning Guide from VC.
Originally I planned for a hearth that would have given a wall clearance of 36â€. When I laid that out on the floor I found it blocked most of a doorway and a window… ok, so no go. Back to more research. My stove came with a rear shield, and with proper wall shielding I could reduce clearances to nearly 12â€. Ok, that could fit and for good measure I gave the stove 16†clearance from the wall placing it angled toward the room, 45 degrees to the walls. The hearth ended up at 68†x 68†with the corner extending into the room clipped at 45 degrees and 20†out from the stove front.
With planning finished I started construction by stripping the carpet from the floor and:
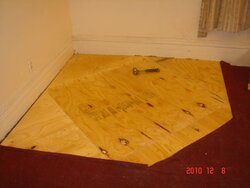
1. One layer of 3/4†exterior plywood nailed down with 1 1/2†galvanized roofing nails.
2. One layer of 1/2†Micore 300.
3. One piece of 24 ga aluminum which extended to within 4†of the edges.
4. Two layers of 1/2†Durock.
5. One layer of bright white 6†x 6†tile.
6. Four bricks of 8†x 8†x 4†size under the feet of the stove.
7. One sheet of 24 ga aluminum sized to fit under the stove, on top of the bricks.
8. Flex-bond between all layers.
9. 1†galvanized roofing nails used on all layers from the Micore 300 and up. I thought 1†would secure each layer to the one below, but help prevent heat transmission to lower layers.
When working on the placement of the layer pieces I’d first thought to cut a 4’ wide pieces, as long as would fit, then cut other pieces to fit the remaining space, rotating the layers so seams were not one on top of the other. I didn’t like this because I always ended up with a bunch of small pieces cut to fit the increasingly smaller gaps. Then I had an idea… what if I cut a 4’ x 4’ square of material and placed it in the center like a diamond with the points reaching out to the corners. wonderful! In a stroke of great fortune the hypotenuse of a right triangle with two 48†sides was 68â€, the exact length of the hearth sides! Now the seams wouldn’t lie one above the other… one layer with a 48†square diamond in the middle, then the next with four triangles with the points in the center. To make it easier to visualize, try to picture this: firstly cut one 4’ x 8’ sheet into two 4’ x 4’ pieces. One of these is placed in the center. Cut the remaining square into four triangles to fit the remaining corners of the hearth. Secondly cut a 4’ x 8’ sheet into two 4’ x 4’ squares, then cut each square into two triangles resulting in four triangles dimensioned 48†x 48†x 68â€. These were placed on the hearth with the 68†edge on the outside of the hearth and the points in the center.
I realize some of this is over engineering it a bit, but lacking in hard data I decided to make SWAGs that erred on the side of caution. I’ve read that an aluminum layer, while once required, is no longer, but I decide to include it anyway, terminating it well away from the edges to prevent any heat from making it to the edges of the hearth and it’s wood trim.
The stove sits on top of four bricks that are raised above the top of the tile by approximately 3 1/4â€, thereby lessening radiation gain some more. On top of the bricks, and beneath the stove, I placed a sheet of 24 ga aluminum as an additional heat reflector. I also used bright white tile to reflect as much heat as possible vice absorb it.
I have started placing Durock on the walls which will eventually extend 8’ up from the hearth surface. Eventually I’ll add tile to it as well, perhaps with a mosaic of Prometheus bound in chains with the great eagle feeding on his liver…
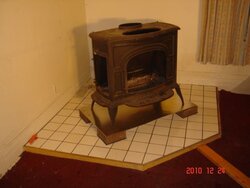
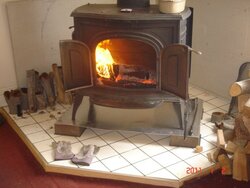
I’ve attached a photo of the nearly finished installation. The wood you see on the hearth is drying from the recent snows, it will be moved shortly. Nothing will be placed on the tile for the long term.
Stove pipe has a T at the bend with the cleanout cap facing out for easier cleaning.
Pic order:
1. Plywood.
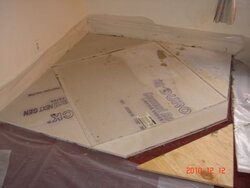
2. Durock on top of Micore 300 on top of plywood.
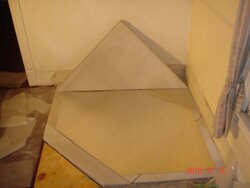
3. Aluminum on top of Durock.
4. Durock on top of Aluminum.
5. Stove in place.
6. Stove burning.
I’d be happy to hear your thoughts, comments, etc.
I'd posted this as a reply in another topic and the moderator BeGreen asked me to post it as an original topic. I've added a bit more info.
I’ve been lurking for a while gathering information, making plans, finding new info, revising plans… ad infinitum it seemed at times. The time has finally come when it has all nearly reached a finish. The hearth is built, my VC Defiant I stove is in place, and the house is warmer! Thank you all for your valuable help.
My stove is a VC Defiant I with the original 1 piece fireback. I found it by a nationwide craigslist search using google to search within the craiglist.org domain. I found this stove for sale in Vermont for $250. I live in NE Ohio and VT isn't that much of a drive. I made the round trip in one day bringing the stove back in the back of my Honda CRV. With the legs removed it fit with an inch or so to spare.
Once back I found the fireback was cracked. Since I'm on a tight budget I decided to used it for this winter and seal the crack with stove mortar. I'll rebuild it in the summer of 2011.
Here is what I did for the installation…
I had problems gathering some firm information about the R values for my stove so I made the best estimation I could adding what I thought were decent safety margins. I did the same for wall clearances since the Defiant I manual wasn’t all that clear and I was unable to get a copy of the Installation and Planning Guide from VC.
Originally I planned for a hearth that would have given a wall clearance of 36â€. When I laid that out on the floor I found it blocked most of a doorway and a window… ok, so no go. Back to more research. My stove came with a rear shield, and with proper wall shielding I could reduce clearances to nearly 12â€. Ok, that could fit and for good measure I gave the stove 16†clearance from the wall placing it angled toward the room, 45 degrees to the walls. The hearth ended up at 68†x 68†with the corner extending into the room clipped at 45 degrees and 20†out from the stove front.
With planning finished I started construction by stripping the carpet from the floor and:
1. One layer of 3/4†exterior plywood nailed down with 1 1/2†galvanized roofing nails.
2. One layer of 1/2†Micore 300.
3. One piece of 24 ga aluminum which extended to within 4†of the edges.
4. Two layers of 1/2†Durock.
5. One layer of bright white 6†x 6†tile.
6. Four bricks of 8†x 8†x 4†size under the feet of the stove.
7. One sheet of 24 ga aluminum sized to fit under the stove, on top of the bricks.
8. Flex-bond between all layers.
9. 1†galvanized roofing nails used on all layers from the Micore 300 and up. I thought 1†would secure each layer to the one below, but help prevent heat transmission to lower layers.
When working on the placement of the layer pieces I’d first thought to cut a 4’ wide pieces, as long as would fit, then cut other pieces to fit the remaining space, rotating the layers so seams were not one on top of the other. I didn’t like this because I always ended up with a bunch of small pieces cut to fit the increasingly smaller gaps. Then I had an idea… what if I cut a 4’ x 4’ square of material and placed it in the center like a diamond with the points reaching out to the corners. wonderful! In a stroke of great fortune the hypotenuse of a right triangle with two 48†sides was 68â€, the exact length of the hearth sides! Now the seams wouldn’t lie one above the other… one layer with a 48†square diamond in the middle, then the next with four triangles with the points in the center. To make it easier to visualize, try to picture this: firstly cut one 4’ x 8’ sheet into two 4’ x 4’ pieces. One of these is placed in the center. Cut the remaining square into four triangles to fit the remaining corners of the hearth. Secondly cut a 4’ x 8’ sheet into two 4’ x 4’ squares, then cut each square into two triangles resulting in four triangles dimensioned 48†x 48†x 68â€. These were placed on the hearth with the 68†edge on the outside of the hearth and the points in the center.
I realize some of this is over engineering it a bit, but lacking in hard data I decided to make SWAGs that erred on the side of caution. I’ve read that an aluminum layer, while once required, is no longer, but I decide to include it anyway, terminating it well away from the edges to prevent any heat from making it to the edges of the hearth and it’s wood trim.
The stove sits on top of four bricks that are raised above the top of the tile by approximately 3 1/4â€, thereby lessening radiation gain some more. On top of the bricks, and beneath the stove, I placed a sheet of 24 ga aluminum as an additional heat reflector. I also used bright white tile to reflect as much heat as possible vice absorb it.
I have started placing Durock on the walls which will eventually extend 8’ up from the hearth surface. Eventually I’ll add tile to it as well, perhaps with a mosaic of Prometheus bound in chains with the great eagle feeding on his liver…
I’ve attached a photo of the nearly finished installation. The wood you see on the hearth is drying from the recent snows, it will be moved shortly. Nothing will be placed on the tile for the long term.
Stove pipe has a T at the bend with the cleanout cap facing out for easier cleaning.
Pic order:
1. Plywood.
2. Durock on top of Micore 300 on top of plywood.
3. Aluminum on top of Durock.
4. Durock on top of Aluminum.
5. Stove in place.
6. Stove burning.
I’d be happy to hear your thoughts, comments, etc.

") Sorry double post, I was a little button happy!
Sorry double post, I was a little button happy!