
Another issue< Ughhhh
- Thread starter rakuz66
- Start date
-
Active since 1995, Hearth.com is THE place on the internet for free information and advice about wood stoves, pellet stoves and other energy saving equipment.
We strive to provide opinions, articles, discussions and history related to Hearth Products and in a more general sense, energy issues.
We promote the EFFICIENT, RESPONSIBLE, CLEAN and SAFE use of all fuels, whether renewable or fossil.
You are using an out of date browser. It may not display this or other websites correctly.
You should upgrade or use an alternative browser.
You should upgrade or use an alternative browser.
- Status
- Not open for further replies.
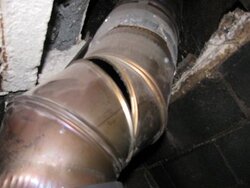
Bummer. It looks like there is too much stress on that elbow. The liner looks to be about 2-3" short and the elbow angle of entry to the stove needs to be steeper so that it falls into place without tension. If the stove can't go back a little further, can more slack be obtained up top? If not, there may need to be a short splice on the end of the elbow at the liner end?
Adjustable elbows don't deal with stress well. You will have to change something in the installation to prevent the next one from doing the same. You may have enough play in the liner to replace the elbow without having to take things apart if you can get back there OK.
One solution:
1. Disconnect that piece of junk adjustable elbow from the liner. That is why I never use the things. I have had them pop open in my hands just adjusting them.
2. Go up top and remove the cap and top plate.
3. Pull the liner up to pull it out of the elbow.
4. Attach a coupler and a piece of liner to the top of the liner.
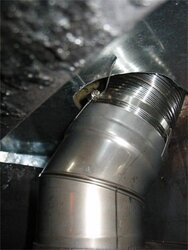
5. Go back down and install a fixed elbow like the one in the pic of my installation. Put a bead of furnace cement inside the female end of the elbow before installing it in the top of the stove.
6. Go back up and lower liner into the elbow and have whoever is at the bottom tighten the band clamp around the liner.
7. Cut the extension up top to the proper height and re-install the top plate and cap.
8. Go back down and put three screws through the flue collar and the bottom of the elbow.
9. Get the stove fixed or trash it.
1. Disconnect that piece of junk adjustable elbow from the liner. That is why I never use the things. I have had them pop open in my hands just adjusting them.
2. Go up top and remove the cap and top plate.
3. Pull the liner up to pull it out of the elbow.
4. Attach a coupler and a piece of liner to the top of the liner.
5. Go back down and install a fixed elbow like the one in the pic of my installation. Put a bead of furnace cement inside the female end of the elbow before installing it in the top of the stove.
6. Go back up and lower liner into the elbow and have whoever is at the bottom tighten the band clamp around the liner.
7. Cut the extension up top to the proper height and re-install the top plate and cap.
8. Go back down and put three screws through the flue collar and the bottom of the elbow.
9. Get the stove fixed or trash it.
Attachments
~*~Kathleen~*~ said:hmmph.
If you didn't put stress on it, it will be fine if the back portion is angled pretty much straight up.
Could he add the liner extension up top, then just drop the flex into a stove connector, and cut the extension to the proper length (if the flex liner could make the turn into the top of the stove?)BrotherBart said:One solution
4. Attach a coupler and a piece of liner to the top of the liner.
Hogwildz said:Get rid of the elbow and use a piece of flex liner in it's place.
Won't work Hog. Can't turn it down into the flue collar, it don't flex THAT much, and the broil foil a liner is made of won't take the screws.
Woody Stover said:Could he add the liner extension up top, then just drop the flex into a stove connector, and cut the extension to the proper length (if the flex liner could make the turn into the top of the stove?)BrotherBart said:One solution
4. Attach a coupler and a piece of liner to the top of the liner.
It won't make the turn and it is gonna smash up against the damper frame.
Went through this drill myself. In fact I have a piece of sheet metal between the liner and the frame to keep the edge of the frame from cutting the liner.
Hi BB, I am getting the stove fixed on Wednesday, so after the welding I need to fix this situation. I follow you, but have a question. What is the proper heighth for the SS liner at the top? Thanks for the step by step instructions!BrotherBart said:One solution:
1. Disconnect that piece of junk adjustable elbow from the liner. That is why I never use the things. I have had them pop open in my hands just adjusting them.
2. Go up top and remove the cap and top plate.
3. Pull the liner up to pull it out of the elbow.
4. Attach a coupler and a piece of liner to the top of the liner.
5. Go back down and install a fixed elbow like the one in the pic of my installation. Put a bead of furnace cement inside the female end of the elbow before installing it in the top of the stove.
6. Go back up and lower liner into the elbow and have whoever is at the bottom tighten the band clamp around the liner.
7. Cut the extension up top to the proper height and re-install the top plate and cap.
8. Go back down and put three screws through the flue collar and the bottom of the elbow.
9. Get the stove fixed or trash it.
On my flex liner, the instructions said to have no more than 3" of liner extending above the top of the masonry chimney. Creosote will form in that section because it is exposed and stays much cooler than the rest of the liner.rakuz66 said:What is the proper heighth for the SS liner at the top?
rakuz66 said:BB, What is the angle on the piece coming out of your stove ? 45?
30 degree. You can get them in 15 and 30 degree.
Thanks BB, Can I get them on-line or is it something I need to go to a dealer to purchase? thanks.
rakuz66 said:Thanks BB, Can I get them on-line or is it something I need to go to a dealer to purchase? thanks.
Pretty much all of the online pipe vendors have them.
Yeah, just looking at them. 15 looks like it will work for my set up. Is there anything special I need to know ( besides diameter)before I order one? Thickness? double wall, single wall, etc, etc, etc. Thanks again BB, I'm certainly getting an education on stoves with the help of pepole like you on this site.
Single wall stainless steel. Most are 304 stainless. Be sure to get one with a band clamp on the female end. Lots easier to install than one you have to attach with screws.
Thanks, and I'm ordering a coupler and a few ft os SS liner, unless the dealer will give me a ft or so for my troubles. Is that considered a block off plate in ur pic?
rakuz66 said:Is that considered a block off plate in ur pic?
Yep. The chamber above it is filled with Roxul and after the pic was taken around the liner hole was packed with it too.
The problem you may have with the flue extender is it fitting in your top plate and cap. Really need to know what you have up there now.
Woody Stover said:On my flex liner, the instructions said to have no more than 3" of liner extending above the top of the masonry chimney. Creosote will form in that section because it is exposed and stays much cooler than the rest of the liner.rakuz66 said:What is the proper heighth for the SS liner at the top?
I've been peeking at this thread with BB's expertise. Everything looks good for a great repair, my concern is now with what woody said, with the extension on the chimney top. How much is enough and what length is too much? I believe mine comes out of the SS cover about 6 inches and then the cap sits down over that and screws in.
- Status
- Not open for further replies.
Similar threads
- Replies
- 5
- Views
- 2K
- Replies
- 1
- Views
- 1K
- Replies
- 2
- Views
- 498