So a few ago I asked "Can I or Can't I". Thanks for all the help and in a nutshell I can or did. It wasn't easy and it wasn't fun and as always the dog heard a few new words/expressions. The part I knew that was going to be bad was worse. While it feels good to have it up and running and to have done it myself. I don't think I would have done if I had known everything I now know this morning - lol.
I do have limited experience with installations as I installed my insert and liner in the upstairs fireplace a year ago. Obviously a year was long enough ago to cover up the scars both mental and physically. That and I'm stubborn, toss in some anality and when I get something in my mind, well lets just say look out!
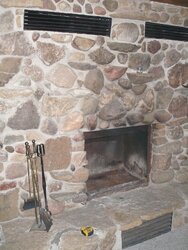
I wish had taken the time to get more photos during the installation but honestly I was on a mission, covered head to toe all day in black soot and just wanted to build a fire. ME NEED FIRE! This install in the basement in my second fireplace for secondary heat to keep the basement warmer and help with cold floors upstairs. As it sits now my furnace doesn't run for days at a time and it can get down right cold in my basement. This little stove is going to help that nicely.
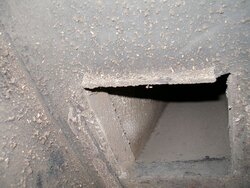
The biggest issue was going to be the transition from a square steel chimney to the lined chimney at the floor level of the upstairs. Lets just say a 6.25" dia liner can get through a 6.75" square hole with a 20+ degree angle but it ain't easy. It did require me to have a friend stop over and help on the roof. Which I had to sweep 3" of snow off of. Don't worry, I tied in at all times and wore my hunting 5 pt. safety harness. I wasn't going to be that guy. With his help pushing, hard mind you, and me pulling and twisting we got it done. But once the liner depth was set in the firebox there was no changing it. It required me to spend half of my day sitting in the firebox pulling, twisting and manipulating the liner to get it there.
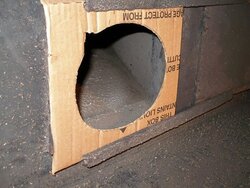
Which leads to me the last issue I ran into. Getting the pipe to line up and be long enough. Once I shoved a little liner back up into the chimney to get the stove in I couldn't get it back down. So after an hour of sitting in the firebox with the stove in there too I decided to just block up the stove.
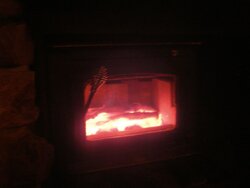
So I fired her up last night and boy for a little stove this thing cooks. It's a Century 244E and it's going to work perfect for secondary heat. I had a couple hours of coals in it when I loaded it up for bed last night. To my pleasant surprise 7 hours later this morning there's enough coals to start another fire without anything but some kindling. I was so happy to see that. I would like to find a way to damper this thing down a little bit more though. With the damper wide open this thing is like a blow torch. Even on low it could use a little less air. You gotta hang onto loose clothing when you feed it more wood - lol. The draft is awesome. Heck it was drafting while I was on the roof finishing the top without a fire in it.
Overall I couldn't be happier this morning and wish I wasn't on so much of a budget to get this done. But I think the install would have cost more than what I have in this thing now, liner included. Enjoy the pics!
I do have limited experience with installations as I installed my insert and liner in the upstairs fireplace a year ago. Obviously a year was long enough ago to cover up the scars both mental and physically. That and I'm stubborn, toss in some anality and when I get something in my mind, well lets just say look out!
I wish had taken the time to get more photos during the installation but honestly I was on a mission, covered head to toe all day in black soot and just wanted to build a fire. ME NEED FIRE! This install in the basement in my second fireplace for secondary heat to keep the basement warmer and help with cold floors upstairs. As it sits now my furnace doesn't run for days at a time and it can get down right cold in my basement. This little stove is going to help that nicely.
The biggest issue was going to be the transition from a square steel chimney to the lined chimney at the floor level of the upstairs. Lets just say a 6.25" dia liner can get through a 6.75" square hole with a 20+ degree angle but it ain't easy. It did require me to have a friend stop over and help on the roof. Which I had to sweep 3" of snow off of. Don't worry, I tied in at all times and wore my hunting 5 pt. safety harness. I wasn't going to be that guy. With his help pushing, hard mind you, and me pulling and twisting we got it done. But once the liner depth was set in the firebox there was no changing it. It required me to spend half of my day sitting in the firebox pulling, twisting and manipulating the liner to get it there.
Which leads to me the last issue I ran into. Getting the pipe to line up and be long enough. Once I shoved a little liner back up into the chimney to get the stove in I couldn't get it back down. So after an hour of sitting in the firebox with the stove in there too I decided to just block up the stove.
So I fired her up last night and boy for a little stove this thing cooks. It's a Century 244E and it's going to work perfect for secondary heat. I had a couple hours of coals in it when I loaded it up for bed last night. To my pleasant surprise 7 hours later this morning there's enough coals to start another fire without anything but some kindling. I was so happy to see that. I would like to find a way to damper this thing down a little bit more though. With the damper wide open this thing is like a blow torch. Even on low it could use a little less air. You gotta hang onto loose clothing when you feed it more wood - lol. The draft is awesome. Heck it was drafting while I was on the roof finishing the top without a fire in it.
Overall I couldn't be happier this morning and wish I wasn't on so much of a budget to get this done. But I think the install would have cost more than what I have in this thing now, liner included. Enjoy the pics!