Any drywall remodeling experts out there...?

  • Active since 1995, Hearth.com is THE place on the internet for free information and advice about wood stoves, pellet stoves and other energy saving equipment.

    We strive to provide opinions, articles, discussions and history related to Hearth Products and in a more general sense, energy issues.

    We promote the EFFICIENT, RESPONSIBLE, CLEAN and SAFE use of all fuels, whether renewable or fossil.

NickW

Minister of Fire
Oct 16, 2019
1,374
SE WI
Anybody ever hear of this?

Background:

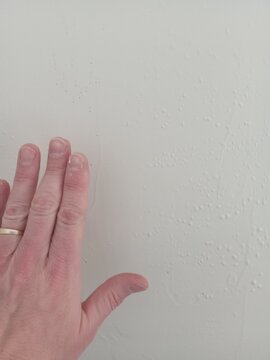
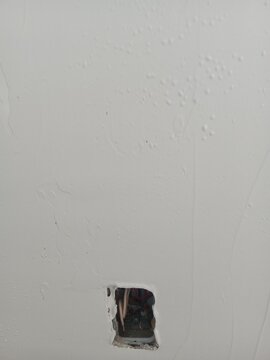
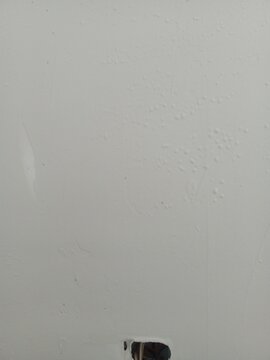
I am remodeling our house built in '78. All drywall is 1/2" "basement board" - drywall with a tan paper surface, no pressed edges. Removed a bunch of painted paneling that was glued and nailed up. Figured to skim coat everything. Paper had some damage from paneling removal and scraping adhesive off. Peeled all loose paper & boogers off. Joints weren't taped under the paneling, so taped all joints & corners and coated with compound. That all went fine. Lightly coated areas with damaged paper with mud. Started skim coating (about 1/4 of the LR) and got a bunch of blisters at the damaged areas from the layers of paper separating. Looked closely at other damaged paper areas with light coating and they were blistered too. Cut blisters out, sealed everything with Guardz. Filled areas where the blisters were cut out, looked good. Second coated those areas and got TONS of surface air bubbles (Think chicken pox or measles). Tried more passes with the knife. Initially looked better, then bubbles again. Tried again, now I'm making a mess. Let it dry, scraped the bubbles, applied a super thin coat to fill the "pockmarks". Wasn't too bad. Grrrr...

Here's where it gets weird:

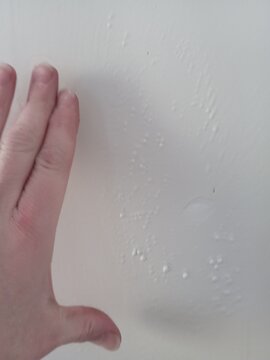
Started second coat of skim coat in the spot where I ended the first round of first coat; so part of the area has 1 coat of skim coat then sealer and part of the area has sealer and then 1 coat of skim. Everything where 2nd coat is directly on 1st coat has the really bad surface bubbles, everything where 2nd coat is on the sealer is fine... I don't understand why this would happen...?!?! 1st coat on the sealer is fine no matter of patch or skim coat. 2nd coat is bubbling no matter what.

Currently venting, researching and thinking... Former professional drywall taper BIL is stumped, GC friend is stumped.

Possibility #1... I am using pre-mix mud thinned down to be more workable. Did this same thing for 60+ gallons of mud on the Northwoods build - no issues. Have done it on other remodeling projects - no issues. Could the first coat be absorbing the moisture but not the air because of the sealer? Could the 1st coat be causing a boomerang effect of moisture and/or air because of the sealer? My next attempt (on a small area) will be mud straight from the bucket, no thinning... I have been advised that further thinning will probably make more bubbles.

Possibility #2... I could wait for what I did this morning to dry and put sealer over the rest of 1st coat. My concern is for finishing/sanding. If I sand through 2nd coat down to the sealer, how will it prime/paint? For that matter, if 2nd coat of mud is bubbling will the primer do the same?

In a nutshell...
Mud, sealer, mud - no bubbles
Sealer, mud, mud - bubbles

Anybody have any words of wisdom for me?
IMG_20240222_165152398.jpgIMG_20240226_123007535.jpgIMG_20240226_123520198.jpge5b4aff2-6370-4dea-a7e2-d901e65abc5c.jpg
 
Thicker mud was slower to bubble, but still did. Adding a little dish soap didn't help. Unmixed mud straight from the pail, mud mixed by hand with a knife in the tray, and mud mixed with the drill & tray mixer all bubbled...

Rust-Oleum, the manufacturer of the Guardz, were no help. Called USG and they aren't open again until tomorrow...
 
No help from me (it hasn't happened the few times I did this kind of thing), but I feel for you. Frustrating.
 
Yeah, i think vancover carpenter has some videos on this. It's happened to me in lesser extent. I skim coated my entire utah house. The ceilings and some walls are not even painted. Just smooth spackle.
 
This guy. And i am a pan and knife guy.
 
What happens if you paint an area first? Do you still get bubbles? It might be something in the drywall causing it vs the mud.
 
It's sealed, so theoretically nothing in the drywall itself should be affecting it. I would expect that if it was something in the drywall it would also affect the first coat, not just the second coat.

It almost has to be something in the interaction between the first and second coat, possibly due to the sealer blocking moisture (and/or air) from being absorbed by the drywall...?

We'll have to see what USG has to say tomorrow. I expect they'll say it's the Guardz. Guardz says it the mud...🙄
 
Ok, so I have 400sf of wall (in this room... There's still another area to do), and because I didn't do a great job with my 1st skim coat expecting to do a second; I am not at the point of doing a "tight skim". I have a non-porous surface under the first skim coat, so I WILL have bubbles in the second skim coat (according to the last video) because it won't be able to be a tight skim.

All I can do is coat it, scrape the bubbles, re-skim the bubbles, sand, and hope for the best...?

Or seal over the first skim coat with a second coat of sealer, then second skim coat and sand... This could potentially trap moisture in the first skim coat between the 2 coats of sealer...?

I think I still will talk to USG tomorrow.
 
As expected, USG was pretty useless...

They have no idea why the first coat is fine but the second bubbles.

They think I should coat over the bubbles again without sanding them out or scraping them off.

They also said I am not "skim" coating now, I am "float" coating. Skim coating is super thin. Whatever...

They don't think I should seal again...

They state each additional coat should have fewer bubbles. That hasn't been my experience at the patches.

Thanks to @bigealta for posting the videos.

The videos posted showing put it on, let it bubble, take it off, put it on again are interesting. I was kind of doing that yesterday but it didn't work well for me; however I wasn't doing that exactly. I was more just trying to re-smooth the bubbles. I may have to give it a try taking more of it off and recoating immediately... Thinking a thinner/wetter mix will be necessary or it will dry out and smear. My first float/skim coat isn't good enough to do a "tight skim" like the last video; however if I can get it "decent", then sand, then maybe I can try a tight skim if necessary. I'm not even sure the first coat is good enough to put it on and take it off and put it on again... I left it pretty rough not knowing I was going to have this issue.

Here's what I know...

1. I am a pretty competent DIYer, but I'm not a mud pro. I can't get a good surface with one coat unless it's a true skim coat. 2 is my minimum for joints or floating, often some spots get 3 then touch ups. 2nd coat (and anything after) directly on first coat is bubbling. My starting surface was pretty rough with remaining adhesive residue, damaged paper, taped joints, etc; which is why I didn't attempt to get first coat really good. Adhesive residue is giving no issues.

2. I had to use the sealer to stop the drywall paper surface from blistering.

3. Everything has one layer of skim coat (or float coat - whatever...). 1/4 of the room has sealer over the first layer of skim (before I discovered the blistering), 3/4 of the room has the first skim coat over the sealer.

4. There are patches where I had cut out the blisters with several coats already which continue to bubble every coat.

5. Yesterday I started 2nd float coat. Anything directly on sealer is fine (where the sealer is over the 1st coat), anything going directly on the first layer of mud gets lots of bubbles (where the sealer is on the drywall and the first layer is on the sealer). Some of the bubbles are broken with pits.

6. Right now I am working with 2 different surfaces. 1/4 of the room with sealer over 1st coat (2 walls, top 4'), 3/4 of the room with 1st coat over the sealer. These 2 surfaces are reacting differently.

7. The Guardz sealer directions say a final coat needs to be applied after the wall is finished before painting/priming. I would think there could be the potential of sealing moisture in between the layers of sealer.

Ugh.

So I am inclined to try some of the techniques in the videos @bigealta posted on the walls where I started 2nd coat yesterday. I also think scraping the bubbles off on the second coat from yesterday and skim coating them is wisest or I'll run the risk of sanding them open later. Might take a couple of thin coats to get the pits to fill in without bubbling again.

If this doesn't work well I can always let it dry, scrape & patch up the bubbles & pits, and recoat with sealer so I am working with the surface that hasn't been bubbling (yet...🙄).
 
I'm not a professional. I have done enough drywall and taping/mudding on new construction and remodels to realize that I don't want to be a professional in that line of work. My experience has been that mud will bubble more when placed over a non-factory surface, paint, primer, etc. Not sure why, it's just what I've noticed. It has always worked for me to just scrape off the raised portion of the bubbles and skim a second (and third time, if needed). But it's pretty hard to diagnose from a distance.
 
So this afternoon went much better. Used a fairly runny mix, put it on, took it off, and kept taking it off, and kept taking it off, and kept taking it off, using a stronger pressure on the strokes. Still have some bubbles, but not nearly as many and mostly not as big. Seems like the second coat can't be a thick "float" coat but only a very thin "skim" coat. Thinking I was just leaving it on too thick and not taking enough off. I've never had bubbles like this before, but I've also never had blisters like I did that required a sealer.

Scraped off yesterday's bubbles and recoated. Seemed to work best to use a spray bottle to mist some moisture into the pock holes before skimming.

Ran out of mud again. Should finish tomorrow with second coat, scrape today's bubbles and skim them and any bubbles I recoated today that need a little more. Thursday I'll scrape what I do tomorrow and skim them. Should be able to get 2 coats of touch up in one day. Then I have to decide if I want to sand first then touch up/tight skim, or touch up/tight skim first and then sand. I'm sure I will need some touch up after sanding no matter what order I do it in.
 
Last edited:
Ok, so I have 400sf of wall (in this room... There's still another area to do), and because I didn't do a great job with my 1st skim coat expecting to do a second; I am not at the point of doing a "tight skim". I have a non-porous surface under the first skim coat, so I WILL have bubbles in the second skim coat (according to the last video) because it won't be able to be a tight skim.

All I can do is coat it, scrape the bubbles, re-skim the bubbles, sand, and hope for the best...?

Or seal over the first skim coat with a second coat of sealer, then second skim coat and sand... This could potentially trap moisture in the first skim coat between the 2 coats of sealer...?

I think I still will talk to USG tomorrow.
How much is 1/“4 drywall a sheet?
 
How much is 1/“4 drywall a sheet?
Cost of drywall was never a concern. I considered ripping it all out and putting new 1/2" in, but decided against it to avoid the ceiling joint. Trying to mud that top corner on a textured ceiling is a bear to get a good transition even after scraping the texture off, then trying to match the texture around the ceiling perimeter... Had I known I was going to have these issues I might have done it.

In the stairwell I might cut it all out up to 3-6" from the ceiling and put new in. That way I can have a face tape joint and not have to deal with the ceiling... Or maybe now that I know what happens I'll seal it, patch the cut out blisters, seal the patches again, then float it and do a better job so a nice tight skim will be ok after... I already taped the stairwell joints and cut out the blisters from the light skim coat on the damaged paper and sealed the cutouts once.
Uhhh I have two rooms left with the popcorn ceiling. That’s was they make crown molding for. I don’t even bother to pain the pvc stuff.
 
Well, if foresight was as good as hindsight, replacing the 1/2" and adding crown may have been a viable option; although I wasn't looking for any more remodeling projects on a house we're selling in a couple of months. Due to the open concept it would have been crown in the LR, kitchen, stairwell, DR and a hall; but it would have been a nice selling point when the house goes on the market. Would have solved both the problem areas. 1/4" over the existing would have been problematic at quite a few windows and doors.

As it is; I was expecting a fairly quick rip out the paneling, do some patching and skim coating, texture, prime, paint... As I posted earlier, things went better this afternoon with the mud.
 
  • Like
Reactions: EbS-P
It's always better to do more thin coats than less thicker coats. It means less sanding. I try not to sand at all. Yes press the trowel hard when you are skim coating. Lay it on with softer pressure then add pressure when troweling it smooth and thin. 3 or 4 or 5 coats are not to many if it means no sanding. I skim coated the knockdown finish on the walls and ceilings in my utah house. I probably did 6 coats maybe even 7 on some of those walls. It's perfectly smooth now with very little sanding. It just takes practice, it's a skill and muscle memory thing that needs time to develop.
 
  • Like
Reactions: NickW
Just to be clear, when I talk "thick" coat I'm talking 1/8" or so...

Anybody can hang drywall. Taping and mudding is an art form.

When I was doing the Northwoods build my BIL shared some things with me about mudding. I'll share them with you guys. Maybe they are things you know, maybe it will help you in the future...

1. As @bigealta has noted - thin coats, however many it takes to get to a really good surface. Easier to put it on than sand it off.

2. Thin pre-mixed mud. It is too thick as sold. About 4 cups to a 4 1/2 gallon pail. I usually take a tray full out and mix with the tray mixer, then add 3 1/2 cups to the pail and mix with a big pail mixer.

3. Don't just hold the knife handle. Fingers on the drywall blade with the handle resting between the thumb and pointer and use your fingers to adjust the pressure applied to the blade. Feathers edges much nicer.

4. Spray on texture covers a lot of sins,but you just can't hide an edge that isn't feathered/sanded well.

5. Keep your equipment clean.

6. Always do a little scraping between coats.

7. Look at your drywall knives before starting. Knives previously used will have a little bow in them. Mud with the middle "belly" towards the wall and the corners away from the wall. If the belly is out and corners are in the corners will dig in.
 
  • Like
Reactions: bigealta
So just a quick update on my frustrating project. I can't even say what I've done each individual day, but I've been working in there pretty much all day every day except the weekend...

Yesterday I gave everything a good sanding then wet sanded. Sanding opened up more pits, wet sanding didn't fill in much of the pitting. Sanding through to the sealer in spots sucked.

Today I am going to mix thin batches of mud and do some micro thin coats over the pits and see what happens. Put it on, wipe it pretty smooth, let it bubble, back swipe it tight. If that doesn't work I may sand, seal the pits, then re-skim, then seal the whole thing.

I am thinking that because I have to seal again (according to the instructions) that minor pinholes might fill in with the sealer and primer; however, due to Murphy's Law (and I'm related to some Murphy's...), I am not banking on it. I will get this surface as good as I can before moving on to sealing, priming and painting even if it means more time lost.

The next area in a few weeks I will seal the cut out blisters, fill them, seal everything, "float" coat, sand, seal, prime and paint. Crap, that makes me wonder if I shouldn't just seal the danged pinholes right away before skimming...
 
From my experience, if your'e skimming over a painted surface 1st coat and maybe 2nd coat, depending on thickness of texture to be covered, has to be pulled tight (very, very thin) and let dry completely. This coat should be bubble free. Because once you have the bubbles, they always return after coating over them. (thicker mud creates the bubbles).
Then you can begin skimming with more aggressive coats. This should give you the finish your'e looking for.

GL
 
  • Like
Reactions: NickW
When you paint, use a textured roller and flat paint! Time to move on to the next frustrating project!
 
From my experience, if your'e skimming over a painted surface 1st coat and maybe 2nd coat, depending on thickness of texture to be covered, has to be pulled tight (very, very thin) and let dry completely. This coat should be bubble free. Because once you have the bubbles, they always return after coating over them. (thicker mud creates the bubbles).
Then you can begin skimming with more aggressive coats. This should give you the finish your'e looking for.

GL
This was where I feel it was so odd. Sealed surface (because damaged areas blistered), first coat was about 1/8" thick - no bubbles, subsequent coats bubbled.
When you paint, use a textured roller and flat paint! Time to move on to the next frustrating project!
I have satin finish...

So after skimming a couple of defects and the fields of pinholes today it is much better. A couple of the bigger pock holes needed a second coat. Super thin, let it bubble, keep swiping from several directions until the bubbles are gone. As long as I don't mess up the light sanding and quick wet sand/wipe down tomorrow I think I'm going to be OK. After that I'm going to seal again (because that's what the sealer instructions say to do... don't want the primer to bubble), then a sand float primer, then paint. I think/hope that between the sealer and primer most defects will be hidden...🤞

So besides this whole deaI... just got my truck back Saturday from the latest trip to the shop and Sunday the wife's cars check engine light came on. Turns out the turbo has a hole in it and needs replacement. After just doing the carrier bearing, rear end bearings, front driveshaft, transfer case rear bearing and a wheel bearing hub on the truck.
 
  • Wow
Reactions: mcdougy
So the LR has been done for several weeks. It did turn out well. Have been working on the kitchen, DR & stairwell. Walls are going better than the LR because I knew what to expect and how to deal with it. Stairwell was completely out for a few days, countertops are out for repairs & skim coating waiting for new ones, several cabinets have been repaired, etc. Lots of little things slowing me down, but should be texturing and painting the end of the week or early next week.

Also have been hauling loads of boxes and non-critical furniture up to the Northwoods. Truck is back in the shop again but should be done today. Almost lost a wheel due to snapped studs. Have to find out if the shop had that wheel off because I know I torqued it when I had it off before it went in the shop last time...