Wondering if anyone else is doing this and might like to share ideas, results, etc.
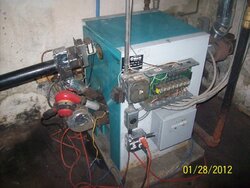
I have a Biasi 4 section cast iron boiler that was fired on #2 fuel oil. I wanted to convert it to burn wood pellets, but after looking into what's available, I think the imported pellet burner guns are just too pricey and they don't address the issue of ash removal. Ash removal is really more about the boiler than it is about the burner. In the case of my Biasi boiler, it'll hold about a weeks worth of ashes.
I burn more fuel (oil or pellets) than most people because my house needs some work. Yeah... I know... but I'm working on that... I chose to get away from buying oil so that I could invest the money into tightening up the house and replacing some ductwork on my air handler for the large room over the garage.
Last year I burned waste motor oil in a custom burner that I built. I started with a Beckett AFG burner and added a custom drawer assembly with a 400W preheater and a digital temperature controller connected to a solid state relay to controll the preheater behind the nozzle. It worked great, but it's such a hassle collecting waste oil and I found that towards the end of the winter I couldn't get enough to heat the house with, so I decided to move that into my shop and build a pellet burner for my boiler.
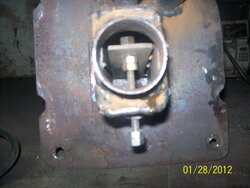
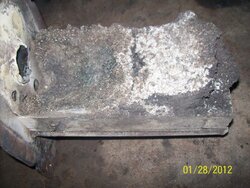
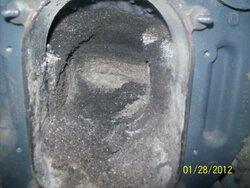
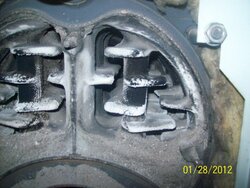
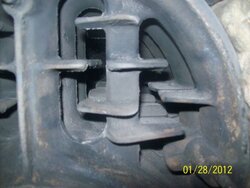
The Biasi has a cast iron cover on the firebox that the burner bolts up to. I removed that cover and fitted a 1/4" steel plate to replace it. I built the burn pot from a short piece of 4" angle iron welded to the plate and lined it with firebrick. firebrick cuts easily enough with a masonry blade on a table saw. I slotted it on the bottom where it meets in the center of the angle iron so that I can blow some primary combustion air under the firebrick and use the angle iron as a duct to get the air under the fire.
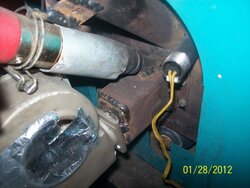
The feeder tube is a piece of 1 1/2" black iron pipe. It's cut off flush with the 1/4" plate and positioned at a 45 degree angle so that it allows the pellets to drop into the burn pot. My phase 2 burner will use 2" pipe insteas of 1 1/2" pipe because I've found that a couple of times that the pellets have jammed in the feeder tube and it was only necessary to give the tube a tap with a wrench to get them moving again. So I learned that 1 1/2" pipe will work most of the time, so I think that 2" pipe should work all of the time.
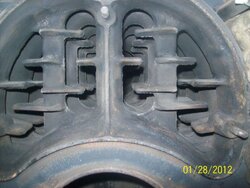
I put two 3/4" holes in the plate for primary combustion air. One hole is between the fire brick and the angle iron, the other is right on top of the firebrick so the pellets cover it as they drop into the burn pot. I built a primary combustion air plenum, a small steel box on the outside of the plate with a damper in it so that I can adjust the airflow between the two holes. I'm using a small centrifugal blower from a dishwasher as the primary combustion air blower. Even this little blower is overkill and I have the blower inlet restricted to leave an opening about the size of a quarter.
My chimney is about 10' of 6" type L wood stove pipe that goes through the ceiling and roof of the boiler room. It's not much of a chimney and I didn't trust it to make enough draft to safely operate a pellet burner. I had an old power vent blower in my shed, so I brought it in, cleaned and lubed it, and installed it on the back of the boiler to force the gases up the chimney. I'm sure this is why I need so little combustion air from the primary combustion air blower. Someone else with a better chimney may not even need a power vent, but it's absolutely imperative that gases never, ever be allowed to go back up the feeder tube. Pelix uses .03" as a minimum draft requirement for a chimney and I think that's probably a good universal standard. For pellets, I'd measure that over the fire rather than at the breach to account for restriction in the boiler itself.
Ignition was an interesting part that required a little tinkering to get it to work right. I wanted hot air ignition, not hot surface ignition. I didn't want anything laying in the burn pot getting eaten up by the fire over time. I welded a piece of 1/2" black iron pipe in and through the primary combustion air plenum, stopping just short of the upper inlet port through the 1/4" plate so that hot air blown through the pipe would blow directly onto the pellets.
I looked at the Leister wood chip and pellet ignitors and they looked perfect for this, but they're just too pricey at $275.00. I went to the local discount warehouse and bought a cheap chinese heat gun and took it home and dissassembled it. It looked perfect for the job. It had a centrifugal inline blower and a ceramic heating element. It's weakness is the little 17V DC motor that spins the blower. I went through 2 of these in 3 weeks. The brush holders are made of something not much stronger than an aluminum beer can and both of these tore up the brushes after about a week and a half of service. I had another heat gun around. This one has a squirrel cage type blower and nichrome heating elements. That one works much better and it's still working just fine after a month, but it looks a little strange hanging off the front of the boiler. It's the one that Harbor Freight sells and it's sold in a lot of different stores as well.
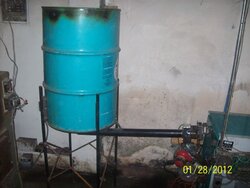
The hopper and the auger were my next build. I decided to use a 55 gallon barrel as a hopper. It'll hold about 7 bags of pellets, and about 6 and a half bags are usable fuel. I could have gotten fancy and tapered the bottom, but it was easier to dump an extra half a bag of pellets into the hopper than it was to spend a day with a cutoff wheel and a mig welder. Small augers aren't easy to come by either. I put the barrel up on a stand and I needed about 42" of auger. I chose to keep the auger as short as possible to make the motor lead an easier life. I bought a commercially made auger motor, 2 RPM, CCW rotation, off ebay for $65.00. The auger tube is a piece of 2" ID black iron pipe. I bought 5 Rotodigger RD-2 bits. These are for digging in gardens, putting pipe or wires under sidewalks, etc. they chuck into a drill for normal use. I cut 4 of them off in the bandsaw and laid them all out on a piece of angle iron to keep them true. I welded the shafts with 7018 rod and my stick welder and mig welded the flighting together. I connected the auger to the motor with a home made drive coupling made from a piece of 7/8 rod.
end part 1
I have a Biasi 4 section cast iron boiler that was fired on #2 fuel oil. I wanted to convert it to burn wood pellets, but after looking into what's available, I think the imported pellet burner guns are just too pricey and they don't address the issue of ash removal. Ash removal is really more about the boiler than it is about the burner. In the case of my Biasi boiler, it'll hold about a weeks worth of ashes.
I burn more fuel (oil or pellets) than most people because my house needs some work. Yeah... I know... but I'm working on that... I chose to get away from buying oil so that I could invest the money into tightening up the house and replacing some ductwork on my air handler for the large room over the garage.
Last year I burned waste motor oil in a custom burner that I built. I started with a Beckett AFG burner and added a custom drawer assembly with a 400W preheater and a digital temperature controller connected to a solid state relay to controll the preheater behind the nozzle. It worked great, but it's such a hassle collecting waste oil and I found that towards the end of the winter I couldn't get enough to heat the house with, so I decided to move that into my shop and build a pellet burner for my boiler.
The Biasi has a cast iron cover on the firebox that the burner bolts up to. I removed that cover and fitted a 1/4" steel plate to replace it. I built the burn pot from a short piece of 4" angle iron welded to the plate and lined it with firebrick. firebrick cuts easily enough with a masonry blade on a table saw. I slotted it on the bottom where it meets in the center of the angle iron so that I can blow some primary combustion air under the firebrick and use the angle iron as a duct to get the air under the fire.
The feeder tube is a piece of 1 1/2" black iron pipe. It's cut off flush with the 1/4" plate and positioned at a 45 degree angle so that it allows the pellets to drop into the burn pot. My phase 2 burner will use 2" pipe insteas of 1 1/2" pipe because I've found that a couple of times that the pellets have jammed in the feeder tube and it was only necessary to give the tube a tap with a wrench to get them moving again. So I learned that 1 1/2" pipe will work most of the time, so I think that 2" pipe should work all of the time.
I put two 3/4" holes in the plate for primary combustion air. One hole is between the fire brick and the angle iron, the other is right on top of the firebrick so the pellets cover it as they drop into the burn pot. I built a primary combustion air plenum, a small steel box on the outside of the plate with a damper in it so that I can adjust the airflow between the two holes. I'm using a small centrifugal blower from a dishwasher as the primary combustion air blower. Even this little blower is overkill and I have the blower inlet restricted to leave an opening about the size of a quarter.
My chimney is about 10' of 6" type L wood stove pipe that goes through the ceiling and roof of the boiler room. It's not much of a chimney and I didn't trust it to make enough draft to safely operate a pellet burner. I had an old power vent blower in my shed, so I brought it in, cleaned and lubed it, and installed it on the back of the boiler to force the gases up the chimney. I'm sure this is why I need so little combustion air from the primary combustion air blower. Someone else with a better chimney may not even need a power vent, but it's absolutely imperative that gases never, ever be allowed to go back up the feeder tube. Pelix uses .03" as a minimum draft requirement for a chimney and I think that's probably a good universal standard. For pellets, I'd measure that over the fire rather than at the breach to account for restriction in the boiler itself.
Ignition was an interesting part that required a little tinkering to get it to work right. I wanted hot air ignition, not hot surface ignition. I didn't want anything laying in the burn pot getting eaten up by the fire over time. I welded a piece of 1/2" black iron pipe in and through the primary combustion air plenum, stopping just short of the upper inlet port through the 1/4" plate so that hot air blown through the pipe would blow directly onto the pellets.
I looked at the Leister wood chip and pellet ignitors and they looked perfect for this, but they're just too pricey at $275.00. I went to the local discount warehouse and bought a cheap chinese heat gun and took it home and dissassembled it. It looked perfect for the job. It had a centrifugal inline blower and a ceramic heating element. It's weakness is the little 17V DC motor that spins the blower. I went through 2 of these in 3 weeks. The brush holders are made of something not much stronger than an aluminum beer can and both of these tore up the brushes after about a week and a half of service. I had another heat gun around. This one has a squirrel cage type blower and nichrome heating elements. That one works much better and it's still working just fine after a month, but it looks a little strange hanging off the front of the boiler. It's the one that Harbor Freight sells and it's sold in a lot of different stores as well.
The hopper and the auger were my next build. I decided to use a 55 gallon barrel as a hopper. It'll hold about 7 bags of pellets, and about 6 and a half bags are usable fuel. I could have gotten fancy and tapered the bottom, but it was easier to dump an extra half a bag of pellets into the hopper than it was to spend a day with a cutoff wheel and a mig welder. Small augers aren't easy to come by either. I put the barrel up on a stand and I needed about 42" of auger. I chose to keep the auger as short as possible to make the motor lead an easier life. I bought a commercially made auger motor, 2 RPM, CCW rotation, off ebay for $65.00. The auger tube is a piece of 2" ID black iron pipe. I bought 5 Rotodigger RD-2 bits. These are for digging in gardens, putting pipe or wires under sidewalks, etc. they chuck into a drill for normal use. I cut 4 of them off in the bandsaw and laid them all out on a piece of angle iron to keep them true. I welded the shafts with 7018 rod and my stick welder and mig welded the flighting together. I connected the auger to the motor with a home made drive coupling made from a piece of 7/8 rod.
end part 1