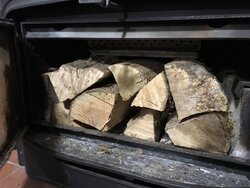
BK Ashford 25 bypass gasket replacement

  • Active since 1995, Hearth.com is THE place on the internet for free information and advice about wood stoves, pellet stoves and other energy saving equipment.

    We strive to provide opinions, articles, discussions and history related to Hearth Products and in a more general sense, energy issues.

    We promote the EFFICIENT, RESPONSIBLE, CLEAN and SAFE use of all fuels, whether renewable or fossil.

Tegbert

Feeling the Heat
Sep 15, 2016
409
Arlington Wa
!!!!!!!!WARNING!!!!!!!!!!

This job requires parts not available to your dealers just yet. Proceed with caution. I was advised a little over a year ago by BKVP to not remove this part probably because of this.

Possibly the exact same setup as scirocco 25 and boxer 24.

User @moresnow also advised me to check the bypass plate for any burrs as his Boxer 24 had one that was pulling on the gasket. Mine did not.

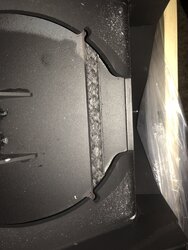
Scenario: Insert was installed by me in November of 2017. I saw something that didn’t seem quite right.
997b07e439e20ab1199f6cc5b8881402.jpg

The bypass plate only pushed against the gasket. I proceeded anyways with the install as it was sealing all the way across. Fast forward to about 3 weeks ago I had smoke out the chimney all throughout the burn. At first I thought the cat was plugging up. But once it cooled off I noticed that the bypass gasket had been pushed out of the retainer.

I called the dealer and messaged BKVP about part z2022. The kit is not available and was advised to replace it with in the insert. I almost did until I realized that there is not much room in there so I proceeded to remove it from the stove.

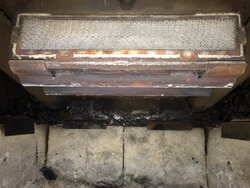
First remove the flame shield and combustor.
605424e9fd7666057d932b9e06af179e.jpg

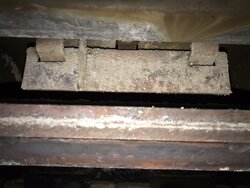
Then remove the baffle behind the combustor. It’s kind of a pain with combustor probe right there.
3eea26dc3e4e063c9c8d6f54d8114b6e.jpg

Then slide the bypass open and remove the 7/16” bolts. And remove the bypass plate.
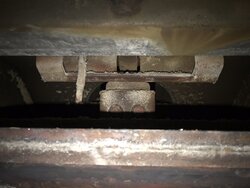
bb06434fcb20a8a5829a4002a8d77431.jpg

Now you can remove the dome guard with the 7/16” bolt/nuts qty 2.
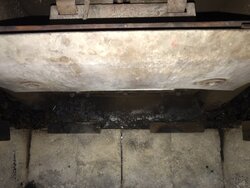
11edd71accbdd8520c578afcc7eb8407.jpg

Now there is 12 nuts holding the bypass retainer in place. All 7/16” nuts. The newer models have a flame shield over the opening that I believe is held on by 2 of these nuts.
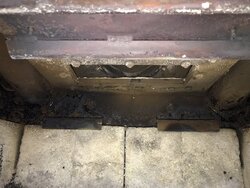
4ea918099ba6adea4ee571967740501d.jpg

Now lift and slide the retainer out and clean all the debris out for reassembly later.
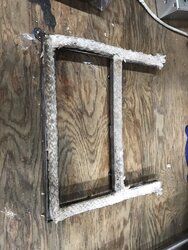
5a5a65829c643f1074d2bf1ed5479754.jpg

Remove the old gasket and clean the retainer. Sorry no picture. But it seemed like hardly any cement was used.

Take the new gasket and place in retainer and get to length.

Reapply gasket cement and put in new gasket. Gasket to be used specified by BKVP is 5/8” DENSE rope gasket. I couldn’t find a gasket that said dense so I used a medium density. I let it sit for 2 days with weight on it to help flatten and cure.

Now take your 1/8” thick ceramic fiber paper and place the retainer on top and press down to get your bolt pattern. I used a drill bit by hand to get the holes through. Once done place the gasket on the retainer and cut out the bypass opening and excess off.
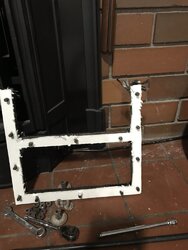
bc13d86c0f3aa3ce4e581cc949dbc226.jpg

Assembly is the reverse order. The bypass slider bolts only need to be hand tight so it’s able to move when the gasket compresses and still maintain a seal. Also always use a new combustor gasket.

I have yet to fire it up again as I’m waiting on my combustor gasket to arrive. Will update on Wednesday as it should be here this Tuesday.

Lopi Rockport
Blaze King Ashford 25
 
Last edited by a moderator:
  • Like
Reactions: jetsam and Lone_Gun
Alright here’s the parts list.

The ceramic fiber gasket per the manual is 1/8” thick. The retainer measures 10.5” wide and 9” long. So I used a 12”x12” sheet of it. If you have a kiln supply place or even a ceramic place they may have some there too. Not many places sell online in 1/8” thick or didn’t advertise the temp rating. This is what I used.

12x12 Semi Soft FiberFrax Fiber Kiln Paper 1/8" Thick Sheet https://www.amazon.com/dp/B06X1BTH3D/?tag=hearthamazon-20

This is what I was going to use but didn’t need the amount they were selling in.

Lynn Manufacturing Gasket Paper, Superwool Plus, 2100F, Small Sheets, 15'' x 24'' x 1/8'', 4 pcs/pkg https://www.amazon.com/dp/B077VRS14X/?tag=hearthamazon-20

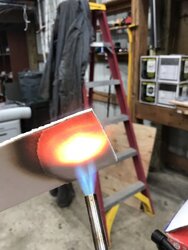
Here is a picture of it burning.

a1e8574846c5d1ec745c230c667d24b3.jpg

Don’t forget the combustor gasket. And if your dealers don’t stock this on a roll or have to order parts this is where I get it from. Originally this item was a free shipping item at a lower cost. I got 10’ before and free shipping. Now I think you have to order $40 of stuff to get free shipping. So I ordered 22’. Overkill yes but you never know when you might need it. They take a while to process and ship so plan ahead.

http://www.firecatcombustors.com/ACIG-2-p/sku_acig-2.htm

And then 5/8” dense rope gasket gasket cement. Can find this locally almost anywhere. BUT none I could find said it was dense. So I took a chance on it for now.

Lopi Rockport
Blaze King Ashford 25
 
Last edited by a moderator:
I guess my only question is, how on earth did the dealer get out of taking care of this?
Also, do you really think the gasket was causing the smoke? Seems like it would allow a minimal amount around the rolled gasket.
 
I guess my only question is, how on earth did the dealer get out of taking care of this?
Also, do you really think the gasket was causing the smoke? Seems like it would allow a minimal amount around the rolled gasket.

Yikes. That sucks! Sorry you had to go through this. I’m wondering if I will have the same issue on mine. [emoji30]


Sent from my iPhone using Tapatalk
 
I guess my only question is, how on earth did the dealer get out of taking care of this?
Also, do you really think the gasket was causing the smoke? Seems like it would allow a minimal amount around the rolled gasket.

I installed it so I took care of it. It was actually pushed completely out of the retainer. I am hoping that it was the issue we will see Tuesday night. Regardless it needed replaced.


Lopi Rockport
Blaze King Ashford 25
 
Yikes. That sucks! Sorry you had to go through this. I’m wondering if I will have the same issue on mine. [emoji30]


Sent from my iPhone using Tapatalk

I don’t think it’s an issue that’s going to be a widespread problem. I just did the write up cause I needed to do it and for future owners or current owners know what the process is like.


Lopi Rockport
Blaze King Ashford 25
 
  • Like
Reactions: darktower007
!!!!!!!!WARNING!!!!!!!!!!

This job requires parts not available to your dealers just yet. Proceed with caution. I was advised a little over a year ago by BKVP to not remove this part probably because of this.

Possibly the exact same setup as scirocco 25 and boxer 24.

User @moresnow also advised me to check the bypass plate for any burrs as his Boxer 24 had one that was pulling on the gasket. Mine did not.

Scenario: Insert was installed by me in November of 2017. I saw something that didn’t seem quite right.

View attachment 238096

The bypass plate only pushed against the gasket. I proceeded anyways with the install as it was sealing all the way across. Fast forward to about 3 weeks ago I had smoke out the chimney all throughout the burn. At first I thought the cat was plugging up. But once it cooled off I noticed that the bypass gasket had been pushed out of the retainer.

I called the dealer and messaged BKVP about part z2022. The kit is not available and was advised to replace it with in the insert. I almost did until I realized that there is not much room in there so I proceeded to remove it from the stove.

First remove the flame shield and combustor.

View attachment 238097

Then remove the baffle behind the combustor. It’s kind of a pain with combustor probe right there.

View attachment 238098

Then slide the bypass open and remove the 7/16” bolts. And remove the bypass plate.

View attachment 238099

Now you can remove the dome guard with the 7/16” bolt/nuts qty 2.

View attachment 238100

Now there is 12 nuts holding the bypass retainer in place. All 7/16” nuts. The newer models have a flame shield over the opening that I believe is held on by 2 of these nuts.

View attachment 238101

Now lift and slide the retainer out and clean all the debris out for reassembly later.

View attachment 238102

Remove the old gasket and clean the retainer. Sorry no picture. But it seemed like hardly any cement was used.

Take the new gasket and place in retainer and get to length.

Reapply gasket cement and put in new gasket. Gasket to be used specified by BKVP is 5/8” DENSE rope gasket. I couldn’t find a gasket that said dense so I used a medium density. I let it sit for 2 days with weight on it to help flatten and cure.

Now take your 1/8” thick ceramic fiber paper and place the retainer on top and press down to get your bolt pattern. I used a drill bit by hand to get the holes through. Once done place the gasket on the retainer and cut out the bypass opening and excess off.

View attachment 238103

Assembly is the reverse order. The bypass slider bolts only need to be hand tight so it’s able to move when the gasket compresses and still maintain a seal. Also always use a new combustor gasket.

I have yet to fire it up again as I’m waiting on my combustor gasket to arrive. Will update on Wednesday as it should be here this Tuesday.

Lopi Rockport
Blaze King Ashford 25
Having to troubleshoot a brand new stove is garbage. I can relate. But good on you brother.
 
Finally got the interam gasket loaded her up and so far so good. It definitely improved my smoke output. It does start showing smoke when turning down the thermostat but seems to quickly catch up now and seems clear. Will find out when I actually am here to reload it during the day.

c109d51cbf4c101dd11c0dd7d19c1070.jpg

Lopi Rockport
Blaze King Ashford 25
 
Last edited by a moderator:
  • Like
Reactions: Lone_Gun
I installed it so I took care of it. It was actually pushed completely out of the retainer. I am hoping that it was the issue we will see Tuesday night. Regardless it needed replaced.

Lopi Rockport
Blaze King Ashford 25
This is not an installation issue, it's a defect repair. That's a warranty issue. Good to hear that your fix appears to be working.