Block off plate help

  • Active since 1995, Hearth.com is THE place on the internet for free information and advice about wood stoves, pellet stoves and other energy saving equipment.

    We strive to provide opinions, articles, discussions and history related to Hearth Products and in a more general sense, energy issues.

    We promote the EFFICIENT, RESPONSIBLE, CLEAN and SAFE use of all fuels, whether renewable or fossil.

Bushels20

Feeling the Heat
May 20, 2018
421
OH
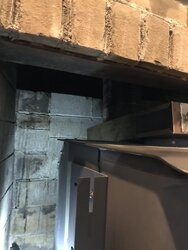
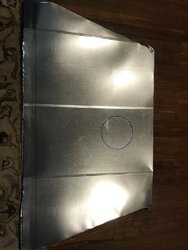
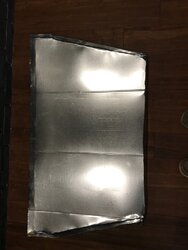
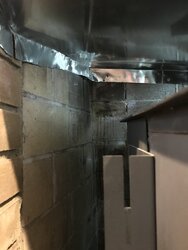
started my block off plate install today. I have measured multiple times the area for the steel plate be placed. Regardless of my efforts I am off somewhere. I think it has something to do with the angle of the firebox from back to front. It is in the shape of a trapezoid. Basically, the back is 29 1/2” and the front is 36 1/2”. The sides are 22”. My front measurement on the metal plate is ending up around 42”.

I think it has to be that I have the angle off, somehow. I used a sliding T-bevel to find my angle and double checked it with a cardboard Template and it appears accurate. I am puzzled.

I have not accounted for, in any of aforementioned a flange for attaching to the brick. I of course will, but wanted to make sure my general measurements were accurate, first.

This plate is being retrofit into an existing install.

Any suggestions from those who are more experience?
 
Last edited:
Get it to fit as well as you can, and let rockwool insulation do the rest.

Did you seal the area with rockwool insulation before trying to put the block off plate up?
 
Get it to fit as well as you can, and let rockwool insulation do the rest.

Did you seal the area with rockwool insulation before trying to put the block off plate up?


I’ve not insulated anything yet. I am dry fitting everything first and hit the “speed bump” and called it quits for the day and have sought the advice of you all.
 
You holding it level?
 
If it is slightly too small, push it up into the smoke chamber as far as you can till it will get tight in there. Then seal the edges off.
 
I’m following this thread to learn from your efforts. I just visited a friends house last evening and while looking at his insert (a Napoleon 1402). I noticed he has no block off plate and no insulation around his liner. He reports a cold draft in winter out of the front top of the stove when he opens his front door. Please take pictures of your fabrication and install. I’d be interested in doing something similar to help my friend out.
 
There are lots of pics in the links in the Wiki article on damper sealing.
 
  • Like
Reactions: Bigger_Al
I’m following this thread to learn from your efforts. I just visited a friends house last evening and while looking at his insert (a Napoleon 1402). I noticed he has no block off plate and no insulation around his liner. He reports a cold draft in winter out of the front top of the stove when he opens his front door. Please take pictures of your fabrication and install. I’d be interested in doing something similar to help my friend out.


I have a Napoleon 1101, the little brother of the 1402. I will add photos once I get everything figured out
 
  • Like
Reactions: Bigger_Al
If it is slightly too small, push it up into the smoke chamber as far as you can till it will get tight in there. Then seal the edges off.

My issue isn’t too small, my issue is 3 of the four sides are measuring up accurate but the lintel/front is coming out too long.
 
That is basically what my issue was too. I kept pushing it in, carefully, till it got stuck in the smoke chamber. Then I sealed it. Done.


Ooooh. I see what you are saying. That may actually, end up being a good way to solve the problem. Won’t be the “prettiest” block off plate but it sure will be righ/well sealed.
 
I’m following this thread to learn from your efforts. I just visited a friends house last evening and while looking at his insert (a Napoleon 1402). I noticed he has no block off plate and no insulation around his liner. He reports a cold draft in winter out of the front top of the stove when he opens his front door. Please take pictures of your fabrication and install. I’d be interested in doing something similar to help my friend out.

Here are some partially finished photos. I am admittedly not a metal worker but it is turning out ok and it is a tight fit. The photos show she plate cut out before the flanges are bent, after the flanges are bent, then a partial install. I cut the plate in half once the measurements were accurate because this is being installed post insert install. I insulated really well above the plate before install.
 

Attachments

  • 46FFFB90-4E6D-42E9-BCAC-85728AD563E9.jpeg
    46FFFB90-4E6D-42E9-BCAC-85728AD563E9.jpeg
    98.2 KB · Views: 163
  • A67697A6-20BD-4AF0-B754-0E6382758083.jpeg
    A67697A6-20BD-4AF0-B754-0E6382758083.jpeg
    119.1 KB · Views: 143
  • AD53239B-4F97-4B0A-89C7-BC42B659DF7F.jpeg
    AD53239B-4F97-4B0A-89C7-BC42B659DF7F.jpeg
    96.6 KB · Views: 144
  • 3E3332A6-1309-4319-80F8-0662DCB12F66.jpeg
    3E3332A6-1309-4319-80F8-0662DCB12F66.jpeg
    84.5 KB · Views: 138
  • Like
Reactions: Jan Pijpelink
Thanks and looks good. I like the idea of cutting it in two. That may be what I will do also for ease of retrofit installation. I’ll assume you’ll silicons the edge/flanges and anchor into the brick? Will you also place rock wool on top?
 
Thanks and looks good. I like the idea of cutting it in two. That may be what I will do also for ease of retrofit installation. I’ll assume you’ll silicons the edge/flanges and anchor into the brick? Will you also place rock wool on top?

Yes, once everything is where I want it to be, I will anchor it to the brick with Tapcons and seal all of edges with stove cement/some kind of high temp silicone/sealant. And yes, there will be insulation on top as well. The package of Rockwool I bought has more than enough to do the top of the liner and around the insert so I will probably stuff the extra up the chimney around the liner as high as I can get it.

If you are looking for guidance on a block off plate install, I would suggest the Wiki page on this site as Begreen referenced above. I am simply regurgitating everything I have learned from this site back to you in my reply. I am happy to help where I can! Don’t get me wrong. Just lots of good info and photos on the Wiki.
 
Last edited:
  • Like
Reactions: Bigger_Al
Don’t get too fist with measuring it onto the steel, just template it fully in cardboard. Get it perfect in cardboard, cutting where needed or duct-taping pieces back onto the template where you cut too far, then trace directly to steel. Then get some perf’d steel angle and some anchors, and decide if you want to install the perf “leg up” or “leg down”. You’ll want to subtract 1/4” from all edges if going leg up, anchor your perf’d angle in there, stuff the area around the liner with non-combustible insulation, if you please, and set the plate in place.

At least that’s how I did mine. I was working in a 250 year old natural stone chimney, so nothing was square or straight, but this method made a straightforward job of it.
 
  • Like
Reactions: Jan Pijpelink
Don’t get too fist with measuring it onto the steel, just template it fully in cardboard. Get it perfect in cardboard, cutting where needed or duct-taping pieces back onto the template where you cut too far, then trace directly to steel. Then get some perf’d steel angle and some anchors, and decide if you want to install the perf “leg up” or “leg down”. You’ll want to subtract 1/4” from all edges if going leg up, anchor your perf’d angle in there, stuff the area around the liner with non-combustible insulation, if you please, and set the plate in place.

At least that’s how I did mine. I was working in a 250 year old natural stone chimney, so nothing was square or straight, but this method made a straightforward job of it.


Thanks. Using this advise and Pijpelink’s, I got everything set in place this evening. I used a good card board template (the duct tape was a great idea). That way any miscuts were easily corrected. Once confident, I over cut it by about 2 inches and bent the flanges down. It was of course, not perfect and as Pijpelink said, I eased it in to a good tight fit. Tapcons screwed in and sealant is in place. Waiting on it to dry so I can insulate around the insert. May be just in time....This weekend is supposed to be in the 30s overnight!

I’m anxious to see the difference. I have been burning for 5 years without a block off plate....
You'll see a difference. I forget how many degrees the temp went up In the room, but it was noticeable.
 
Just installed my insert and stuffed safe and sound up and cut the old damper to fit either side for this year. I'll stuff some in the top this weekend when I fully secure it. Good info here. I will be doing this next summer. Thanks for the pics!