Bought Another! $50 Stove, Busy Prepping for Install. Lots of Pics!

  • Active since 1995, Hearth.com is THE place on the internet for free information and advice about wood stoves, pellet stoves and other energy saving equipment.

    We strive to provide opinions, articles, discussions and history related to Hearth Products and in a more general sense, energy issues.

    We promote the EFFICIENT, RESPONSIBLE, CLEAN and SAFE use of all fuels, whether renewable or fossil.
Status
Not open for further replies.

chamas

Member
Dec 13, 2011
162
PNW
Actually, $50 for the stove, another $40 in fuel to go and get it.

Can you tell I'm hooked? Second stove in two months!

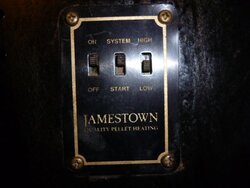
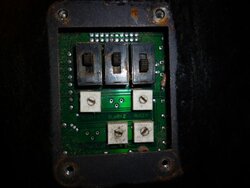
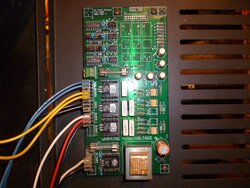
Simple old Jamestown J1000b "Baby Bear" they call it in the brochure, rated 4,000 - 30,000 BTUs, probably from late '80s - early '90s. Pretty compact-- 24"h (without legs) x 23"w x 18"d.

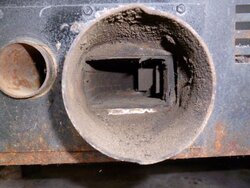
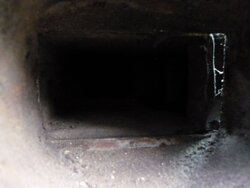
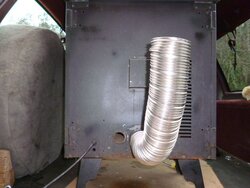
I plan to install it on the stone ledge in front of the living room fireplace, and run the exhaust vent up the chimney, the OAK down thru the cleanout to the outside of the chimney thru the outer cleanout door.

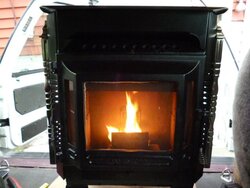
Here you see the flame, testing in the back of the Suburban, lol.

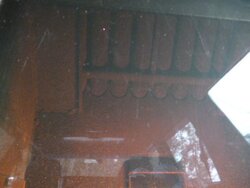
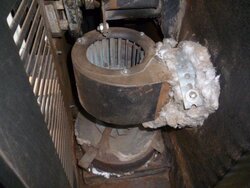
Also looking up thru the glass at the heat exchange tubes, which angle up towards the front.
 

Attachments

  • Baby Bear Prep 004.jpg
    Baby Bear Prep 004.jpg
    40.6 KB · Views: 1,026
  • Baby Bear Prep 005.jpg
    Baby Bear Prep 005.jpg
    30.2 KB · Views: 1,017
Looking inside, left side view shows auger motor above, and more interestingly, the combustion and convection fan housings, driven by one vertically mounted open frame motor. Is there a way to lube these motors?
 

Attachments

  • Baby Bear Prep 007.jpg
    Baby Bear Prep 007.jpg
    55.2 KB · Views: 962
  • Baby Bear Prep 008.jpg
    Baby Bear Prep 008.jpg
    57.1 KB · Views: 952
Squirrel cage convection fan.
 

Attachments

  • Baby Bear Prep 009.jpg
    Baby Bear Prep 009.jpg
    50.2 KB · Views: 952
Looking in the right side, shows the auger motor above, the other side of the combined combustion/convection fan motor is in the background. Also you can see the snapdisk limit switches.
 

Attachments

  • Baby Bear Prep 021.jpg
    Baby Bear Prep 021.jpg
    61 KB · Views: 913
  • Baby Bear Prep 022.jpg
    Baby Bear Prep 022.jpg
    53.7 KB · Views: 931
Control panel. Behind the plate you can see the pots to adjust blower speed and auger. Top row is for hi speed, bottom row for low.
 

Attachments

  • Baby Bear Prep 014.jpg
    Baby Bear Prep 014.jpg
    35.9 KB · Views: 932
  • Baby Bear Prep 019.jpg
    Baby Bear Prep 019.jpg
    36.1 KB · Views: 948
Main circuit board.
 

Attachments

  • Baby Bear Prep 020.jpg
    Baby Bear Prep 020.jpg
    61.4 KB · Views: 925
Exhaust stub. I found a gap that needs sealing up, you can see in the photo, along the righthand side, there is a fairly large 1/8 - 3/16" gap that could potentially allow exhaust into the back of the stove, hence the room. Any ideas on how to seal this? It looks like the flange that screws onto the back of the stove does not align precicely with the outlet of the combustion fan exhaust housing.
 

Attachments

  • Baby Bear Prep 023.jpg
    Baby Bear Prep 023.jpg
    59.8 KB · Views: 901
  • Baby Bear Prep 024.jpg
    Baby Bear Prep 024.jpg
    24.7 KB · Views: 917
Currently testing the stove on high, reading temps of 400 - 420*F on the outer front panel where the heat exchange tubes exit. Hoping to burn off the stink of the paint the seller sprayed on it.

Then let it cool, do a good cleaning, and attempt to seal up that exhaust stub flange, and wait for SS flex vent kit to arrive.
 
Nice find.

Functional stove for $50.

Can't go wrong IMO.
 
High temp RTV will seal that gap. Or you could use cement (2,000*).

Looks good. I thought when I seen the dual blower on one motor, that it was a Positive pressure firebox.. But some later pics show that it is not.

Looks pretty fancy... Testing in the back of the Suburban? ? ;-P

$50.... What a deal. You definitely have been bitten by the "bug"...
 
The one motor for both fans is the same setup my old Whitfield has. I looked and could never find any oil holes, replaced the motor about 4 years ago, other than that all I have done is cleaned it for the past 12 years or so
 
DexterDay said:
Looks pretty fancy... Testing in the back of the Suburban? ? ;-P
I knew somebody would call me out on that. Here's a rear end view of my "testing bench" lol.
 

Attachments

  • Baby Bear Prep 025.jpg
    Baby Bear Prep 025.jpg
    45.1 KB · Views: 858
chamas said:
DexterDay said:
Looks pretty fancy... Testing in the back of the Suburban? ? ;-P
I knew somebody would call me out on that. Here's a rear end view of my "testing bench" lol.

As long as you and truck are safe... ;-P

Just ribbin ya.

Looks good... $50 stove still has me jealous. Looking forward to install pics in the near future.

Hope you blow it out really good with compressed air. Seeing how its outside, you might as well blast it from the inside out and make it good as new...
I'm sure it has seen some usage over the years. A good cleaning, lubing, and new gaskets (if needed) and you'll be good to go.

Good luck...
 
Nice, just that much less oil and gas being burned. Staying warm for el cheapo. PRICELESS!
 
You could also fab up a bit of heavy sheet metal goods and resize the area that blower flange goes up against and then use some sheet gasket material, make certain you do something about the insulating blanket as well as it looks a bit shop warn and must be there to protect the motor etc from heat.

Enjoy the project stove.
 
Smokey which blanket are you concerned about? I'm still learning the terminology.

I have some galv. sheet metal ducting scraps that I could cut up to help close up that exhaust fan housing/ exit flange gap. Looks like the exhaust/intake stub flange will have to come off.

Would this sealant work in that area? (see pic)
 

Attachments

  • Baby Bear Prep 026.jpg
    Baby Bear Prep 026.jpg
    40.1 KB · Views: 750
The blanket just above the combustion blower and just below the motor cooling fan in the right hand picture of your second post above.

That sealant would work as long as you do something about the gap. Otherwise what tj provided a link to handles large gaps. Personally I would do a bit of sheet work and seal it up the right way. I've used the furnace aka retort cement and the sealant you are talking about and for this application I'd go with some sheet gasket, a new metal area to mount the blower flange to and forget about the sealant and cement. But that is just me and I can get very picky about exhaust system repair.
 
chamas said:
Exhaust stub. I found a gap that needs sealing up, you can see in the photo, along the righthand side, there is a fairly large 1/8 - 3/16" gap that could potentially allow exhaust into the back of the stove, hence the room. Any ideas on how to seal this? It looks like the flange that screws onto the back of the stove does not align precicely with the outlet of the combustion fan exhaust housing.

Perhaps you can disassemble that area and enlarge the holes on the panels that are screwed to the stove... you may be able to get more adjustment and get it aligned properly.
 
OK thanks for the clarification. That blanket is more of a pad and yes it is chewed up at the edge there, the rest looks intact but I will look for replacement material. That fan motor seems to run hot anyway-- I IR temp'd it at 160 - 180*F while running. Seemed hot to me but I didn't make the connection that that insulating pad could be contributing to its heat load. That could certainly reduce the life of that motor.

I'll get ready to cut up some of that scrap galv. sheet material and hit the auto parts store for some hi-temp sheet gasket material. With that sandwich other sealant there not needed?
 
chamas said:
OK thanks for the clarification. That blanket is more of a pad and yes it is chewed up at the edge there, the rest looks intact but I will look for replacement material. That fan motor seems to run hot anyway-- I IR temp'd it at 160 - 180*F while running. Seemed hot to me but I didn't make the connection that that insulating pad could be contributing to its heat load. That could certainly reduce the life of that motor.

I'll get ready to cut up some of that scrap galv. sheet material and hit the auto parts store for some hi-temp sheet gasket material. With that sandwich other sealant there not needed?

As long as you can get a compressive seal with bolts and nuts you'll be fine.

That blanket should be cerawool or kaowool.
 
SmokeyTheBear said:
The blanket just above the combustion blower and just below the motor cooling fan in the right hand picture of your second post above.

That sealant would work as long as you do something about the gap. Otherwise what tj provided a link to handles large gaps. Personally I would do a bit of sheet work and seal it up the right way. I've used the furnace aka retort cement and the sealant you are talking about and for this application I'd go with some sheet gasket, a new metal area to mount the blower flange to and forget about the sealant and cement. But that is just me and I can get very picky about exhaust system repair.

Once again the Smokester has a better solution. If you're going to do it, do it right. I'd rip the whole thing apart and start over.
 
Status
Not open for further replies.