Everything Drolet Tundra - Heatmax...

  • Active since 1995, Hearth.com is THE place on the internet for free information and advice about wood stoves, pellet stoves and other energy saving equipment.

    We strive to provide opinions, articles, discussions and history related to Hearth Products and in a more general sense, energy issues.

    We promote the EFFICIENT, RESPONSIBLE, CLEAN and SAFE use of all fuels, whether renewable or fossil.
I really just wanted my money back because I was set on buying a max caddy when all my problems started but now that is not an option I need some input.
Just a thought, maybe you could work out a deal with someone that is getting ready to make a large purchase at Menards (post an ad?) You use your credit to buy their mower/logsplitter/hot tub, whatever, then they pay you cash for it. I know my co-worker has spent tens of thousands at Menards over the last year doing their whole house remodel, sometimes 5Gs in one trip...
 
Last edited:
I hafta say, my first impression after 2 firings, being used to the raw firepower of the mighty mighty Yukon, the heat output of the Tundra is, well, underwhelming. BUT, to be perfectly fair, it is a new install, so I am still getting used to 'er, still tweaking my duct pressures, and my draft is on the low side of the -.04" to -.06" called for since it is not that cold out (40 ish overnight) Also, I have been loading light (like 3 small to medium sized splits) so as to not roast us outta here, and if the Tundra is like my Defender stove in the fireplace, there is a big difference in heat output between a light load and cramming 'er full!
So I guess actual judgement shall be reserved for this fall/winter...I need to quit foolin with this thing and get my AC serviced and ready to go. Pretty hard to not mess with a new stove installed in the late spring though, ya know?! ::-)
 
Last edited:
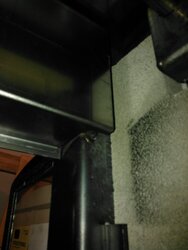
Regarding the cracking around the loading door, @brenndatomu showed his metal heat shield in post #323, and mentioned firebrick as an alternative. I did that this past weekend.

After measuring everything, I cut firebrick to the following dimensions:
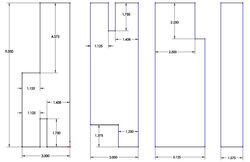
firebrick dimensions.jpg

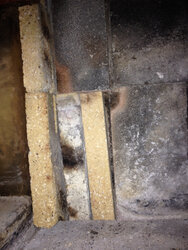
The 1st piece in the above goes on the top front of the firebox, the 2nd piece goes on the bottom front, and the 3rd piece goes on the side top toward the front. After cutting the 4 1/2” wide firebrick to 3” wide for the 1st and 2nd pieces, I had a pair of 1 3/8” wide strips that I was going to toss but they ended up fitting on the side bottom toward the front. The firebox is symmetrical, so I had to multiply all of the above pieces by 2. The below picture shows the final pieces; the pieces on the green kneepad go on the front of the firebox (as looking from inside the furnace), and the pieces off the green kneepad go on the sides of the firebox. (*note that I had some firebrick left over from a previous furnace, so I used that, therefore the burn marks.)
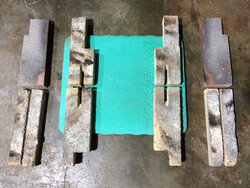
firebrick layout.jpg

This is the top right corner (as seen from inside the rear of the furnace, on the door hinge side)
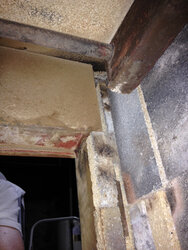
corner view top.jpg

This is the bottom right corner:

corner view bottom.jpg

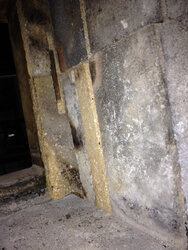
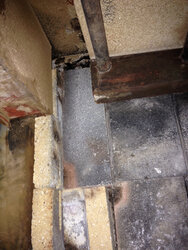
This shows the same bricks looking sideways at the top:
side view top.jpg

And sideways at the bottom:

side view bottom.jpg

As mentioned, the install looks symmetrical on the other side.

I didn’t remove the baffle around the air inlet damper, as Brenndatomu did. I installed the bottom front firebrick, then the top front firebrick, then the top side firebrick, then the bottom side firebrick(s). The side bricks hold the front bricks in place. The secondary burn rectangular tube holds the top side brick in place and the top side brick holds the bottom side brick(s) in place (just like the original Tundra bricks did).

I kept to 1/16” in my dimensions and cuts, but probably could have relaxed that a bit. The 2.25” dimension on the top side firebrick left things a little tight to wiggle the bottom side bricks in below, and I could have made that 2.25” a little bigger with enough meat remaining to be restrained on the top by the rectangular tube for the secondaries.

I had fully intended to cut a single brick for the side bottom, but when I looked at the 1 3/8” cutoffs, they added up to about the right size so I used them instead. I might yet replace them with a single piece, and it won’t be a big deal to cut them if I decide to.

I have a cheap tile wetsaw from a bathroom remodel. It cut the firebrick like butter. However, the bricks were pretty saturated by the time I was done (also from blasting them clean with the garden hose), so it took them a few days in the sun to dry enough for the final install to avoid putting that moisture into my furnace.

The bottom of the loading door still is directly exposed to the firebox. I suppose I could line that with brick, too, but I’ll wait to do that. I’m thinking the bottom might not be quite as hot, and I’ll measure that this winter with the IR gun.

This spring I noticed my loading door handle is not as stiff to unlatch as the floor model at Menards. I remember my handle took some heft to unlatch when new, but not much anymore. I looked closer, and found that the firebox steel on the side of the door is warped a little to relieve the stress in the latch when the handle is closed. Just another indicator in my opinion that the front of the firebox should be lined with brick.

So, hopefully this brick will help stop the cracks in posts #101, #120, and #316 and prevent the latch from relaxing further.
 
  • Like
Reactions: brenndatomu
Just curious, why did you use firebrick and not a ceramic blanket? I would think a ceramic blanket would insulate better than firebrick...especially the non-insulating type of firebrick which looks like you used.
 
Good question. Answer is simply that I don't know much about ceramic blanket, nor the difference between insulating or non-insulating firebrick, nor a good place to touch and feel and buy these items. But I'm willing to learn, I'll take any info.
 
  • Like
Reactions: STIHLY DAN
Thanks for the info JrHawk9. The leftover firebrick from the old furnace was heavier than the same sized bricks from the Tundra, so that sounds consistent with the description in your above article that insulated aren't as dense, and that the ones I used for the front probably aren't insulated.

Last winter I took temps on the front outside of the furnace with the IR gun, so I'll compare with the uninsulated firebrick to see how well I do. Like you said, I guess anything is better than the nothing that was there.
 
  • Like
Reactions: JRHAWK9
Nice work DB! I'm sure that was a lot cheaper than the way I did it. Gonna be kinda interesting to see exactly how Drolet does (did) this mod.

This spring I noticed my loading door handle is not as stiff to unlatch as the floor model at Menards
Check section 5.1.3 (page 26 in my manual) it tells how to adjust that door latch tension.

Just curious, why did you use firebrick and not a ceramic blanket? I would think a ceramic blanket would insulate better than firebrick...especially the non-insulating type of firebrick which looks like you used.
I think any firebrick will provide some protection (shielding) from those intense temps of a huge glowing bed of coals. Basically, lighter bricks insulate better than heavier ones.
I think the main thing is gonna be just shielding the front panel from the fire more so than actually "insulating". I think when comparing the temps on the front now, vs pre shield, it will be much lower now. Much more even across the total area of the one piece (mostly) panel that forms the front of the furnace.

I agree, but just thought I'd mention it seeing he went through the process. He may have been able to do the same process with a different product and have better results. Who knows though.
 
He may have been able to do the same process with a different product and have better results.
I appreciate the mention, it's always worth knowing what better options might be.

My backup plan (if the old firebrick was too crumbly or something) was to swing by Menards for a 6-pack of Vogelzang firebrick. The specs online don't say insulated or non-insulated. But, it says the pack is 25 lbs and I'm guessing 4 lb per brick is probably uninsulated, based on what the bricks felt like last weekend.

But if those were the only bricks readily available, I'd still probably do that and think they would make a large improvement over nothing.

Thanks everyone.
 
Interesting info on firebrick...https://www.google.com/url?sa=t&rct=j&q=&esrc=s&source=web&cd=4&cad=rja&uact=8&ved=0CC8QFjADahUKEwiSxICkhqXHAhWNjpIKHfbkATQ&url=http://ceramicartsdaily.org/wp-content/uploads/2010/06/firebrick-types.pdf&ei=3QXMVdLhIo2dygT2yYegAw&usg=AFQjCNH1dNlVTBVeWR0hL-45Ub-tpEO7OA

I have a cheap tile wetsaw from a bathroom remodel. It cut the firebrick like butter. However, the bricks were pretty saturated by the time I was done (also from blasting them clean with the garden hose), so it took them a few days in the sun to dry enough for the final install to avoid putting that moisture into my furnace.
BTW, low or medium duty firebrick (what is in most wood furnaces) can be cut dry with a diamond blade, no problem, especially on a small project like this. Gotta wear a good dust mask though...silicosis and all...
We make road cuts (concrete with rebar), cut everything from cast iron, ductile iron, steel, etc with our Stihl concrete saw at work, all done dry, diamond blades last for 6 months or so depending on circumstances and run time. Gotta admit, we are pretty hard on them though
 
1st post on this forum, been doing some reading and found a lot of great info.I just purchased a Tundra and will be doing the install in the next few weeks. I have a question about the Ductwork which I will be calling SBI this week and questioning them about it also. So I see they want to keep the static pressure in the ducts at .2wc. So with the 2-8" collars they provide that's roughly 660cfm in total or 330cfm per 8" supply @ .2wc. My question is why do they have a 4 speed blower that goes 900,1000,1200 and 1400cfm on high. I am wondering what you guys ended up doing with your installs and what calculations you used? The Ductwork is being installed just for the Tundra itself.
 
1st post on this forum, been doing some reading and found a lot of great info.I just purchased a Tundra and will be doing the install in the next few weeks. I have a question about the Ductwork which I will be calling SBI this week and questioning them about it also. So I see they want to keep the static pressure in the ducts at .2wc. So with the 2-8" collars they provide that's roughly 660cfm in total or 330cfm per 8" supply @ .2wc. My question is why do they have a 4 speed blower that goes 900,1000,1200 and 1400cfm on high. I am wondering what you guys ended up doing with your installs and what calculations you used? The Ductwork is being installed just for the Tundra itself.
There is a lot of factors when it comes to duct work. For example the length of runs, register supply size, number of heat register vents, and return pressure to name a few. So depending on those factors and pressures you may need to increase or decrease the blower speed to maintain .2wc
 
I do have a preliminary plan that I came up with showing the runs of duct I will be doing. I will try to post the layout when I get home or tomorrow and see what you guys think.
I will also add that I did call SBI prior to purchase to confirm that they did resolve the issue of cracking and I was told they did. SBI did also state that it had a lot to do with improper use and install. Just to let you guys know I have Serial #1993 with late 2014 production. I purchased from L&M farm and fleet supply. $1249.00 on sale. $1460 delivered to my driveway in CT. L&M was great to deal with and I would purchase from them again.
I disagree with their statement that it has to do with improper use and install. If that would have been the case than why did they reimburse us "me being one" that had the issues with no objections at all?
 
Yeah, SBI is using that as a cop out IMO. I'm sure there were some "improper" installs, but building steel fireboxes is not exactly a new science and there are tons of 'em out there that have had the bag run off of 'em for years and no cracks. I guess me personally it would have been easier to just accept, forget and move on with the whole thing if they just admitted to inferior metal or a design/manufacturing weakness, whatever.

I purchased from L&M farm and fleet supply. $1249.00 on sale. $1460 delivered to my driveway in CT. L&M was great to deal with and I would purchase from them again.
Good deal!
So would you mind posting some pics of the front of it...outside, and then on the inside of the door on either side (back side of the front of the firebox)
 
  • Like
Reactions: STIHLY DAN
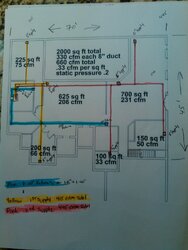
Ok here is the ductwork layout i have to date:
The Blue is Returns = 2-10"
The Red is 1st Supply= 8" round with 3-5" & 1-6" supplies about 445 CFM
The Yellow is 2nd Supply=8" round with 1-7" & 2-5" supplies about 415 CFM
I will be using take offs with dampers at each supply branch just in case i need to play with airflow alittle.
duct 2.jpeg
 
Yeah, SBI is using that as a cop out IMO. I'm sure there were some "improper" installs, but building steel fireboxes is not exactly a new science and there are tons of 'em out there that have had the bag run off of 'em for years and no cracks. I guess me personally it would have been easier to just accept, forget and move on with the whole thing if they just admitted to inferior metal or a design/manufacturing weakness, whatever.


Good deal!
So would you mind posting some pics of the front of it...outside, and then on the inside of the door on either side (back side of the front of the firebox)
 
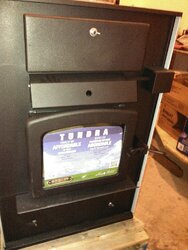
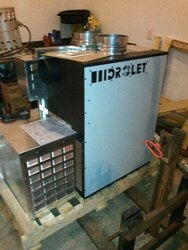
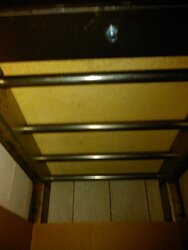
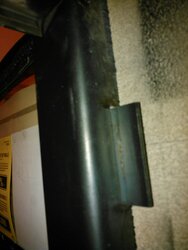
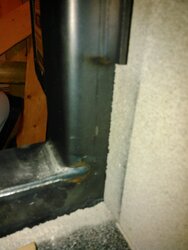
I love seeing pictures myself so its only fair being a new guy i post some. I think they changed the steel plate above the fire tubes its now made of firebrick material. I could be wrong but i think i saw a picture on here that showed it in steel. I'll keep posting more pictures as install continues and hope maybe it will help some others that may think of installing one in the future. First i need to start with lighting a fire outside in the yard with it before bringing it in so i don't smoke out the house with curing stuff.
KIMG0259.jpeg KIMG0258.jpeg KIMG0260.jpeg KIMG0261.jpeg KIMG0264.jpeg KIMG0266.jpeg
 
  • Like
Reactions: brenndatomu
My exact words to the SBI tech, "So your telling me the issues with the fireboxes cracking has been taken care of " Reply was "yes". I followed up by telling him consider having another one sold and thank you for your help.
I did notice a change. If you look at post #328 (he is installing firebrick in the front. above the door the metal on mine goes from firebrick to firebrick. where his looks like it stops just past the door so he had room to run the firebrick up to the top along side the metal.
 
Last edited:
My exact words to the SBI tech, "So your telling me the issues with the fireboxes cracking has been taken care of " Reply was "yes". I followed up by telling him consider having another one sold and thank you for your help.
You should have asked him how they actually fixed the problem. I don't know if anyone actually knows. Maybe they actually didn't do anything?
 
  • Like
Reactions: DoubleB
Looks the same to me.
Ditto here.
I wonder when they changed things...build date could mean everything. Maybe hafta get into something made in the last few months?
 
  • Like
Reactions: STIHLY DAN