Last edited:
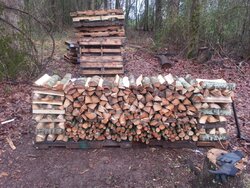
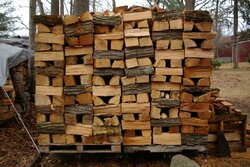
First attempt at cribbing
- Thread starter Rebelduckman
- Start date
-
Active since 1995, Hearth.com is THE place on the internet for free information and advice about wood stoves, pellet stoves and other energy saving equipment.
We strive to provide opinions, articles, discussions and history related to Hearth Products and in a more general sense, energy issues.
We promote the EFFICIENT, RESPONSIBLE, CLEAN and SAFE use of all fuels, whether renewable or fossil.
You are using an out of date browser. It may not display this or other websites correctly.
You should upgrade or use an alternative browser.
You should upgrade or use an alternative browser.
- Status
- Not open for further replies.
RockyFordOak78
Member
Woody Stover
Minister of Fire
Sometimes I'll just cross-stack a couple of splits on the end, every third layer or so. Seems to work pretty well....
paul bunion
Minister of Fire
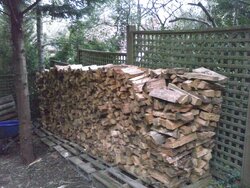
View attachment 130396 Pass or fail? Maybe it'll stay up. Took down a small pin oak today and decided to try it. I'll have to say it was much easier like this. No posts or timbers to worry with.
Looks real good. Split them big and square and you can go real high. And then wait for them to dry.
firefighterjake
Minister of Fire
Looks real good. Split them big and square and you can go real high. And then wait for them to dry.
View attachment 130408
That looks great.
midwestcoast
Minister of Fire
Looks nice.
Hard to tell from the pic, but maybe the right side is leaning out a bit? If so that could be an issue if you go higher. Keeping it low like that = much less likely to fall.
Not saying I could do any better, I've done my share of re-stacking...
Hard to tell from the pic, but maybe the right side is leaning out a bit? If so that could be an issue if you go higher. Keeping it low like that = much less likely to fall.
Not saying I could do any better, I've done my share of re-stacking...
yooperdave
Minister of Fire
Looks nice.
Hard to tell from the pic, but maybe the right side is leaning out a bit? If so that could be an issue if you go higher. Keeping it low like that = much less likely to fall.
Not saying I could do any better, I've done my share of re-stacking...
Yea it's leaning out some. Noticed the pallet was on a high spot after the fact. Only reason it's that low is it was a small tree. I'm thinking if I do it this way, I'll probably stack low anyway
tfdchief
Minister of Fire
Looks good, but as others have said, make sure the ends don't go up leaning out. I'm like Jake, I don't even like vertically plumb, although it looks the best. As the wood drys it settles and if the ends are plumb, then they will often start leaning outward, and you may even lose them before you burn it. I stack my ends slightly out of plumb to the inside. That will take care of the aforementioned problem......Never fall down if you do it that way.
Woody Stover
Minister of Fire
Backwoods Savage
Minister of Fire
Looks good for your first try. It is not too late to fix that rh side either. Shoot, I've even been known to tear apart a short end like that if it didn't look strong enough. Best way I can say is stack it up the put your eye so you look straight down the end. If you can see the ends of the other pieces, you are fine. If not, you have gone too far out. In addition, there is no reason for not filling up the holes in the cribs. Sadly, the best pieces for this are those small rounds on the bottom of the stack. Just remember this on your next stack.
As for height, we've stayed right at 4 1/2' in height for some time now and find that about the best. Higher and the piles tend to get a bit shaky. It can also help a bit if you pile the center of the row a bit higher than than the ends rather than a level pile so that water will run off easier.
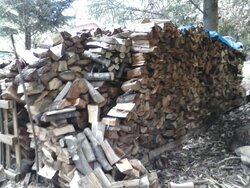
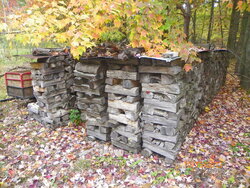
Here is what is left of some wood that was stacked almost 5 years ago; April, 2009. For most of these stacks we put kindling wood in the cribbed ends. If we need kindling, it is easy to find this way.

BEConklin
Feeling the Heat
A- ... I'm a tough grader though. I like to halve the ends go up level or lean a bit to the inside vs. Outside.
Looks better than mine right now
I was building one the other day - my first stack with cribbed ends - and I had the cribs leaning in towards the center. It was working pretty well and I thought it looked great. I was about 2/3 done and I brought some more hickory rounds out of the woods to split. I figured I'd do that right there and so I began to set them down on top of the stack. But one round slipped and I dropped it about 3 inches on to the pile... which promptly shifted - blowing one of the crib ends out the other way ....grrr

I took the rounds off the stack and tried to whack the splits back into line but it ended up that I had to take the pile down about halfway on that side and that crib had to be taken down to near the bottom to start all over again.
Learned a lesson though - don't drop heavy rounds on top of a stack with cribbed ends

tfdchief
Minister of Fire
I have seen those stacks in person. Dennis is the master.Looks good for your first try. It is not too late to fix that rh side either. Shoot, I've even been known to tear apart a short end like that if it didn't look strong enough. Best way I can say is stack it up the put your eye so you look straight down the end. If you can see the ends of the other pieces, you are fine. If not, you have gone too far out. In addition, there is no reason for not filling up the holes in the cribs. Sadly, the best pieces for this are those small rounds on the bottom of the stack. Just remember this on your next stack.
As for height, we've stayed right at 4 1/2' in height for some time now and find that about the best. Higher and the piles tend to get a bit shaky. It can also help a bit if you pile the center of the row a bit higher than than the ends rather than a level pile so that water will run off easier.
Here is what is left of some wood that was stacked almost 5 years ago; April, 2009. For most of these stacks we put kindling wood in the cribbed ends. If we need kindling, it is easy to find this way.
View attachment 130425

Looks good for your first try. It is not too late to fix that rh side either. Shoot, I've even been known to tear apart a short end like that if it didn't look strong enough. Best way I can say is stack it up the put your eye so you look straight down the end. If you can see the ends of the other pieces, you are fine. If not, you have gone too far out. In addition, there is no reason for not filling up the holes in the cribs. Sadly, the best pieces for this are those small rounds on the bottom of the stack. Just remember this on your next stack.
As for height, we've stayed right at 4 1/2' in height for some time now and find that about the best. Higher and the piles tend to get a bit shaky. It can also help a bit if you pile the center of the row a bit higher than than the ends rather than a level pile so that water will run off easier.
Here is what is left of some wood that was stacked almost 5 years ago; April, 2009. For most of these stacks we put kindling wood in the cribbed ends. If we need kindling, it is easy to find this way.
View attachment 130425
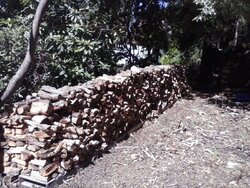
That spot looks like it might be a little shady.My spot where I'm gonna be stacking is very similar. Does it slow the drying process much?
tfdchief
Minister of Fire
Yep, most of us learn all those things the hard way....but you won't make that mistake again. I stack/crib my ends and then as I stack in between, I try to stabilize the cribbed ends with the splits I stack in between. Sometimes I even through in some really long splits into the cribbed ends, parallel to the stack, and then when I stack the splits in between the cribbed ends they set on the long splits in the cribbed ends. Really ties it all together and makes it stable. I push back and forth on my cribbed ends as I go up to check stability and sometimes do a little shimming with scraps from splitting. I have learned that it all pays off in the end. In 40 years, I have only had a few stacks fall over, and that was a long time ago. I love everything about wood burning except stacking, so I have learned to do it right the first time. I sure as heck don't want to do it twice!Looks better than mine right now
I was building one the other day - my first stack with cribbed ends - and I had the cribs leaning in towards the center. It was working pretty well and I thought it looked great. I was about 2/3 done and I brought some more hickory rounds out of the woods to split. I figured I'd do that right there and so I began to set them down on top of the stack. But one round slipped and I dropped it about 3 inches on to the pile... which promptly shifted - blowing one of the crib ends out the other way ....grrr
I took the rounds off the stack and tried to whack the splits back into line but it ended up that I had to take the pile down about halfway on that side and that crib had to be taken down to near the bottom to start all over again.
Learned a lesson though - don't drop heavy rounds on top of a stack with cribbed ends

Yep, most of us learn all those things the hard way....but you won't make that mistake again. I stack/crib my ends and then as I stack in between, I try to stabilize the cribbed ends with the splits I stack in between. Sometimes I even through in some really long splits into the cribbed ends, parallel to the stack, and then when I stack the splits in between the cribbed ends they set on the long splits in the cribbed ends. Really ties it all together and makes it stable. I push back and forth on my cribbed ends as I go up to check stability and sometimes do a little shimming with scraps from splitting. I have learned that it all pays off in the end. In 40 years, I have only had a few stacks fall over, and that was a long time ago. I love everything about wood burning except stacking, so I have learned to do it right the first time. I sure as heck don't want to do it twice!
more great tips! Keep em coming!
Last edited:
tfdchief
Minister of Fire
Thanks Rebelduckman, You will find that in this place you will find an incredible wealth of knowledge. No no-it-alls, just a great group of wood burners wanting to help each other. When I found this place, I thought I had burned wood so long that I knew everything there was to know about it. I can't even begin to tell you how much I have learned and tips I have used from members on this forum that have made me a better wood processor and wood burner. You just keep asking and these guys will just keep giving you great ideas!more great tips! Keep em coming!

Driver
Member
I just found this site in Feb.(wish I would have a few years earlier) didn't really think I'd learn much, boy was I wrong, always tips and ways of doing things I hadn't thought of.When I found this place, I thought I had burned wood so long that I knew everything there was to know about it. I can't even begin to tell you how much I have learned and tips I have used from members on this forum that have made me a better wood processor and wood burner.
tfdchief
Minister of Fire
Well, if you haven't been welcomed to the forum, WELCOME!! We all love this place and love to help each other.I just found this site in Feb.(wish I would have a few years earlier) didn't really think I'd learn much, boy was I wrong, always tips and ways of doing things I hadn't thought of.
Auzzie Gumtree
Minister of Fire
- Oct 17, 2012
- 535
- Status
- Not open for further replies.
Similar threads
- Replies
- 30
- Views
- 2K
- Replies
- 44
- Views
- 2K
- Replies
- 18
- Views
- 2K


