GCI 60 Smoke Smell From Blower.

  • Active since 1995, Hearth.com is THE place on the internet for free information and advice about wood stoves, pellet stoves and other energy saving equipment.

    We strive to provide opinions, articles, discussions and history related to Hearth Products and in a more general sense, energy issues.

    We promote the EFFICIENT, RESPONSIBLE, CLEAN and SAFE use of all fuels, whether renewable or fossil.

Tom59

New Member
Sep 22, 2019
11
Na
Hello,

I realize there are quite a few ‘smoke smell’ posts but I haven’t found anything specific to the GCI 60 insert.
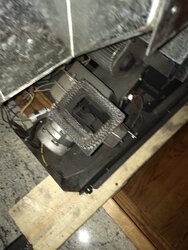
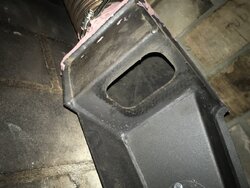
Just bought a used stove, it’s a 2014, installed the entire thing myself including the 4 inch liner. Now that I’m running the stove I’m getting a smoke smell when the blower kicks on. Could this be due to the slight gap where the heat exchange tube scraper handle inserts in to the firebox?
 
Did you use a t connector on the flue?

No, the manual doesn’t call for it. It’s the insert version not the free standing.

I did replace the 120 degree exhaust sensor the other day and Lao checked to be sure the exhaust fan is turning and blowing air, which it is.
 
Liner slides over the ‘chimney’ shown in the picture attached. That chimney is a part of the frame that the stove slides in to. The stove locks in to the frame and presses the exhaust fan against the ‘chimney’ Attached to the frame. Does that make sense?
 

Attachments

  • 62795047-E729-40A4-8B41-E0DCE15A5998.png
    62795047-E729-40A4-8B41-E0DCE15A5998.png
    230.1 KB · Views: 157
We had this same problem on an insert last week. The liner wasn’t connected tight into the stub connector and no sealant was used on the connector or the connection to the stove flue. The convection fan was drawing in smoke from the leak.
 
Liner slides over the ‘chimney’ shown in the picture attached. That chimney is a part of the frame that the stove slides in to. The stove locks in to the frame and presses the exhaust fan against the ‘chimney’ Attached to the frame. Does that make sense?
Did you use sealant? And I believe there should’ve a stove adapter that connects the liner to the stove. Did uyyou just slide the liner over the stove flue and lamp it?
 
That was a thought I had. I bought some high temp sealant today. It’s drying as we speak. Any thoughts about the gasket that attaches the exhaust fan to that stub on the frame? It just presses up against it, worries I’m not getting a seal there’s. Is that a common problem. Picture of the current gasket attached.
 
Pics referenced
 

Attachments

  • B76984D1-5DB7-4486-90BB-5DA26C3074DC.jpeg
    B76984D1-5DB7-4486-90BB-5DA26C3074DC.jpeg
    133.3 KB · Views: 160
  • 2620DBA6-5B6A-4181-8E6C-0CE4A2963A69.jpeg
    2620DBA6-5B6A-4181-8E6C-0CE4A2963A69.jpeg
    133.3 KB · Views: 163
  • 4BF02C0E-DC28-44BE-BC70-F632C38A41C6.jpeg
    4BF02C0E-DC28-44BE-BC70-F632C38A41C6.jpeg
    106.2 KB · Views: 167
Did you use sealant? And I believe there should’ve a stove adapter that connects the liner to the stove. Did uyyou just slide the liner over the stove flue and lamp it?

I had clamped it. I sealed it today. When you say ‘stove adapter’ you mean the part of the frame that the liner slides over correct? I took a couple pictures and attached them here. Is this what you’re referring to?
 

Attachments

  • A09E88AA-7806-4DD5-8165-0DF44346E9B0.jpeg
    A09E88AA-7806-4DD5-8165-0DF44346E9B0.jpeg
    126.3 KB · Views: 162
  • F7479776-50CD-4E19-BD72-60CC393B9F15.jpeg
    F7479776-50CD-4E19-BD72-60CC393B9F15.jpeg
    115.9 KB · Views: 158
  • 3260F9AE-5BF7-4236-BB84-DD4BEAF295BA.jpeg
    3260F9AE-5BF7-4236-BB84-DD4BEAF295BA.jpeg
    190.9 KB · Views: 179
I believe there should be an adapter the goes onto the t and connects tight to the pipe. Here’s what I’d do. Turn off the lights and get a flashlight and start the stove. Slide the insert out enough so you can see all the connections. Make sure to look where the stove flue connects into the chimney on the frame.
 
I’m pretty sure the piece your referencing is there. The liner did slide over it. The issue with moving the stove to look for smoke is that the flue (exhaust blower) separates from the chimney on the frame. The two parts I’m referencing , pics below, just press against one another. They are held together by latches on the front that suck the stove back in to the frame.
 

Attachments

  • 23A250A7-7D1A-4171-BC60-79A5A9C7707D.jpeg
    23A250A7-7D1A-4171-BC60-79A5A9C7707D.jpeg
    190.9 KB · Views: 149
  • A9D37305-E1FE-4242-8D98-DEFF25B3EDDF.jpeg
    A9D37305-E1FE-4242-8D98-DEFF25B3EDDF.jpeg
    115.9 KB · Views: 150
That stove does not use a stove adapter, it uses a flex adapter to connect the liner and then to the exhaust flange on top of the frame on the back left side. The liner must be secured to the flex adapter with at least 3 self tappers and sealed with silicone. I always add silicone to the flex liner then insert it into the flex adapter and after putting in the self tapping screws I add more silicone to assure a complete seal. I use the clear RTV high temp silicone because it looks better. I had the same problem and replacing the rope gasket on the exhaust flange in you picture fixed it in my case. Also make sure after the stove slides into the frame, the latches latch up tight.
One more place to check is where the exhaust flange connects to the exhaust housing, I saw one case where the screws were loose and the silicone seal broke. In that case I had to remove the flange and clean off the old silicone with a wire wheel on my drill driver, then use new silicone to seal it inside and I put extra silicone on the outside after putting the flange back on then I used slightly larger stainless steel self tappers for a good solid connection. If the screws are stripped and the flange wiggles back and forth just adding more silicone does not “cut the mustard”
Also I like to run a 3” aluminum liner up the chimney with a separate chimney cap that must be 1 foot lower than the flue cap. This brings fresh air into the burnpot and then 100% Fire proof Roxul insulation can be added right above the stove to keep any heat from going up the chimney thus giving you and added 10 % more efficiency. I did that on a stove in an all electric house and that winter which was a very mild one, the owners electric bill dropped by 8.7 %
Just my experience.
Good Luck:)
 
Last edited:
  • Like
Reactions: vinny11950
Great info.

I ran the 4 inch flexible stainless steel liner straight straight to the exhausts flange on the frame. Is that ok?
The 3 Inch liner your referring to is the same as an OAK correct? Do you connect yours to the back of the stove? How would I know if an OAK is necessary in my case?

Thanks for the help!
 
So I think I’ve fixed the issue by sealing the flex liner to the exhaust flange. Stoves been burning with no smoke smell. Hopefully that did it. Thanks for the help!!
 
Great info.

I ran the 4 inch flexible stainless steel liner straight straight to the exhausts flange on the frame. Is that ok?
The 3 Inch liner your referring to is the same as an OAK correct? Do you connect yours to the back of the stove? How would I know if an OAK is necessary in my case?

Thanks for the help!
The flex adapter is made to make it easier to properly seal the liner to the stove frame so that is recommended.
Yes the 3” liner is for the oak on the back of the stove and really does make it 10 % more efficient when you add Roxul after the oak is installed,
 
Awesome. Thanks for the info! I’m definitely going to add the roxul. Might hold off on the oak until next year though.

Any thoughts on a good pellet for this stove?
 
Try a few bags of different brands that are local to you and see what burns best in your stove.
 
Awesome. Thanks for the info! I’m definitely going to add the roxul. Might hold off on the oak until next year though.

Any thoughts on a good pellet for this stove?
The Vermont Pellets are the best we have seen. :)