Hello!
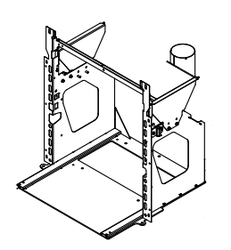
I've recently purchased a floor-model (2014 build date) Harman 52i insert. The stove came with an outside air kit that I'm trying to install prior to having a chimney sweep come out to drop the liner.
Does anyone have access to the installation instructions that would have come with the OAK? It appears to be pretty straight forward to install but I need to verify I'm supposed to drill for the inner-most screw. After removing the little stubby pipe that comes installed on the stove only two of the three holes for the OAK flange line up with existing holes. The bottom hole lines up with the same hole used by the stubby pipe, the hole toward the left edge of the stove lines up with an existing hole but there is no hole for the screw in the center of the stove. I removed the left blower fan to get better access to that area and there's nothing. The screws are self-drilling sheet metal screws so I'm wondering if I'm supposed to just drive them in like the two smaller screws that go into the back of the hopper.
Anyone installed one of these kits themselves?
Thanks in advance! I've been reading tons of great posts on here in preparation for having my stove installed but this is my first post. I will be making another post soon for the DIY service rails I built. Thanks to all the regulars on here who provide so much good information!
-Matt