Harman Accentra, 10 years old, but new to me.

  • Active since 1995, Hearth.com is THE place on the internet for free information and advice about wood stoves, pellet stoves and other energy saving equipment.

    We strive to provide opinions, articles, discussions and history related to Hearth Products and in a more general sense, energy issues.

    We promote the EFFICIENT, RESPONSIBLE, CLEAN and SAFE use of all fuels, whether renewable or fossil.
Status
Not open for further replies.

womaus

Feeling the Heat
Oct 25, 2015
498
Central MA
Greetings again,

A well used well cared for Harman Accentra is about to grace my doorstep. I'll be leaving it there for a couple of days so that I can do a deep clean and get to know her routine, then it will come into the house for installation. I'll need those days anyway, need to get city permit in place, blindfold the wife (or send her on a cruise), and take a few deep breaths.

The exterior cast iron looks like a well used stove. Nothing major in the way of damage, just a bit mottled in looks. What do the people recommend for brightening up the look?

-- MEECO'S RED DEVIL 402 Stove Paste

-- Rutland William's Stove Polish

-- Rutland Stove Polish Paste

--IMPERIAL 6-oz Stove Polish

Any other good products out there?

Or go old school?

Lamp black mixed with beeswax was one method. Lamp black, sugar and water to make a thin paste applied, allowed to dry and then rubbed down with mutton fat was another. Lamp black is basically carbon powder, finer than soot or graphite.

The old school approach has a certain intrigue, I do like a good piece of mutton.

Picking up the stove tomorrow. Some of the above products are available locally, some through Amazon. Ordering through Amazon tonight if needed will have them here Monday latest, that would work for me. Most of the internal cleaning should be complete by then.

Who has preferences?
 
  • Like
Reactions: Peterfield
DSCN0158.JPG
 
So, I'm thinking by the size of the graphic you're recommending MEECKO'S?

Looks like Amazon it is...not available locally as far as I know.
 
Next question:

I've got the thru-wall apparatus, but what vent pipe do you guys recommend?

Lowe's has some Duravent components on the shelves, but not all. Home Depot, in this area, seems to have gotten out of the pellet stove business.

Again, I have time before installation. I can order and wait.

Recomendations?
 
If you go with Duraleak venting, make sure to get a roll of self bonding silicone tape to shrink wrap ALL of the interior joints. It will prevent any pin hole leaks that use of tube silicone may get and is easier to remove if one needs to change or replace. Often found in the electrical dept.
 
If you go with Duraleak venting, make sure to get a roll of self bonding silicone tape to shrink wrap ALL of the interior joints. It will prevent any pin hole leaks that use of tube silicone may get and is easier to remove if one needs to change or replace. Often found in the electrical dept.

I've seen that recommendation before on the forum.

Your input is greatly appreciated.

Better to order Selkirk (sp?) or another online? Again, I've got time. At least I think so....
 
Have not heard many complaints of the Selkirk. I have not used much of it.
 
Lots of people use Stove Bright spray paint. It's most likely what your stove was painted with at the factory.

The problem with stove polish, at least in my experience, is it always seems to want to come off onto something you don't want it on. I had this experience even with all the rubbing and polishing in the world. Can also look splotchy when finished. JMO
I used stove polish on my coal stove..but yeah when you touch it it gets on ya..if it's outside..give it a good high heat paint job..then fire it up outside to get rid of the smell
 
If you have the time its hard to beat a strip-blast and couple coats of stove paint. Strip out the door gaskets and replace now too.
The more renewal you do before install the better.
 
  • Like
Reactions: JimD
If you have the time its hard to beat a strip-blast and couple coats of stove paint. Strip out the door gaskets and replace now too.
The more renewal you do before install the better.

The door gaskets look to be in very nice shape, possibly replaced within the past few years. Strip blast the outer? Not sure if I'm that, well, needy. If it looks presentable, and heats the way I'd like I'm OK with it.

Going through the internals I'll be sure to look at all gaskets, all connections.

I've got lots of time. We never turn the heat on until after Thanksgiving.
 
  • Like
Reactions: JimD
Greetings again,

A well used well cared for Harman Accentra is about to grace my doorstep. I'll be leaving it there for a couple of days so that I can do a deep clean and get to know her routine, then it will come into the house for installation. I'll need those days anyway, need to get city permit in place, blindfold the wife (or send her on a cruise), and take a few deep breaths.

The exterior cast iron looks like a well used stove. Nothing major in the way of damage, just a bit mottled in looks. What do the people recommend for brightening up the look?

-- MEECO'S RED DEVIL 402 Stove Paste

-- Rutland William's Stove Polish

-- Rutland Stove Polish Paste

--IMPERIAL 6-oz Stove Polish

Any other good products out there?

Or go old school?

Lamp black mixed with beeswax was one method. Lamp black, sugar and water to make a thin paste applied, allowed to dry and then rubbed down with mutton fat was another. Lamp black is basically carbon powder, finer than soot or graphite.

The old school approach has a certain intrigue, I do like a good piece of mutton.

Picking up the stove tomorrow. Some of the above products are available locally, some through Amazon. Ordering through Amazon tonight if needed will have them here Monday latest, that would work for me. Most of the internal cleaning should be complete by then.

Who has preferences?

Congrats! Glad you were able to find one as well. I just painted mine this afternoon with this Krylon product I saw someone on this board speak highly of. Looks really sharp I think.
 

Attachments

  • 20151029_173208 (960x1280).jpg
    20151029_173208 (960x1280).jpg
    115.5 KB · Views: 242
  • 20151029_184117 (600x800).jpg
    20151029_184117 (600x800).jpg
    66.9 KB · Views: 217
Congrats! Glad you were able to find one as well. I just painted mine this afternoon with this Krylon product I saw someone on this board speak highly of. Looks really sharp I think.

Better looking than mine right now. Nice job.
 
Hey, congrats on your find. You're going to be addicted soon enough.

You're not getting off that easy...I still need your advice. You're one of the ones I've learned to trust.

Got advice on pipes?
 
You're not getting off that easy...I still need your advice. You're one of the ones I've learned to trust.

Got advice on pipes?
Only what I've already read above - those seem to be the two brands most mentioned. You might do a quick search on CL. Once in a while someone will be selling pipe but you have to be careful because pellet pipes do deteriorate over time.
 
Only what I've already read above - those seem to be the two brands most mentioned. You might do a quick search on CL. Once in a while someone will be selling pipe but you have to be careful because pellet pipes do deteriorate over time.


Most likely will go new with pipes...I've saved enough with the used purchase.

Thanks.
 
  • Like
Reactions: JimD
I use DuraVent, full install kit purchased last year at TSC. I have zero leaks and do not use tape. The tape is still a good idea for peace of mind, but DuraVent works just fine. I'm on my second year with it and no signs of corrosion (I burn only wood pellets, no corn) and for the price, I am happy.

CO detector in the stove room, 1 other room on that floor, and 2 each on the 2nd and 3rd floors. Never had one go off.

Only bit of advice is goop the hell out of the appliance adapter where it connects to the stove. High temp silicone stuff. That's usually where it leaks and people get that "smokey smell" when they first light off the stove.
 
  • Like
Reactions: womaus
But you mentioned the approval of the the wife!

Ahhh.....I went back to see what I meant by the "not that needy" comment.

You're right. I better get this thing looking good.

No MEEKO'S in the area, picked up some Rutland polish in the tube.

Applied for the building permit this morning, to be entirely legal. Won't be able to cut the hole for another week or so (legally).

Picking up the stove in 45 minutes. Everybody, please wish my back well. We're going to try to hump it into the back of a van.
 
I use DuraVent, full install kit purchased last year at TSC. I have zero leaks and do not use tape. The tape is still a good idea for peace of mind, but DuraVent works just fine. I'm on my second year with it and no signs of corrosion (I burn only wood pellets, no corn) and for the price, I am happy.

Thanks for that. Seems like there's only Duravent in the immediate area.

Not sure if I need the full $230.00 box kit. I may try to source the individual pieces. As the previous post, I shouldn't start the install for another week. Don't want to piss of the city or the insurance people. Lots of time to get this done.
 
The ongoing saga of the Accentra:

I picked up the device Friday afternoon, wrestled it onto a two wheeler, cardboard sheets for protection, secured with a couple of winch straps.

Slid from top of stairs onto an ex-UHaul ramp straight into the back of a Ford Econoline, on it’s side.

Strapped the two wheeler / stove secure with more winch straps, side to side of the van, front to back.

Only had to move it a mile. Had to stop three times to reconfigure the straps, tighten up the straps where needed. Very happy I only had to go the short distance.

Was going to put it in the garage for the deep clean, but smartly reconsidered that and drove the van across the lawn up to the front entry steps. Harbor Freight ramps (purchased for this) employed to get the stove out.

29e4u9k.jpg

Ramps had a slight incline to the steps. Me, bent over in the van, trying to get the two wheeler up and moving and up that incline was not going to happen. Took one of the straps, grabbed the front axle with the S hook, then tied the strap around my wife’s waist. Told her she was going to act as the mule…

That got her mad enough to get the stove up the slight incline with ease, up onto the front landing. (Sorry, no pic)

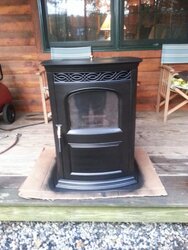
Wrapped it up in case of rain.

The next day (Saturday) I rounded up some tools, get the air compressor in place, spent some time in the forums for tips on cleaning.

Pulled off the back panels. Immediately some things looked odd. This is an older Accentra, has the chain drive for the auger. The chain appeared to be extremely tight, to the point of scoring a groove into the heavy plastic wheel. I pulled the wheel, found the bolt head had recessed and cut into the plastic. Looking at the schematics in the original manual it appears that this wheel does not actually need to roll, it just acts to keep the chain from jumping the sprockets? I flipped the wheel around, set it as I think it should be.

While doing that I found that the transfer case for the auger looked to be splitting apart? Pulled the unit, all 6 screws needed to be fully tightened (quite a bit, too). I’m betting that there’s bit of debris inside the case, most likely causing some wear and tear on those gears. I’m wondering if I should pull it apart, clean and re-grease, or just order another new and have it on hand?

2vlae61.jpg

Clean out door behind the auger motor pulled, not much in there. The gasket looks to be needing replacement. I’ll get one on order.

Got all that back together. Onto the front. Had a hell of a time getting the latches in the upper corners to release the cast iron firebox panels. Hit with some PB Blaster, let sit while I tended to some other things. Still no luck with easy movement. Employed a long bolt and hammer to get a bit of movement in place, then a decent pair of pliers. Within minutes had both moving freely. Pulled panels, looked to be pretty clean. Scraped all components and areas.

Pulled bottom exhaust fan cover…this too looked good. Cleaned everything here. Wiped down the ESP.

Then got the compressor charged up, started blowing out the fans, the firebox area, the heat exchangers, inside the front of the door, underneath the stove. Covered the entire area, possibly within a quarter mile radius, with a fine layer of ash, soot, dust, dirt. Holy crap. Glad I’m doing this outside.

Pulled the vacuum hose from the sensor in the back and compressed air cleaned back to front. Again, where is this crap coming from? Looked like Mt. St. Helena just erupted.

Compressed air into the window vents. More of the same.

Repeatedly went through the same routine until all looked to be blowing clear.

All looks good. Put everything back together. Wiped down all outside areas of the stove. Cleaned up the front porch with a broom and the compressor.

Took a breath, made sure all parts were accounted for (i.e. nothing laying on the front steps).

Opened a Guinness.

Checked the settings on the stove, checked the manual. Set all for “first fire”. Rechecked. OK…all looks good. This stove ran fine when I purchased it, tested nice. Not expecting any surprises.

Put a small handful of pellets in the firebox. Hopper is 1/4 full.

Plugged it in (using the extension I was using for the compressor).

Following the instructions on the control box itself, started it up.

KAPOW!

Bright flash of light from behind the control box panel, big noise. Unplugged quickly. Damn. With my luck it’s a $300.00 control board.

Took a harder look at the swing out panel. The bundle of wires looks like there are at least a couple with hard crimps, possibly cutting through the wire insulation. Pulled the two screws, looked at the board. Easy to see the fuse was toast, blackened inside the glass insulator. Reconfigured the hard plastic wrapper spiral on the bundle of wires, that looks better, will protect as it should. Not finding any wires bared, just crimped.

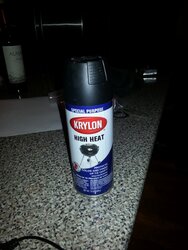
Off to the hardware store for a fuse. Only able to find time delay type in a 5A size rating. Picked up those.

Fuse in, everything back together. Rechecked everything connection-wise in the rear.

Crossed fingers.

Plugged in.

Follow starting instructions. Little bit of a flash in the back, I think it was some dust in the wrong place. No issue.

Control box lights are on.

Took about 5 minutes to get some smoke visible, but it eventually started up. Let it run in a low distribution fan setting for 30 minutes or so. Seemed to be working correctly. Cycling as it should, good looking fire.

xofii1.jpg

I feel relieved. Money well spent.

Decide to set the distribution fan speed to high. While I’m kneeling in front of the stove.

I’m then covered in I don’t know what. Where does this stuff hide?

Overall, I consider this a success. And a steep learning curve. And a good reason for a hot bath.
 
  • Like
Reactions: bogieb
Looks like you did a good job of routing out the infestation of dust bunnies. Would probably look at taking the auger motor gear box apart and replacing the grease.
 
  • Like
Reactions: womaus
Looks like you did a good job of routing out the infestation of dust bunnies. Would probably look at taking the auger motor gear box apart and replacing the grease.

That makes sense, I've got a week before the install permit shows, lots of time.

I'm thinking LockTite on the screws also. Do those normally loosen, or was this a past repair that went bad? What do you think?
 
Status
Not open for further replies.