Hearth Weight / Support / Reinforcement

  • Active since 1995, Hearth.com is THE place on the internet for free information and advice about wood stoves, pellet stoves and other energy saving equipment.

    We strive to provide opinions, articles, discussions and history related to Hearth Products and in a more general sense, energy issues.

    We promote the EFFICIENT, RESPONSIBLE, CLEAN and SAFE use of all fuels, whether renewable or fossil.
Status
Not open for further replies.
Thanks for all the compliments on the hearth. I really enjoy it. The morning and evening light glistens off the iridescent glass tile. It's really a pleasure sitting on the couch and catching the light show, whether the stove is going or not. It was a ton of work, but so far I'd say it was totally worth it.

To answer the question of what I did about the bracing: well, not much. I built a wooden frame below the stove to catch it if it falls, but the frame doesn't touch any of the existing masonry. I didn't want to create a problem where none exists, but I didn't want to be irresponsible and do nothing either.

I still cringe every time my kids or partner step on the hearth. I sometimes cringe when I find myself doing it too.

Last year I bought a miller diversion 180 tig welder. I've been wondering if a couple of steel triangular reinforcements would be an ideal long term solution.

The problem is... I know wood, stone, and steel all have different coefficients of expansion and I really don't want to add support that only ends up causing a crack during a temperature swing. I'm not a structural engineer either.

Still scratching my head.
 
WOW! That hearth is beautiful! We are trying to decide what we want to do for a hearth right now but I don't think I can convince the husband that he wants to do something like that! love love love it!
 
WOW! That hearth is beautiful! We are trying to decide what we want to do for a hearth right now but I don't think I can convince the husband that he wants to do something like that! love love love it!

Thank you. Since you like this so much I'll tell you a bit about what went into it.

This was my first big project. I completely failed to track the amount of time and money that went into it. I've completed a few more projects since then and become religious about collecting receipts and logging my time so I can quote and estimate jobs better.

Looking back, I think I bought 4 boxes of 12x12 black slate tile. I tried to estimate the number of boxes I would need during the planning stage, but completely blew my estimate. I think the saw kerf added up way more than I expected. Current price per case at Home Depot is $45 per box. I used two cases of pearl iridescent mosaic tile. It was probably $50 a case too. So, $300 in tile.

I then bought two layers of select grade 10x10 boards from Lowes for a rigid base. So, maybe $120 in lumber.

Throw in a durock sheet for the layer under the tile for a good fire resistant layer and a box of durock screws. $50?

Finally, grout and mortar, maybe another $40?

At least $510 in materials. I probably spent more than that because I made mistakes along the way.

Also, tools. I already had a hammer drill for mixing mortar and grout, but I bought a mixing wand for it. Floats. Buckets. Various tile nips for the glass tiles. Marking tools (I started with absolutely nothing.) Two wet diamond saws (table saw variety and small 4" circular saw variety). More than $500 in tools, altogether, if you don't have them already. I plan to remodel a bathroom or ten, so they were strategic purchases on my part.

I spent at least $1100 on this project out of pocket, but at least half of that cost can be recycled for the next project.

Then time. I spent at LEAST 120 hours on this. Maybe more. It took me a month and a half of nights and weekends. I spent a lot of time scratching my head between steps and researching the correct way to do the next step. If I had it to do again, I could save time with design decisions, planning time, etc, but tile work is always labor intensive.
 
To date, this is my favorite photo of the stove and hearth in action. Note the open ash pan door on the f500. This is a serious no-no as it WILL crack the firebox floor of your stove (ask me how I know), but it makes a fantastic photo.

8300137769_8a1452b431_z_d.jpg


Note how the tiles are raised and lowered in alternating fashion. This was a conscious design decision. It means I have to use a vacuum to clean the hearth, but I think it looks awesome.

If I had it to do over, I might attempt the same illusion using tiles with slightly different shades of gray, rather than physically raising the tiles in alternating succession. It would make cleaning easier.
 
  • Like
Reactions: jaychino415
totally awesome hearth!!! 
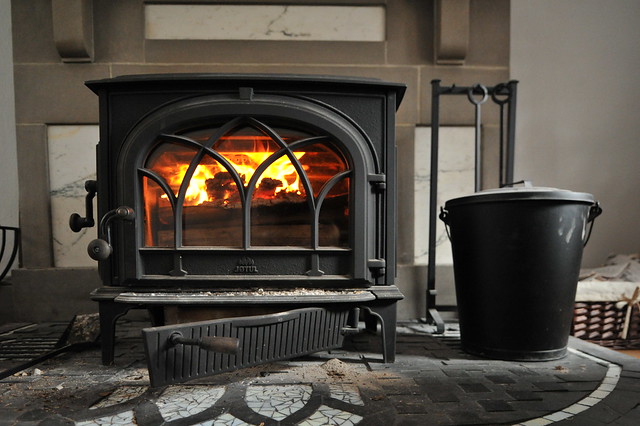
not a bad stove either.
 
So . . . uh . . . how do you know (he asks as if he needs to really ask about the ash pan door being left ajar as a bad thing? ;)

Sorry . . . couldn't help myself.

Still loving this hearth by the way.
 
very nice hearth!! From a structural standpoint I would use an adjustable column if at all possible. Us 2 pieces of 4x4 treated for a foot or a 1' square steel plate. Up top a baby I-beam or even treated 4x4 should disperse the load enough to provide support or just piece of mind. The hearth I built is made from 100+yr old pavers removed from a local city street and they weigh 10lbs a piece! Roughly - I have 2300lbs in bricks alone not to mention Dura Rock, grout and a stove. I am guessing I have added 3000ish lbs to that part of the floor. I plan to add a beam and column under it but have not gotten around to it(yet) and with 4 cord stacked under there in the basement I wont any time soon. I have checked the floor with a plumb stick a couple time over the past year or so and there is not flex.

The column and beam seem to be the simplest solution to my situation because I have access to them for essentially free.

Again, really nice job on the hearth pad!!
 
IMO the photo is spoiled by the ashpan door being open and ash all over that nice hearth. Had he waited 15 minutes there would have been plenty of flame for a nice shot. What you don't want to see is this photo after a season of using the ash pan door for a quick start.

Jotul base crack2.jpg
 
Status
Not open for further replies.