Help please: how do I remove this fireplace insert for cleaning?

  • Active since 1995, Hearth.com is THE place on the internet for free information and advice about wood stoves, pellet stoves and other energy saving equipment.

    We strive to provide opinions, articles, discussions and history related to Hearth Products and in a more general sense, energy issues.

    We promote the EFFICIENT, RESPONSIBLE, CLEAN and SAFE use of all fuels, whether renewable or fossil.
Status
Not open for further replies.

Freefall_Doug

New Member
Hearth Supporter
I am in the middle of removing my insert so I can properly clean my chimney. I don't have a full liner right now, but the current setup has to do for the winter so I want to at least give it a safe a proper cleaning.

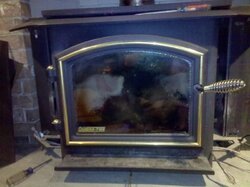
First things first, can any one help ID this quadra fire insert: it measures roughly 21 inches wide by 20 inches high with the blowers and surround removed. The fire box is 18 inches deep. It doesn't have the autocontrol, it is an older model, at least 8 years old.

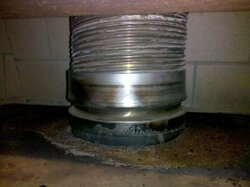
I believe the first part I need to tackle is removing the direct connect stainless liner from the top of the stove. I attached a picture of the connection. I don't see any clamps, or screws that are holding it to the insert. Do I simply pull on this until it releases. I doubt it was ever removed before, previous owner just swept the chimney and the creosote fell into the black hole! Never wondered where all the creosote was going!!! Eeek!

After that is removed what is the next step? Break my back and pull it out of the hearth? The bottom of the mantle is natural stone, should I put something down to protect the stone from the insert?

Thank you all for the help!
 

Attachments

  • quadrafire_small.jpg
    quadrafire_small.jpg
    58.4 KB · Views: 699
  • direct connect to insert_small.jpg
    direct connect to insert_small.jpg
    55.4 KB · Views: 595
Well, regarding the liner attachment, start gingerly and use a wonder bar to pry at the collar. See if it moves. It might just be stuck on from creosote or something. Might just want to be sure there are no clamps or screws one more time. To move the insert out try to lift or pry the front of the insert up a bit and slide a couple dowel under it. You can then roll/pull the insert forward more easily. Stick a couple more dowels under there as needed. Cardboard or thin plywood will help protect things as needed. Pull any insulation that may be there and carefully pull the liner segment out. Sweep the chimney, smoke chamber, etc as a normal fireplace. Brush out the liner segment and install everything again. Reconnect the liner and clean up the insert.

Direct connects are a royal pain.
 
Doug, Reach around the back of the collar and check to see if there is a clamp screw in the back. In the picture, it looks like a SS band at the top of the collar. Or since the collar does not seem to be secured (again you mingt check the back side) maybe you can just pry the collar connector off the stove collar. Just a thought. Hard to tell from the pics.
 
Newer quadrafire documentation shows that the direct connect liner might be retained from inside the insert.

Unfortunately they don't have any documentation for older models, great!

I think I need to take the secondary burn tubes out, and then remove the top shelf with the insulation on it. Hopefully I can get a phone number for quadra fire because a lot of the fire brick is cracked, might as well replace them while the unit is half apart.

Thanks for the replies, wood dowels are an awesome idea!!! It worked for the pyramids and huge slabs of limestone. =)
 
Bumping this to the top. I am amazed at the volume this forum gets, pretty awesome.

I am hoping that an older model quadra fire owner will pop up and help ID this insert. I sent an email with the picture of the insert off to a distributor also last night to see if I could get an ID.
 
It looks like an older model 3100I to me. Here is a link to the manual for what I think is your stove. http://www.quadrafire.com/downloads/installManuals/man_3100i_act.pdf
I have a 12 year old 5100-I and just went through the manual and it does not describe how the flue is connected to the stove. The bricks are expensive and can only be had at a Quad dealer.

I just checked the manual in the link and it describes what you are looking for on page 11.
 
How expensive is expensive?

Is it OK the the bricks are cracked? After 9 plus years they are pretty busted up, but I could fit them back in like jig saw puzzle. LOL!

I agree that it is probably a older 3100, unfortunately they made enough changes to the fire box itself that the disassembly instructions don't cross over.
 
I paid $140 for a complete new set this year from a local dealer, another dealer wanted $210 for the same set. I tried the regular firebrick last year because they were cheaper but the stove did not seem to get as hot. May have been the wood or the brick, but after 11 years I figured I would replace the brick. I think you can buy a six pack of the bricks. Did you look at the brick layout in the manual in the link, from the picture that looks like the stove you have.
The brick set in that manual is about $200 at this online store, add shipping and it may be cheaper using the local dealer, plus you can pick his brain.
http://woodheatstoves.com/brick-fir...9.html?zenid=466906e979b084c493c459a4110c64ef
 
If the bricks are cracked and no large pieces are missing and they still fit together somewhat tight you may be able to use some refractory cement on the bricks and still use them. My old brick set were cracked for years from tossing in splits and hitting the back of the stove before I changed them. I also do not toss in the splits anymore.
You can get refractory cement in tubes or cans almost anywhere, HD, Lowes, hardware store, fireplace store.
 
Thanks for the link to the manul btw. It looks different than the one I downloaded last night, and I think it gave me the clue I needed to remove the remaining burn tubes and get the baffle board out.

The pile of creosote sitting on top of the insert when I pulled the surround off was scary! I should have taken a picture of it before the shop vac with hepa filter went to work lol!
 
I wanted to bring this post back up incase it helps some one who is searching later.

The model ended u being a 3100I, not a act or acc model based on the 1/4 inch plate steal top baffle, instead of ceramic baffle board.

The liner was secured by two bolts on the inside of the insert. Had to pull the baffle, ceramic batt insulation, & secondary burn tubes to get to them.
 
Status
Not open for further replies.