Heritage 1 8021 model Soapstone stove.

  • Active since 1995, Hearth.com is THE place on the internet for free information and advice about wood stoves, pellet stoves and other energy saving equipment.

    We strive to provide opinions, articles, discussions and history related to Hearth Products and in a more general sense, energy issues.

    We promote the EFFICIENT, RESPONSIBLE, CLEAN and SAFE use of all fuels, whether renewable or fossil.

Badapple

New Member
Oct 19, 2020
4
Canada
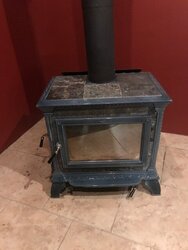
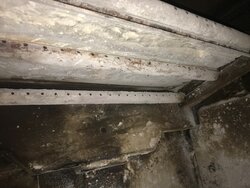
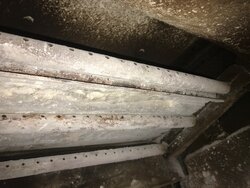
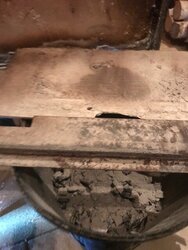
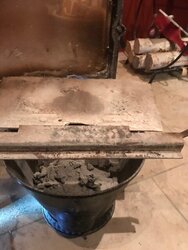
I've been concerned for the last few years that my stove is not functioning to its maximum potential. Thanks to this site I observed a number of baffle installation videos and discovered a number of concerns with my stove. Upon inspection I found that my baffle is not secured in place as depicted in the videos and installation manuals. Secondly the baffle support appears to just hang down not sure of the proper position of this part and unable to view the correct positioning in any video or manual. I've attached a few pics of the baffle and baffle support both installed and removed. Please note I broke a piece off the baffle while removing LOL. Any assistance with this would be greatly appreciated.

Regards Dan
 

Attachments

  • image4.jpeg
    image4.jpeg
    42.5 KB · Views: 84
  • image3.jpeg
    image3.jpeg
    96.4 KB · Views: 107
  • image2.jpeg
    image2.jpeg
    92.5 KB · Views: 87
  • image1.jpeg
    image1.jpeg
    58.4 KB · Views: 85
  • image0.jpeg
    image0.jpeg
    55.3 KB · Views: 77
The baffle needs to be totally intact. Otherwise flue gases will take a shortcut and not be combusted completely.
 
The baffle needs to be totally intact. Otherwise flue gases will take a shortcut and not be combusted completely.
Thanks as stated prior to me removing the baffle it was fully intact. My concerns are securing of the baffle and placement of the baffle support.
 
There should be wires to hold it in place.
 
I owned a heritage, removed that baffle about a dozen times, and even replaced it once.

In the photos it is not installed correctly. It must lay flat on all tubes. All the way back and the front edge covered by that stainless bracket. Your new baffle board will come with the new wire to tie around a tube that only acts to keep the baffle from being sucked up by chimney draft.

The front baffle bracket thing goes on last and needs to be rotated forward 90 degrees so the fin sticks up towards the firebox top. A cotter pin holds it in place.

Clean out any chunks of left over cement or baffle board with a scraping tool prior to reassembly. You do not need to cement the new baffle in place.
 
  • Like
Reactions: ArtDeco
I owned a heritage, removed that baffle about a dozen times, and even replaced it once.

In the photos it is not installed correctly. It must lay flat on all tubes. All the way back and the front edge covered by that stainless bracket. Your new baffle board will come with the new wire to tie around a tube that only acts to keep the baffle from being sucked up by chimney draft.

The front baffle bracket thing goes on last and needs to be rotated forward 90 degrees so the fin sticks up towards the firebox top. A cotter pin holds it in place.

Clean out any chunks of left over cement or baffle board with a scraping tool prior to reassembly. You do not need to cement the new baffle in place.
My original baffle is in good shape with the exception of one small piece missing. I've ordered a new one but seen someone on this site use both stacking them using the old one on the bottom. What are your thoughts with this technique? I have no evidence of a cotter pin nor any holes that one would go into.
 
Last edited:
My original baffle is in good shape with the exception of one small piece missing. I've ordered a new one but seen someone on this site use both stacking them using the old one on the bottom. What are your thoughts with this technique? I have no evidence of a cotter pin nor any holes that one would go into.

Don’t double up baffle boards. Your stove was designed for one and adding the second will reduce the opening above the front door to the flue.

The cotter pin in mine, bought new in 2007, was through the front tube and through a hole in that stainless steel bracket. The holes are about the size of the holes in the air injection tube so easy to miss. It is probably possible to put this thing together without the pin but like the wire around the center tube, the manufacturer did it for a reason.