How to install stove pipe for serviceability

  • Active since 1995, Hearth.com is THE place on the internet for free information and advice about wood stoves, pellet stoves and other energy saving equipment.

    We strive to provide opinions, articles, discussions and history related to Hearth Products and in a more general sense, energy issues.

    We promote the EFFICIENT, RESPONSIBLE, CLEAN and SAFE use of all fuels, whether renewable or fossil.
Status
Not open for further replies.

James04

Member
Oct 18, 2007
130
Eastern Ct
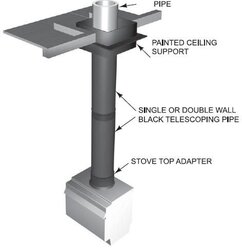
I would like to redo my stove pipe. What is the best method to keep it serviceable? Is there some kind of slip joint needed? My stove collar is extra big. So I would like to put the factory crimped end into that so that the flared portion seats against the collar to form a seal. Then at the ceiling there is the thimble which is about a 6" long male end. So I was thinking that is were I can get the needed "play" to slide the pie up in order to get the lower sections out. Only I don't know if this is safe or the best way to do it. Also should I leave the screws out of this last section so that the pipe can slide up and down for expansion. I have seen it move as much as half an inch when hot verses cold.

James
 
Your setup should look like this. Most companies have telescoping lengths for ~2 feet to 4 feet and for ~3 feet to 5 feet (differ slightly by manufacturer). If you need additional lengths you can add them. If you have a rear exit stove I would suggest a cleanout tee behind the stove. You may need to buy a stove adapter as well.
 

Attachments

  • Single wall.JPG
    Single wall.JPG
    17.3 KB · Views: 692
Metal said:
Your setup should look like this. Most companies have telescoping lengths for ~2 feet to 4 feet and for ~3 feet to 5 feet (differ slightly by manufacturer). If you need additional lengths you can add them. If you have a rear exit stove I would suggest a cleanout tee behind the stove. You may need to buy a stove adapter as well.

I have already purchased 3 sections of the regular 24ga pipe. Isn't there a way to make this work? How much are the expandable sections? Anyone else know how this is supposed to be done?

James
 
The telescoping sections are used for ease of installation and also because the give the pipe room to expand/contract during use (if this wasn't allowed there is a chance the pipe could be damaged). Can you return what you bought, or is it the pre-existing pipe from the old setup? A 6" diameter telescoping length should cost you $50-60 and in most cases is all that is needed unless you have high ceilings.
 
Hello James04, I can just make mine come apart by pushing it up on the top piece that connects to the chimney. I do have 3 screws on each section, but no cement on the top 2 joints. That way I can remove it easily for cleaning and checking.
Don
 
Thank you both. I will consider returning the sections. But I am inclined to make what I have work. Ill need to sleep on it tonight. Does anyone know if the big box stores carry the telescopic pipe?

James
 
Note that your "male ends" should point DOWN with a wood stove! It sounds like you are wanting to install the pipes backwards to save purchasing the appropriate adapters.... This is a BAD THING! While it is less of a problem with the cleaner burning new stoves, you will still get a certain amount of liquid creosote condensation in your pipes. If your male ends face down, the pipes will act like a series of nesting funnels and guide the creosote back down inside the stove where it can be reburned. If you put the pipes in upside down, you risk having the creosote leak out onto the outside of the pipe, which can be a real smelly and ugly mess, as well as a potential fire hazard.

Get the adapters you need to do the job right.

Gooserider
 
Gooserider,

Sorry if the way I wrote it it made it sound like I was trying to do this. I am not the most elegant typist. I know that the male ends go down. In fact I was trying to say that I would like to put the factory male end down into the stove collar so that the flared portion just after the crimped end will form a nice seal at that point. What I would also like to archive though, is to be able to get the sections out for cleaning without having to move the stove. Hence the desire for the sleeved portion.

James
 
Hello James04, here is a picture of my setup. As you can see there is just enough room to slide the pipe up to take a joint apart. The pipe looks alot better then in the picture. It works fine and did not need any extra parts.
 

Attachments

  • pipe (1152 x 864).jpg
    pipe (1152 x 864).jpg
    103 KB · Views: 484
N6CRV said:
Hello James04, here is a picture of my setup. As you can see there is just enough room to slide the pipe up to take a joint apart. The pipe looks alot better then in the picture. It works fine and did not need any extra parts.

This is exactly what I was trying to ask about in my original post. I just wasn't sure if it was acceptable or safe. I think this is what i will do for simplicity sake. I see you have screws at this joint. Is there any portion of the setup that can accommodate expansion and contraction. I don't have any screws here and I see it move up to 1/2". I am thinking that eventually something will have to "give" if everything is fixed and rigid.

James
 
James, I have 2 adjustable Ell's so I think they allow some movement. I don't ever hear anything trying to move and with the flue pipes together I do have some movement because of the Ell's. I would see no harm if you left the top screws out. I would of left mine out if it was not for the Ell's.
Don
 
James04 said:
Gooserider,

Sorry if the way I wrote it it made it sound like I was trying to do this. I am not the most elegant typist. I know that the male ends go down. In fact I was trying to say that I would like to put the factory male end down into the stove collar so that the flared portion just after the crimped end will form a nice seal at that point. What I would also like to archive though, is to be able to get the sections out for cleaning without having to move the stove. Hence the desire for the sleeved portion.

James

OK, glad to hear you are doing it properly... In terms of getting a seal, you are SUPPOSED to insert the male end in far enough that the bulge after the crimps butts up against the end of the next peice. This is actually a problem on some stoves because they don't make the flue collar deep enough to let the pipe go in all the way. They make special "stove starter" peices of pipe with shorter crimp sections, or what I've suggested many times is simply to trim a standard peice so that the crimp section is about 1/16" shorter than the depth of the flue collar.

For disassembly, I think the slip section that others have suggested is the best approach - and when I got the one I use in the basement stove it wasn't that expensive, about like purchasing an extra length of regular pipe.

Gooserider
 
Status
Not open for further replies.