Insinkerator Hot Water Dispenser - HD or Lowes has leak in Stainless Steel Tank @ 4 years!(Possible

  • Active since 1995, Hearth.com is THE place on the internet for free information and advice about wood stoves, pellet stoves and other energy saving equipment.

    We strive to provide opinions, articles, discussions and history related to Hearth Products and in a more general sense, energy issues.

    We promote the EFFICIENT, RESPONSIBLE, CLEAN and SAFE use of all fuels, whether renewable or fossil.
Status
Not open for further replies.

Don2222

Minister of Fire
Feb 1, 2010
9,117
Salem NH
Hello

Well, When we remodeled the kitchen 4 years ago, there were not many reviews on the Internet for this unit as there are today!!
See reviews !! >> http://www.amazon.com/InSinkErator-H770-SS-Invite-Instant-Dispenser/product-reviews/B000FAVXW4

Naturally the guarantee is for 3 years and from what I hear they do not last much longer from Amazon.com product reviews!!
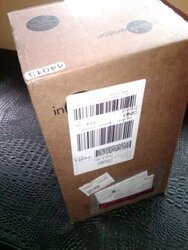
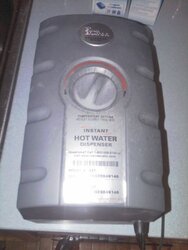
The way the warranty works is if you do not have the sales slip the manufacturer date is encoded in the serial #
Therefore by calling the toll free # 1-800-558-5700 and giving the SR # 06028849146 I found it was made in Feb 2007, but I found the sales slip which showed Home depot sold it on 03/03/2007 so it was in warranty until 03/03/2010 !!!

What is wrong here? My Superstore Indirect Stainless Steel water tank has a lifetime guarantee !!

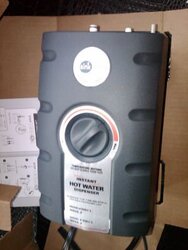
So we purchased an Insinkerator brand Hot Water Dispenser Model SST

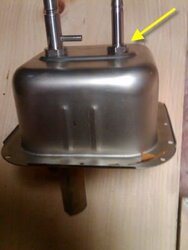
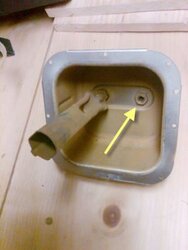
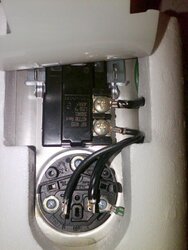
Anyway, the tank is leaking and the GFCI keeps popping with the tank plugged in!!
I do not see any parts to fix or replace the tank cheap.

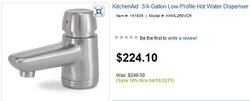
I hear that Waste King has a Hot Water Tap cheaper, made better and lasts longer even though it only has a 1 year guarantee!
http://www.amazon.com/Waste-King-H710-U-SN-Coronado-Faucet/dp/B001KOCV0C
Waste King Reviews
http://www.amazon.com/Waste-King-H7...iewpoints=1&sortBy=bySubmissionDateDescending

So what should I do???? Does anyone have a Brand that lasts longer than 3 or 4 years??

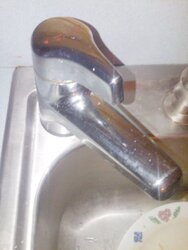
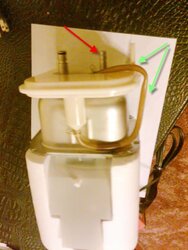
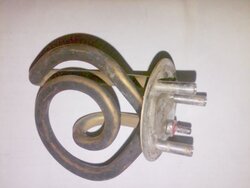
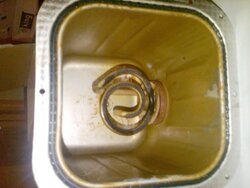
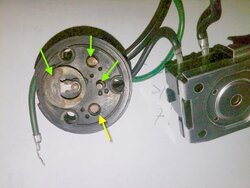
See dead tank and water tap in pic below:
 

Attachments

  • InsinkeratorBoilingHotWaterTapSC.jpg
    InsinkeratorBoilingHotWaterTapSC.jpg
    27.3 KB · Views: 1,851
  • InsinkeratorStainlessSteelWaterTankSC.jpg
    InsinkeratorStainlessSteelWaterTankSC.jpg
    29.4 KB · Views: 2,903
What is that used for? Do you not have hot water plumbed to the sink off a reg water heater?
 
NATE379 said:
What is that used for? Do you not have hot water plumbed to the sink off a reg water heater?

Hi Nate
It is used for instant coffee and soups. Our hot water heater in the basement is set for 130 Degrees F. This hot water tap puts out 200 Degrees F !!
 
We have had ours for about 3 years now on city water. So far so good. My inlaws just started leaking at 3 years on hard well water. They need to have a sacrificial anode for a longer servce life.
 
RED FRONTIER said:
We have had ours for about 3 years now on city water. So far so good. My inlaws just started leaking at 3 years on hard well water. They need to have a sacrificial anode for a longer servce life.

Ours was on city water also. Maybe that is why we got 4 years.

Do you both have an Insinkerator Brand? Will your inlaws get another Brand like Waste King?

Have you see this??
http://chowhound.chow.com/topics/685557

After we called the company (Insinkerator), we were told we were still under warranty. When the man came to replace the unit, we all examined it and discovered that the stainless steel tank was in two halves. The halves were joined with non-stainless steel brads. Dissimilar metals cause an electrical charge which causes corrosion, thus the tank corrodes and it leaks. I hope after replacing a few zillion of these, they will use a better brad. At least I know what happened and can use it as a bargaining chip, if it happens again. FYI.

By eclectick6n2 on Mar 12, 2010 05:15AM

OR This ??
http://ths.gardenweb.com/forums/load/appl/msg0614231230495.html
I've had little butler's for years in two places with zero problems going on 9 years. Franke doesn't make the heater/tank and I'm not sure who does. It is exactly like a lot of others on the market from the likes of Mountain Plumbing and others.
 
That is where theirs failed. They got sick of relacing them so they got a soap dispencer and use the microwave.
 
sometimes companies make a cheaper version of there product for home depot and lowes....you can see it in weber bbq also john deere...it really is dumb...when it comes to something like that go to a plumbing supply..up front it will cost a little more...but you will end up saving money in the long run.
 
Exactly. Don't buy plumbing fixtures from Home Depot or Lowes. My plumber compared a faucet from the local plumbing supplier to one he bought at Home Depot. They were identical on the outside with the same model number and description. On the inside the guts of the Home Depot faucet were plastic while the other was all brass.
 
Use the microwave or the stove and be done with it.
 
Reggie Dunlap said:
Exactly. Don't buy plumbing fixtures from Home Depot or Lowes. My plumber compared a faucet from the local plumbing supplier to one he bought at Home Depot. They were identical on the outside with the same model number and description. On the inside the guts of the Home Depot faucet were plastic while the other was all brass.

my plumber has a pair in his truck to show the difference(s) too.


I bought a garage light from Lowes that was ( inexpensive).
So cheaply made I doubt I'll be able to change a bulb in 6 months. If the screws that held the cover on were one thread shorter they wouldn't reach the captive nut.
If I hadn't bought them last Fall before the garage was finished I'd bring them back.
 
RED FRONTIER said:
That is where theirs failed. They got sick of relacing them so they got a soap dispencer and use the microwave.
+1
Ed
 
Hogwildz said:
Use the microwave or the stove and be done with it.

Hi Hogwildz

It's tough going back once you get used to it! Also we threw away the tea kettle from non usage!!
 
Hello

I found a cheap fix from >> http://buywaterdispenser.blog.cd/20...-gallon-stainless-tank-and-filtration-system/

“Designed to Fail, But Can Be Repaired†2010-07-20
By Phil Shikuka (Terre Haute, IN United States)
This Insinkerator product suffers from a couple of inexcusable design flaws. Like many here I found a puddle of water under my unit about two years after installing it. Checked into buying a new unit, but at $200 I wasn’t going to give in easily. After reading other folks’ experience with the unit I opened mine up and found the obvious source of the leak. There is a 1/4″ plastic vent hose than helps handle the return hot water after you release the faucet handle. Since it’s a non-pressurized unit, all water in the line up to faucet gets returned to the tank after you release the faucet handle. This hose, combined with a plastic overflow tank handles the water return. The root cause of the leaking problem is that Insinkerator uses standard clear vinyl plastic tubing for this one part — the same kind you would use for supplying air in a home aquarium. At the hardware store they warn you not to use it even for ice maker supply lines, but some genius at Insinkerator specified it for use in an enclosed water heater. It’s speced at a max temp of 175F, but in the hot water heater it sits at near 200F, 24/7/365, and it can’t handle it. Mine had turned a dark brown to nearly black color and had completely failed where the hose was routed right along the stainless steel tank. Every time we used the heater the return water ended up in our cabinet. For lack of another 25 cents worth of the correct material, customers everywhere are replacing their tanks prematurely. And the fix is so simple there’s no excuse for Insinkerator not doing it.

HOW TO REPAIR: Basically you have to replace the hose with the right kind, and fortunately it’s pretty easy. I recommend silicone tubing (rated to 500F), and you’ll need some with 1/8″ inside diameter. I bought some from an Amazon seller, 1/8″ ID and 3/8″ OD with thick 1/8″ walls. Search on Amazon and you’ll find what I’m talking about. Unfortunately it’s only sold in 10′ lengths, and you need less than a foot. I have extra left over if anyone’s interested. If you can find it locally, all the better. For good measure get a couple of small plastic zip ties (cable ties) to secure the new tubing.

1) Unplug, drain, and remove the tank. After unplugging the power cord, run water thru the unit till cold water flows out the faucet. Then place a large bowl (1-gallon capacity minimum) under the tank, unscrew the drain screw, and let the tank drain into the bowl. If you can easily shut off the water supply do it now, but it is not necessary as long as no one uses the faucet when you are working on the tank. While draining remove the three tubes from the top of the tank. One has a spring loaded clip you need to depress to remove the tube and the other two are silicone and plastic tubes that just pull off. Loosen the mounting screws, and when the tank has drained, remove it from your cabinet and find a water resistant place to work on it.

2) Disassemble the tank. Really easy — there is a small screw on the top that holds the two sides of the plastic shell together … remove it. The two sides of the shell pull apart fairly easily but you might need to muscle it a bit. Once you get them apart, remove them from the unit and place aside. Then remove the temperature dial and put it aside. At this point you will have the guts of the unit with the steel tank encased in a dense styrofoam shell. Take a minute to examine the way it’s put together (pictures wouldn’t hurt either). You’ll most probably easily pick out the problem part — it will probably be very dark and brittle, and one end will be attached to the side of the water inlet port. Cut the hose somewhere before the metal port it attaches to, and you will then be able to remove the upper styrofoam shell. After that you will see where the other end of the defective hose goes — the bottom of the plastic overflow tank. You will need to cut the old zip ties at each end of the hose to fully remove the old hose. See what a piece of crap it is? Why they would use that kind of plastic is beyond me.

3) Inspect and dry the full unit. You may want at this point to remove the other styro shell piece and completely dry everything. At this point I discovered that the leaking water has badly rusted several of the screws holding the two pieces of the stainless tank together. Really Insinkerator?? A stainless tank but regular steel screws?? That’s the second design flaw I mentioned earlier. I wasn’t sure whether or not the rust has led to and leak in the tank itself, so I disassembled the stainless tank (fun to do with rusted screws I’ll tell you. Mine took a T-10 Torx driver for the screws, and I eventually got them all out. A trip to the hardware store got me some #6 x 3/4″ stainless machine screws and lock nuts. If you see anything else besides the hose that could be a problem, you’ll need to deal with it.

Pic of Insinkerator Stainless Steel Tank shows Thermostat with AC Cord connected mounted above Heating Element Electric Connection:
 

Attachments

  • InsinkeratorTankThermostatWithHeatingElementBelowItSC.jpg
    InsinkeratorTankThermostatWithHeatingElementBelowItSC.jpg
    41.1 KB · Views: 1,749
Hello

Cheap Fix continued from >> http://buywaterdispenser.blog.cd/20...-gallon-stainless-tank-and-filtration-system/

4) Reassemble the unit, installing the new hose as you go. Put the tank back in the bottom styro shell. Attach one end of the silicone hose to the plastic overflow tank and secure with a zip tie cutting off the excess tie. Put the plastic tank back in the upper styro shell and slide the two back onto the top of the stainless tank. The plastic tank lines up with the silicone hose to the front of the unit. You’ll route the hose along the tank flange to the right of the unit just like the old hose was. Once the shell is as far down as it goes, route the hose along the side of the styro shell following the groove for the old hose (not a perfect fit, but that’s OK) and then over the top to the water inlet port. Hold it in place and see where you need to cut the silicone hose to fit the port without excess slack in the hose. Then cut the hose, attach it to the port and secure with a zip tie. Replace the thin upper piece of styro over the top of it all and reassemble it all into the plastic shell. Take your time and work the two halves together, making sure to get the power cord grommet correctly into the cutout in the shell. Get the bottom together first then work your way up. Pay attention to the new hose, keeping it tucked in behind the side of the front half of the shell (don’t let it end up stuffed behind the back half of the shell. When done properly the shell will snap together nicely, and you may note a slight bulge where the new hose it — that’s OK. Put the small screw back into the top the shell, and reinsert the drain screw.

5) Reinstall and test tank. Just reverse the removal steps. Open the faucet until water flows before plugging the tank in. Then use the faucet normally checking regularly for any leaks. Mine has been leak free for two weeks, and should last for years now.

That’s it, and it’s probably easier than it sounds. For a grand total of less than $25 (with nine feet of hose left over) I have a fully functional tank again. The rest of the unit is very well made, so I expect it to last years. Good luck with your home repair efforts. It’s only a matter of time before it will be necessary with this product.
 
Hello

Well, the prior 2 posts gave me the info on how to take my Insinkerator apart and I have nothing to lose.

Unfortunately, the interior hose that burned up in the prior post was fine in my unit after 4 years.

All the screws that hold the two sections of the tank together are NOT rusted and in good shape!

I did find a problem. The metal hose connection on the top of the tank is very loose. So water could seep out and cause the GFCI to trip.
That explains the small leak that could rust the screws after a while but I caught it in time!

To make that tight the tanks must be taken apart and the nut tightened on the inside. However those screws have the star head and need that type if driver to remove them!

So if I purchase the T-10 Torx driver tool and fix the spout, what are the chances the heating element is still good after 4 years?

Red Arrow points to Loose Metal spout in pic below:
Green Arrow points to Inferior interior plastic Hose that can burn out and rust the tank!
 

Attachments

  • InsinkeratorTankShowsInsideHoseSC.jpg
    InsinkeratorTankShowsInsideHoseSC.jpg
    43 KB · Views: 2,609
Hello

Well in my case, the leaking spout could easily be tightened to stop the tank from leaking.

However plugging the unit into the GFCI outlet and it still tripped.

So I removed the wiring mount from the element and plugged it into the GFCI and it did not pop.

It Looked like the Electric Connection OR Heating Element is defective. See pics below.

I tried a few places and no one even Insinkerator has a replacement element for this Model SST which
is very common and sold at Lowe's and Home Depot!!
 

Attachments

  • InsinkeratorBoilingHotWaterElementSC.jpg
    InsinkeratorBoilingHotWaterElementSC.jpg
    24.7 KB · Views: 2,197
  • InsinkeratorBoilingHWElementInTankSC.jpg
    InsinkeratorBoilingHWElementInTankSC.jpg
    32.6 KB · Views: 1,943
Hello

Well I pulled out the old Radio Shack Multi-Meter and tested the Heating Element and got a nice reading of 20 Ohms. So it is not open or shorted, in fact that tested good!

V=IR so V/R = I so 120v/20ohms = 6 Amps Ah Ha 6 amps is very close to the 6.25 in the specs below
Therefore the Heating Element is Good!

The specs at PlumberScribe.com say 115 volts, 750 watts, 6.25 amps
http://www.plumberscrib.com/Product...eel-Tank-and-Filtration-System__SST-FLTR.aspx

So I then examined the round electrical connector that presses against the heating element where the AC plug wires are screwed on.
See prior post of Electrical Connector picture of it mounted to the Stainless steel tank below the Thermostat.

Below is a pic I took of the other side of the Electrical Connector than normally presses against the base of the heating element inside the tank!!

The contacts are in very bad shape. the Yellow arrow points to the spring connector in which I had no continuity with the other side that one of the AC leads connects to!!! The others were poor connection at best. Now if the neutral connection is lost and there was a slight leak then the water can make the case HOT and that will trip the GFCI.

So it looks like we have another possibly Inferior part, the Electrical Connector mounted on the Stainless Steel Tank where the AC is screwed on!!

Since Insinkerator will not supply this part to servicemen or customers this $200.00 unit is JUNK after 4 years with Good City Water!
 

Attachments

  • InsinkeratorBoilingHWElectricElementConnectorSC.jpg
    InsinkeratorBoilingHWElectricElementConnectorSC.jpg
    39.2 KB · Views: 1,391
Hello

Should we purchase another Insinkerator or get another brand? Does anyone know of if another brand like Waste King.. etc. will last more than 4 years??
 
Insinkerator makes good stuff, but I'd buy from a plumbing supply place instead of Home Depot or Lowes.
 
Hello Everyone

Well there is a happy ending here after all for my hard work and diligence!!

From Insinkerator Customer Service !!!!!
Dear Don,

Thank you for your response.

I am sorry to say that we do not sell replacement parts. We have parts distribution centers that may have replacement parts but would depend on its availability.

The model SST has a warranty for 3 years and we understand that you are out of warranty. As a goodwill gesture from our company, we can send you a replacement tank at no charge. This brand new SST will carry a 90-day warranty. You will be responsible for the installation.
Should you like to take the offer, please send us a response so we could process the request for replacement.

Sent e-mail back with case # for new tank. :)
 
Hello

New Tank arrived today. Same configuration so just connected tubes and screwed it back onto wall under sink.

Now it is time to have some Instant Coffee in a real Instant !!!!

Good to have a nice clean tank. They should make a way to clean the dirty brown stuff out of the tank more easily. See prior pic with element. The brown stuff does wipe right off!!!

It works. See pics
 

Attachments

  • NewInsinkeratorBoilingHotWaterTankInBoxSC.jpg
    NewInsinkeratorBoilingHotWaterTankInBoxSC.jpg
    22.2 KB · Views: 1,174
  • NewInsinkeratorBoilingHotWaterTankSC.jpg
    NewInsinkeratorBoilingHotWaterTankSC.jpg
    17 KB · Views: 1,257
Hello

After all this research in this post, I sent the ISE customer technical representative the following suggestions to make their product better and more competitive in the future and thanked them for their help!

Here are a few comments from my experience and research that I hope you hand over to your manager to help make your product better and be more competitive in the future.

1. I wish that you would consider selling replacement parts such as heating elements and the electrical connector that failed in my tank.

2. Improve the interior hose to withstand the heat.

3. Use Stainless steel screws to assemble the two tank halves together.

4. Have instructions and a good way for customers to clean the interior of the stainless tank. I had a brown film from minerals in the water that could easily be wiped off.

5. Please add a stainless steel lockwasher to the inside of the metal spout on the top of the tank. This will keep the spout from getting loose and having water leak down the tank and cause much more damage!

Yellow arrow in pics below point to where Lock Washer is needed inside top tank half under spout nut.
This spout loosened after time due to hot water expansion and contraction. Water started leaking at this point and dripping down the inside of the tank causing the electrical contacts to prematurely corrode and to open to make the GFCI to trip!
 

Attachments

  • InsinkeratorTankTopHalf3sc.jpg
    InsinkeratorTankTopHalf3sc.jpg
    12.8 KB · Views: 1,387
  • InsinkeratorTankTopHalf2sc.jpg
    InsinkeratorTankTopHalf2sc.jpg
    13.8 KB · Views: 1,134
Hello

Well something may be done in the near future!! Thank-you InSinkErator !

I always say "Don't complain - roll up your sleeves and find a better way!"

----- Forwarded Message -----
From: [email protected]
To: [email protected]
Sent: Wednesday, April 13, 2011 10:41:32 AM
Subject: RE: Tracking # - Please read and thanks again for all your help.

Dear Don,

Thank you for the reply.

We appreciate your taking the time to send InSinkErator your thoughts about our products, as well as suggestions for other features that you would like us to add.

We are always upgrading our product to make it the best possible, for you, the customer.

Please rest assured that your feedback will be forwarded to the appropriate department.


Should you still have any issues with the dispenser, please do let us know.
 
I have a Kitchenaide insta-hot that we installed when we built the house in 1994. Still trouble free.
 
Dieselbreath said:
I have a Kitchenaide insta-hot that we installed when we built the house in 1994. Still trouble free.

Hello Dieselbreath

I really appreciate the info and glad you had much better luck with yours. I hear the Waste-Kings are good, but until I hear how long someone has owned one we do not know how good!

If I have to buy a new one sometime, I will definitely look into this Kitchenaide.

I hope this new kitchenaide at Lowe's here is the same quality as yours.
http://www.lowes.com/webapp/wcs/sto...37291&cm_mmc=SCE_gps-_-gps-_-gps-_-KitchenAid 3/4-Gallon Low-Profile Hot Water Dispenser KHWL260VCR

If the quality is up there, then this Insta-Hot seams like an excellent value for the price!

Does yours have all copper lines and a stainless steel tank?

The Insinkerator has a stainless steel tank, but only 1 copper line to the Domestic Water tie in! The other lines are plastic!
 

Attachments

  • KitchenAideInsta-HotAtLowes.jpg
    KitchenAideInsta-HotAtLowes.jpg
    18.6 KB · Views: 1,022
Status
Not open for further replies.