Installing Stone Veneer on Wall with Fireplace

  • Active since 1995, Hearth.com is THE place on the internet for free information and advice about wood stoves, pellet stoves and other energy saving equipment.

    We strive to provide opinions, articles, discussions and history related to Hearth Products and in a more general sense, energy issues.

    We promote the EFFICIENT, RESPONSIBLE, CLEAN and SAFE use of all fuels, whether renewable or fossil.

Weizilla

New Member
Oct 30, 2017
6
Chicago
I have a fireplace surround + wall that I want to tile with a stone veneer.

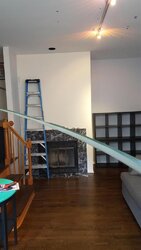
This is what it looks like now. e26YYy0.jpg

The blue part will be stone veneer and the green will be floor tile.UepIGY1.jpg

I want to remove the existing marbel tile on the wall and put stone on that whole facing wall along with the wall around the corner on the right (not visible in the pic).

Closeup of the current drywall and tile: VtVSzRF.jpg .

The goal is to do something similar to this except no mantel: QgT7its.jpg Album

I was thinking of using these: https://www.homedepot.com/p/MS-Inte...ases-40-sq-ft-pallet-LPNLQSIEBLU624/205960135

This is my first time doing a project like this so I want to double check that I have all the steps and materials right.

  1. Remove existing wall marble tiles.
  2. Get some Durock cement board and screw it into the studs directly over the drywall. Use cement board specific screws and make sure they're long enough (how long?) The goal album used metal lath but seems using cement board instead is ok too.
  3. Tape and mud cement board joints?
  4. Get some thin-set mortar and slather it on the stone veneer. Do I need special modified thin-set?
  5. Put stone veneer on the wall. Start at corner, then cut linear pieces with a wet tile saw. The manufacturer instructions says to do 3 ft per day. Seems like I should start at the ground and not at the top of the firebox?
  6. For the tile on the ground, is it as simple as smashing the existing one to remove them, put the same thin-set mortar on whatever subfloor is there then put new tile in? This will be flat square tiles and not the same stone veneer as the wall.

Questions:

  1. Is it ok that thin-set and cement board will go up to the edge of the firebox? I guess if the drywall is up against the firebox, cement board is ok. I'm not covering any of the metal parts.
  2. The firebox will probably be 2 inches deeper than the surface of the stone veneer. Is there anything aesthetically people do for this or just leave it as is?
  3. What happens if I get to the ceiling and there's only 1" left? Too narrow for another row but enough to be visible?
 

Attachments

  • e26YYy0.jpg
    e26YYy0.jpg
    51.6 KB · Views: 1,770
Last edited:
  • Like
Reactions: leco
I'll bet that a lot of this manmade veneer rock gets slapped right on top of sheetrock using regular old versabond modified thinset from home depot. Do you really think that the existing marble tile is on cement board? It hasn't fallen down has it?
 
I'd be inclined to take the area to be veneered down to the studs, then attach cement board to the studs.
 
I'll bet that a lot of this manmade veneer rock gets slapped right on top of sheetrock using regular old versabond modified thinset from home depot. Do you really think that the existing marble tile is on cement board? It hasn't fallen down has it?
No the tile hasn't but it has allot more surface area per lb. Yes people do stick stone to drywall all the time and stone fall off all the time as well.
 
The marble might have been just glued to the drywall.
 
I agree with bg it will also give you the opportunity to check for proper installation and condition of that fireplace.
 
I'll bet that a lot of this manmade veneer rock gets slapped right on top of sheetrock using regular old versabond modified thinset from home depot.

Is that ok? Should I be using something else?

Do you really think that the existing marble tile is on cement board? It hasn't fallen down has it?

The current tile has not falling down and from the close up picture, it certainly looks like it's just attached on the wall surface. I'm removing all the existing tile and adding new cement board on top so I guess it shouldn't matter?

I'd be inclined to take the area to be veneered down to the studs, then attach cement board to the studs.

I agree with bg it will also give you the opportunity to check for proper installation and condition of that fireplace.

This seems like it will add significantly more time and effort to this project. What kind of risks are there if I don't do this? I wouldn't even know what to look for in terms of good vs bad installation and condition so would I have to hire someone to inspect the fireplace after I tear everything down? We bought this house last year but have never used the fireplace.
 
This seems like it will add significantly more time and effort to this project. What kind of risks are there if I don't do this? I wouldn't even know what to look for in terms of good vs bad installation and condition so would I have to hire someone to inspect the fireplace after I tear everything down? We bought this house last year but have never used the fireplace.
It's one extra step that will take maybe 30 minutes. But in the end you will get a cleaner finished job that will be flush. Otherwise the veneer will be a 1/2" further out than the drywall. Or is the intent to do the entire wall with the veneer? The finish project picture shows up as black for me.

The fireplace should be inspected anyway and this is an opportunity to verify that it was installed properly.

Do you know what is the make & model of the fireplace? If should be on a tag in the door frame.
 
  • Like
Reactions: bholler
What he said above. Now is the time to have it inspected. I can tell you that a fair number of the fireplaces like this that I have opened up did not have proper clearances. Contractors hear zero clearance and don't bother to read the instructions.
 
The current tile has not falling down and from the close up picture, it certainly looks like it's just attached on the wall surface. I'm removing all the existing tile and adding new cement board on top so I guess it shouldn't matter?

My attempt at sarcasm was not successful apparently. I'm sure that the marble and a large percentage of this type of lightweight artificial veneer is commonly installed by simply adhering it to sheetrock with thinset. You'll see the same thing with tile backsplashes in kitchens. It is just the way people do it, right or wrong.

Before I considered adding a layer of cement board on top of the existing sheetrock I would remove the old sheetrock and install 1/2" cement board flush as described above.

Then there are all sorts of ideas about the next step. Some folks put up metal lathe, some don't. I would recommend you follow the instructions that came with the veneer.
 
  • Like
Reactions: bholler and Doc C
My attempt at sarcasm was not successful apparently. I'm sure that the marble and a large percentage of this type of lightweight artificial veneer is commonly installed by simply adhering it to sheetrock with thinset. You'll see the same thing with tile backsplashes in kitchens. It is just the way people do it, right or wrong.

Before I considered adding a layer of cement board on top of the existing sheetrock I would remove the old sheetrock and install 1/2" cement board flush as described above.

Then there are all sorts of ideas about the next step. Some folks put up metal lathe, some don't. I would recommend you follow the instructions that came with the veneer.

I can't see the pic of the stone but I am assuming it's the man made stacked stone that home depot sells.

Is that's the case you really should to take the drywall off.

Replace with cement board of a decent thickness.

The use a good thinset and stack your stone.

I stopped using mastic for stuff years ago and please stick with a thinset you have to mix yourself. None of that prefixed stuff.

It's really on a few minutes to pull the drywall.

You don't know the integrity of the drywall. There is paper that peel off over the years of having stone on it. Also you will be using a thinset with water in it that can absorb into the drywall if you don't have food paint on it. And if you do have a good paint on it then you risk the chance of the thinset not sticking well.

Lathe can be used if you feel the need.
 
It'd be silly to not take the drywall down. It seriously wouldn't take more than an hour to demo and remove the screws or nails. Take a utility knife and cut the tape on the two inside corners and then where the wall meets the lid. It'll save the finish on the drywall that stays. The durock should be mounted directly to the studs. There's going to be a decent amount of weight between the durock and stone. I used trevi gray msi stone on my recent fp30 change out. I liked the sierra blue but couldn't talk the wife into it. I used premixed thinset for mine but it's more expensive, but you can put the lid back on for the night if you're done. For the difference between the face of the stove and stone I used angle iron painted with stove paint. Came out real clean looking. For cutting finishing rips I used an angle grinder with a diamond wheel from the backside. I doubled up some old bath towels to help with the vibration. The key is to go slow. It's going to take a while but it's worth it in the end.
 
Thanks for all of the advice! Sounds like removing the drywall is the way to go then just continue with the original plan of cement board and thin-set mortar.

It's one extra step that will take maybe 30 minutes. But in the end you will get a cleaner finished job that will be flush. Otherwise the veneer will be a 1/2" further out than the drywall. Or is the intent to do the entire wall with the veneer? The finish project picture shows up as black for me.

The fireplace should be inspected anyway and this is an opportunity to verify that it was installed properly.

Do you know what is the make & model of the fireplace? If should be on a tag in the door frame.

I want to do the whole wall. I updated the original post with more pictures showing which parts will be stone and an example of a finished product.

The fireplace is made by Superior with model number CF 3860.

What he said above. Now is the time to have it inspected. I can tell you that a fair number of the fireplaces like this that I have opened up did not have proper clearances. Contractors hear zero clearance and don't bother to read the instructions.

What kind of a company do I get to inspect the fireplace? I'm assuming if I go with a general contracting company, they might not do any better than the original installers?

For the difference between the face of the stove and stone I used angle iron painted with stove paint. Came out real clean looking. For cutting finishing rips I used an angle grinder with a diamond wheel from the backside. I doubled up some old bath towels to help with the vibration. The key is to go slow. It's going to take a while but it's worth it in the end.

How did you install the angle iron?

Any reason you used an angle grinder instead of a tile saw? I was thinking of angle grinder since it'll be cheaper and could be used for other projects but it seems like it would be a lot slower for this kind of a job than a saw.
 
Last edited:
A chimney company
 
Thanks for updating the pictures. I don't have the manual for this fireplace, maybe bholler does. What I wanted to check were the clearances to combustibles and the material recommended for the surfaces around the fireplace.
 
20171012_201013.jpg
My mason from work borrowed me his wet saw so I could cut my mitered corners. I used a grinder for cutting around the vents and face of the stove and beveling the back side of the pieces meeting the wood cieling. The angle iron I pre drilled and then used self tapping screws for the stove body. I also clearenced just enough of the durock backside so it would sit flat against the fireplace body.
 
  • Like
Reactions: leco and Highbeam
30lb or double 15lb tar paper over the drywall or studs prior to cement board.
 
What kind of compound and tape do you use for the inside corners where the cement board and drywall meet? I know for cement board seams, you use alkali-resistant tape and thinset. But if the corner is against drywall which will be painted, what should I use?

Do I need a corner bead for the outside corner?

I have used a hot mud like a 30 minute or a little slower drywall mud. If you go this route then you'll want to use drywall tape as well.

Another option is to do like they do in manufactured homes and caulk it with no tape.

And yes metal corner bead for outside corner unless I misunderstanding that part of the question.
 
Last edited:
What kind of compound and tape do you use for the inside corners where the cement board and drywall meet? I know for cement board seams, you use alkali-resistant tape and thinset. But if the corner is against drywall which will be painted, what should I use?

Do I need a corner bead for the outside corner?

Also drywall guys use hot mud in our area for where the cement board meets the tub when doing tile surround. It seems to hold up well even being on the cement board. Seen it done like that for years.

Probably other ways to do it and I'm sure others will chime in.
 
I have used a hot mud like a 30 minute or a little slower drywall mud. If you go this route then you'll want to use drywall tape as well.

Another option is to do like they do in manufactured homes and caulk it with no tape.

And yes metal corner bead for outside corner unless I misunderstanding that part of the question.

Thanks!

This is the outside corner where the two cement boards meet and will go under the corner stone veneer. I was wondering if I needed a corner bead, use tape and thinset or do nothing at all.
 
I'm not a mason or a taper but why would you need to tape the durock to the sheetrock? Also MSI makes outside corners for the ledgestone you mentioned earlier. Just make sure the corner is ridged before the durock goes on.
 
Thanks!

This is the outside corner where the two cement boards meet and will go under the corner stone veneer. I was wondering if I needed a corner bead, use tape and thinset or do nothing at all.

I would just run the stone to the corners. No need to use corner bead there, the thinset and stone will make it strong enough.

Unless for course you have the stuff already then it's not going to hurt.
 
Last edited: