King 5500 M initial test

  • Active since 1995, Hearth.com is THE place on the internet for free information and advice about wood stoves, pellet stoves and other energy saving equipment.

    We strive to provide opinions, articles, discussions and history related to Hearth Products and in a more general sense, energy issues.

    We promote the EFFICIENT, RESPONSIBLE, CLEAN and SAFE use of all fuels, whether renewable or fossil.

SnuffySmith

New Member
Jan 27, 2024
17
North Carolina
I have 2 King / Ashley 5500M stoves. I ran the initial test on both and one was good to go. The other one had the red LED over Heat Range on steady (not blinking) during every step of the test.

I did a factory reset and tried again but the red LED above Heat Range was still on.

Other than that the test went as outlined.

I have read the manual and searched this forum but can’t find an explanation of what that means.

Does anyone know?

Thanks for any help or direction - much appreciated.
 
I did a factory reset and tried again but the red LED above Heat Range was still on.
Does it blink when you turn stove on? Try unplugging the Thermistor and replugging it in, plugs in board where it says temp in. Also try switching the Thermistors between stoves.

Quickly Flashing Heat Range Setting Indicator (changes twice per second): This indicates that
the stove is in normal operation and that an over-temperature condition exists causing the fuel to
stop.
Slowly Flashing Heat Range Setting Indicator (changes once per second): This indicates that
the stove is in a cut back condition in an attempt to prevent an over-temperature shutdown

1706397493217.jpeg
1706397589573.jpeg
 
Thanks very much for the reply. I will try unplugging the thermistor and replacing in.

I did not know what the error was referenced to but the thermistor makes sense. Last winter I installed new gaskets, new ignitor and new vacuum hoses.and auger motor in that stove plus cleaned it well. Did not look at the thermistor.

Thanks again. I was more worried that something on the control board had failed.

Much appreciate the pictures too! Thank you for your time.
 
I tested the thermistor resistance with a heat source and the resistance decreases with the rise in temperature. I think that is the way a good one works.

I re installed the thermistor and nothing changed - during the ‘initial test’ the red led above ‘heat range’ switch is on solid - not blinking or flashing - through the entire test.

Pressed the up and down aux buttons to reset factory default settings and start the stove.

For some reason the auger is not feeding enough pellets. When I go back and run the initial test the auger turns at 1 RPM which is what it should do.

If I put a cup of pellets in the burn pot the stove functions as it should with the exception that no pellets are dropping in the burn pot. It eventually burns the cup of pellets and the fire goes out. I have changed auger motors with the same result.

Any ideas?

Thanks very much.
 
After turning stove on what happens if you press and hold on button? Should feed pellets as long as you hold it.

The other one had the red LED over Heat Range on steady (not blinking) during every step of the test.

I'm sorry old timers got me I thought you wrote light was blinking the whole time.

You reset to default now check to see if C codes are at default settings. Some of the c codes do not apply to your stove but this is the posted list for the 5500m Pay attention to C15 auger load time.

5500M C Codes
To adjust the operation constants, press the hold the MODE and AUGER DELAY buttons simultaneously
for 3 seconds. The display will show “C-1”. Use the HEAT RANGE UP or HEAT RANGE DOWN buttons to
change the constant number (see the list of vales below). When the desired constant is displayed, press
the ON button to toggle between viewing and editing the value. While editing a parameter, use the AUX
again to return to the constant number list. Press the OFF button to exit the operational constants
mode.
 C1- Reset to defaults (hold Mode and Auger Delay buttons for 3 seconds to reset all to defaults).
 C2- Fuel Lbs. per Hour HR 1 (0-5.0) – This is the fuel rate in pounds per hour for a heat range
setting of 1. The default is 1.75 lbs.
 C3- Fuel lbs. per Hour HR 9 (0-5.0) – This is the fuel rate in pounds per hour for a heat range
setting of 5. The default is 4.5lbs. The fuel rates used between setting 1 and 5 are linearly
interpolated between these two settings.
 C4- Draft Fan Level HR 1 (0-500) – This is the draft fan output level for a draft fan setting of 9.
The default is 150
 C5- Draft Fan Level HR 9 (0-500) – This is the draft fan output level for a draft fan setting of 9.
The default is 350. See next parameter for disbursement.
 C6- Monitor Hopper Switch (0-1) – If this parameter is set to 0 (default), the hopper switch input
is ignored. If it is set to 1, the hopper input is monitored, and if the hopper is opened, the auger
will stop. The delay LED will flash when the hopper is opened.
 C7- Ramp Seconds for increasing level (0-300) – When the heat range setting is adjusted, control
will ramp from the current setting to the target setting to avoid abrupt changes in the outputs
that could cause problems with the flame quality. The ramp seconds value sets the amount of
time to spend on each heat range setting (1-9 pseudo ranges not 1-3 user ranges) as the current
setting is ramping toward the target. If the current setting is ramping down toward a lower
target, the ramp value is half this number. The default value is 90 seconds.
 C8- Startup Minutes for detecting Warm Stove – (10-60) this is the amount of time the control
will wait for the stove to reach the warm temperature (110 Degrees F) after the stove has been
started before shutting down and reporting an Error condition Err3. The default is 30minutes.
 C9- Over temp Set point – (0-500) this is the temperature the flue gas can reach before an over
temp condition exists. If the measured temperature is higher than this set point, the control will
stop auguring fuel until the temperature returns to a safe operating point. The default is 445
degrees.
 C10- Cutback Set point – This is the temperature that the flue gas can reach before a cutback
condition exists. If the measured temperature is higher than this set point, the control ramps
down the heat range according to the auger ramp seconds value. The default is 430 degrees.
 C11- Room fan on set point – (0-300) this is the temperature that the measured flue gas must
reach before the room fan turns on. This variable also serves to indicate to the control that the
stove is warm. If the measured temperature is higher than this set point, the stove is considered
warm and will not create an Er3. Whether or not the stove is warm also determines if the unit
will recover from a power failure. If the stove is warm when the power is lost and cold when it
returns, it will shut down with an Er4 error. The default is 130 degrees.
 C12- Cold stove set point – (0-300) this variable is used to determine when the stove is cold and
ready to be shut down. If during the shutdown sequence the measured temperature is less than
this value, the stove will stop running the fans to cool it off. The default is 110 degrees.
 C13- Room fan level HR 9 (0-500) – this is the output level applied to the room fan for a setting o
1. The default values is 300/500.
 C14- Room fan level HR 9 (0-500) – This is the output level applied to the room fan for a setting
of 9. The default value is 500/500. The room fan output levels used between settings 1 and 9 are
linearly interpolated between these two settings.
 C15- Auger load time (0-30) – This variable is used to control the length of time that the fuel is
augured into the burn pot during startup. The default is 6 minutes.
 C16- Starter on time (0-30) – This variable is used to control the length of time that the igniter is
turned on during startup. The default is 8 minutes.
 C17- Ignore fuse errors (0-1) – This variable can be used to ignore errors detected by open fuses.
By default, it is o (do not ignore the vacuum switch), but can be set to 1 for diagnostic of
emergency operation purpose.
 C18- Ignore vacuum switch (0-1) – This variable can be used to ignore the vacuum switch. By
default it 0 (do not ignore the vacuum switch), but can be set to 1 for diagnostic or emergency
operation purposes.
 C19- Bump rate in pounds per hour (0-0.5) – The bump rate defines the rate of fuel to be
delivered when the unit is over temperature or in shutdown to prevent burn back, Since this
stove design isn’t conductive to burn back, the default setting is 0lbs. per hour, but can be
adjusted to a maximum of 0.5lbs per hour.
 C20- Purge time (0-120) – The purge time defines how many seconds to run the auger to purge
it on power down or shutdown as the stove moves from a warm state to a cool state. It is
intended to push and partially heated pellets still in the auger tube out. By default, the auger
will run for 30 seconds, but can be set between 0 and 120.
 C21- Enable serial communication (0-10 – By default, serial communication is not enabled (0).
Set this variable to 1 to enable communication.
 
Thanks! Did not know there was a way to verify settings after a reset to factory specs.

I will try that tonight.
Is the auger turning during entire test or just when you get to step 4 auger output test?
I did not check that. I thought it would only turn on step 4 of the test. I will run through the test again and look for that.

Thanks
 
Do you have external thermostat attached or thermostat jumper in place? If not stove will not call for heat and auger will not turn on. That does not solve the red light on but could be the auger not turning. Also you could try jumping hopper switch, with stove off unplug both wires at hopper switch, attach them together with paper clip or double male jumper wire tape them, then try turning stove on see if auger runs. Also try jumping vacuum switch. Do not touch wire spade ends to stove it will short your board. I know you said they passed test mode but bad switches some times do strange things.

1706484111680.jpeg


1706484482651.jpeg
 
Did not know there was a way to verify settings after a reset to factory specs.
C codes allow you to set your own settings one of the great things about US stove 4 button controls. Feed rates, draft settings can be adjusted for a better burn.
 
Do you have external thermostat attached or thermostat jumper in place? If not stove will not call for heat and auger will not turn on. That does not solve the red light on but could be the auger not turning. Also you could try jumping hopper switch, with stove off unplug both wires at hopper switch, attach them together with paper clip or double male jumper wire tape them, then try turning stove on see if auger runs. Also try jumping vacuum switch. Do not touch wire spade ends to stove it will short your board. I know you said they passed test mode but bad switches some times do strange things.

View attachment 323973

View attachment 323974
I don’t know if it had a remote thermostat but will look for the jumper.

I bought the stoves used about 3 years ago. They sat for a year then last year I use the one giving problems now. Before using last year I cleaned it out and replaced fan gaskets, vacuum lines and igniter. Also removed the auger and looked at the bushing. The auger motor never ran so I had to replace that before I fired it up. It ran well last winter giving no problems.

After running the stove this afternoon it had error 2 on the display - ran out of fuel - but there was plenty in the hopper. Just not getting to the firebox. The auger is free and turns easily by hand.

I just ran through the initial test again - after getting no auger turning when I ran the stove this afternoon - the auger works fine in step 4 of the test. I let it run 3 revolutions. The auger only ran during step 4.

Thanks for all your replies. Hopefully this will help others too.

over the next few days I will go over the test manual.

Also will check the pellet shoot from the top of the auger to the outlet above the fire box. Maybe it’s clogged. The old motor had a small gear in the gear box striped of two teeeh and the motor was shot. Maybe there is a clog.

I will post what I find next.
 
After running the stove this afternoon it had error 2 on the display - ran out of fuel - but there was plenty in the hopper. Just not getting to the firebox.
Can get error 2 when stove has not reached 110 degrees I know error codes say Err 3 but Err 2 can also mean not up to temp. I am assuming auger still not running so no pellets being fed therefore no 110 degrees. Did you try pushing and holding On button to manually fed more pellets to try get temp up to 110? Did you try jumping hopper switch?, Vacuum switch? I ask about jumping the vacuum switch but you can also go into the C codes and change C18 to 1 which will ignore the vacuum switch. After you try jumping both those switches (one at a time) that will tell us if hopper switch is bad or you have a vacuum problem. Which will give us a direction to go to fix the auger not working.
 
Can get error 2 when stove has not reached 110 degrees I know error codes say Err 3 but Err 2 can also mean not up to temp. I am assuming auger still not running so no pellets being fed therefore no 110 degrees. Did you try pushing and holding On button to manually fed more pellets to try get temp up to 110? Did you try jumping hopper switch?, Vacuum switch? I ask about jumping the vacuum switch but you can also go into the C codes and change C18 to 1 which will ignore the vacuum switch. After you try jumping both those switches (one at a time) that will tell us if hopper switch is bad or you have a vacuum problem. Which will give us a direction to go to fix the auger not working.
I will jumper those those switches on at a time tonight after I get home from work and also try holding the on button to see if the auger turns.

I did put pellets directly in the fire box before starting and after they caught fire I kept pellets in the fire box till the room fan came on and hot air was blowing out the front grill. I think the fans and thermistor are functioning. After 3 times adding pellets to the fire box I let the fire burn out and got the er 2 so I think the error 2 was legit as the fire just burned out because no pellets were being fed in.

After it cooled down, running the initial test again showed the auger functioned as it should on step 4 of the test. I did not short the hopper lid switch for the test but did hold it closed with a ty rap so I could watch the auger with the hopper lid open. I will try shorting the switch as somehow the switch may not be closing when the lid is shut.

Somehow the auger motor must not be getting power when going through the normal start up and run program by pressing the on button.

Maybe I will put my volt meter in the auger circuit.
 
I did put pellets directly in the fire box before starting and after they caught fire I kept pellets in the fire box till the room fan came on and hot air was blowing out the front grill. I think the fans and thermistor are functioning.
Great test yes it means not thermistor.
 
All I had time to do tonight was jumper the hopper lid switch. I put one of the leads from my meter on the jumper and the other to ground.

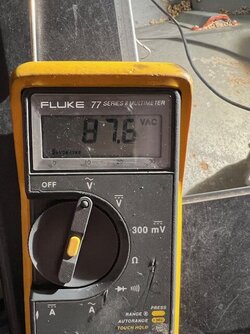
Just power cord for the stove in to an outlet my multimeter reads 87V on the jumpered hopper lid switch circuit. I am hard of hearing but I noticed a low hum like a motor trying to turn. I think a fan motor is getting the 88 volts too.

If I run through the control board test the heat range LED is still on through all 9 steps.

I started looking through the Pellet Stove Test Manual and the same 9 step test is in it too. Except that it goes in to more detail. The heading paragraph of the test is the same except the Test Manual version has one more sentence in bold - If the Heat Range light is on during every test check the Hopper Switch Wires. It stops short of telling what causes that. I think the 88 volts all the time explains the Heat Range light during the test.

Somewhere there is a short or voltage leak.

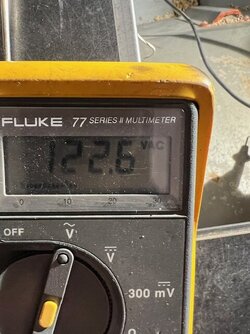
Step 4 in the test shows 120 volts on the hopper lid switch circuit and the auger turns.

I will read more in the manual and keep looking.

IMG_1354.jpg IMG_1356.jpg
 
Nice multi meter, try testing on both sides of auger fuse, (red circle) and if you can test bottom of auger triac, (Yellow circle). Triac is basically a on off switch. On your board they line up directly across from fuses. So auger one is directly across from auger fuse. Some times they short out.

1706632460534.jpeg


1706632516003.jpeg
 
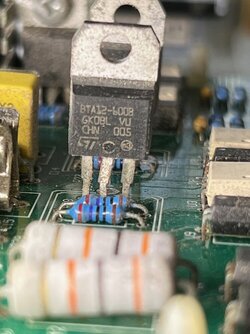
Should have said test outside prongs on triac each one should be 120 ish when stove turned on, Middle prong comes from microprocessor/timer and makes triac turn on/off. Triac should be BTA12 600BW if shorted will probably be 120 on one side and the 87 ish on the other. As to why the jumped hopper switch shows 87 volts I think you have short some were, hopper switch is on white/neutral line not hot and check red wire from auger motor back to the board and all the white wires. I don't expect you to find anything on red auger or white hopper wires because the auger works during test mode and that test uses those two curcuits . You could also unplug red wire from auger and meter test ground to red wire be careful do not touch red wire to stove or yourself. Did you ever try to jumper the vacuum switch?
 
Last edited:
Meter was ebay find and trustworthy.

I took the main board out before I read you last post. There are no visually obvious burns or other damage except some corrosion. I was thinking to try to clean the connections and maybe use dielectric grease on the connections.

I am a raw rookie when it comes to circuit boards and their components. Thanks for your patience and help.

The 4 Triac on my board look to be BAT12 6008 (maybe the 8 is actually a B). the legs are corroded but still solid and connected. On all 4 Triac there is continuity between the outer legs but none between either outer leg and the middle leg.

I will put the board back in and do the tests you suggested.

If I understand correctly the auger hot wire runs through the Triac for switching and the auger neutral wire runs through the hopper lid switch. I am trying to understand how the neutral is showing 87V. Somewhere the auger motor neutral wire must be touching a hot wire. I will look for that. I am thinking that's the only problem I have.

If the auger works in test mode then what is different in test mode current routing and "normal operation" current routing? How can it test OK but not run during normal operation cycle? Does the test cycle bypass the Triac?

I keep thinking about the one sentence in the Pellet Stove Test Manual under 5500M 4 Digit Control Board Test - If the Heat Range Light is on during every test check the Hopper Switch Wires. Somewhere that wire much be touching a hot wire. Also there is that low hum when you plug in the stove that sounds like its coming from a motor. Maybe its the auger motor trying to run on 87 volts??

I apologize for not getting back sooner. I was not able to work on it evenings this week.
 
Still need to jumper the vacuum switch. Short might not be a wire it could be a component that is why you jumped the hopper switch, tested the fuse holder and the triac. Also can you test the voltage at the triac legs.

If the auger works in test mode then what is different in test mode current routing and "normal operation" current routing?

The vacuum switch is in the circuit when running but not in test mode.
 
Last edited:
Thanks for your reply.

Just back to the computer from tests. Have not jumpered the vacuum switch but will do that next.

What I did find is that I had the motor wires both hooked to white wires - one white wire from the hopper switch and the other that was paired with the red wire out of the harness. I had the red hot wire for the motor on one of the hopper lid switch wires. I guess I thought the hopper lid switched the hot. A dumb mistake.

I fixed that mistake and the hopper lid switch wires read zero volt. Also tested the hopper switch and tested the wires. I am satisfied that hopper lid switch and the two white wires are good.

With the motor disconnected from the red wire I tested the red wire to ground and got about 85V - no matter if the board was off or on run.

I ran the board test again with the red wire disconnected from the auger motor and the Heat Range light was on throughout the test. 85V on the red wire every step of the test but step 4 - the auger test - and the red wire had 120V for step 4.

I will go jumper the vacuum switch.

My mistake with the red wire may have fried the auger motor. It got hot and I hope the insulation held. If not I think I have another good motor.

Thanks for your help!
 
Jumped vacuum switch at the board buy removing the two brown wires and plugging in a jumper. Still 80V on red motor wire not connected to motor.
Ran the board test and the Heat Range light was on for all steps. Step 4, auger, red wire showed 120V. All other steps - 80V

I put the brown wires from the vacuum switch back on the board. With the red wire still disconnected from the motor I put the black wire from the multimeter on the neutral that goes to the hopper lid switch. Hopper lid switch was closed. I checked for continuity to the pins in the white plug that goes into the board. The plug was pulled from the board when I did this. I had continuity with the white, blue and orange wires. None with the red or black wires. I don't know what that means if anything. I was looking for the white wire and red wire to be connected. I guess all the white wires are connected back to the main power neutral and the the red to the 120V.

I had the vacuum switch out last winter and tested it. I have run about 5 bags of fuel through the stove since then.