Log Cabin Pellet Stove Installation. Advice Needed.

  • Active since 1995, Hearth.com is THE place on the internet for free information and advice about wood stoves, pellet stoves and other energy saving equipment.

    We strive to provide opinions, articles, discussions and history related to Hearth Products and in a more general sense, energy issues.

    We promote the EFFICIENT, RESPONSIBLE, CLEAN and SAFE use of all fuels, whether renewable or fossil.
Status
Not open for further replies.
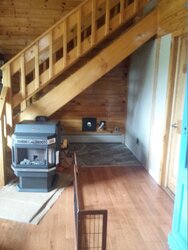
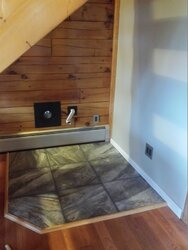
OK I started the installation today. I went with the under the stair installation. I ended up getting through the thick logs with a chainsaw, and a small hole saw for the OAK. I put down my tile base and I am waiting for it to dry for the rest of the installation. I ran into an issue with the vent kit I bought from tractor supply. It is the 3" dura vent pellet stove kit. On the end of the vent there is a shroud. The shroud has no grate on it to prevent bugs/birds from getting in there. Is there supposed to be one? Or can I just screw in some wire mesh over the end of the vent to keep pests out?

I will post some pictures of the installation tomorrow
 
Is there supposed to be one? Or can I just screw in some wire mesh over the end of the vent to keep pests out?

No, as shipped the vent hood does not have a grate, at least in the kit here. If you add one, the mesh should not be too fine - you want it to be able to vent and not clog. Some 1/4 or 3/8 Hardware cloth would be as small as I'd go here.

* That hood is stainless steel, and tough: a high speed Dremel tool, w/ a diamond tipped bit, is handy to drill the hood / start a pilot hole for screws.
 
Found a good screen at Lowes. It is actually a Gutter downspout grate that prevents leaves and debris from going down the downspouts. It has pretty large holes so I don't think it will clog the Pellet Vent. There are a ton of birds in my area, so I'm really just looking for something that prevents birds from getting in there.

Next question, when I attach the vent to the back of the stove there is an "appliance adapter" in the dura vent kit. How do I get a tight seal with this adapter? It just slides onto the stove, but there is no way to clamp it. Do I just put sealant around it and slide it on, or is there a way to clamp this adapter for a tight fit? There is no instruction in the kit on what to do, so I just don't want any fumes leaking out of the back.
 
pic 1.jpg pic 2.jpg
 
A good ring or two of high temp silicone should do the job. Let it set up as per instructions on silicone.
 
  • Like
Reactions: CleanFire
Looks real good except for the baseboard.:)
 
Looks good, you may need to use some fans to push the heat from out under those stairs.
 
Check the perimeter of the exhaust pipe coming out from the stove, if you see a hole in the pipe 3-4" back from the edge, it is there to accept a sheet metal screw to secure the appliance adapter to the stove, which you should do.

This will secure the adapter to the stove, and allow you to disconnect the first section of pipe from the back of the stove for any maintenance or cleaning needed.

We have a short pipe run for our setup, so no high temp. silicone here, I used 3M High Temperature Aluminum Flue Tape,

link: http://www.acehardware.com/product/index.jsp?productId=1273881

The gasket ring inside the female adapter of the Duravent pipe may get pushed down as shipped, preventing good contact / seal.
You can use a small screwdriver, pick tool, etc. to lift the gasket ring up in the channel, so the male end makes good contact.

If you have any 45 or 90 degree elbows, you can use the 3M Aluminum tape above to wrap any joints in the elbow, to seal them.

* Don't forget to add a Surge Protector (or UPS), and a CO detector to your list of things to do, before roasting pellets..
 
  • Like
Reactions: bogieb
So the final install day was a complete disaster....!

First off, the OAK I bought at Tractor Supply is absolutely useless. The flex pipe is very poor quality and broke in multiple places while I was trying to hook it up. The only way to secure it to the unit is to tighten the clamp a significant amount, but then it rips the crappy hose that they give you. I would not recommend this OAK at all....very frustrating to install. I am going to purchase some metal straight pipe to run through the wall, and a higher quality exhaust flex pipe from the auto parts store to replace the nonsense from this kit.

Next part of the disaster: The Duravent Kit seems to be somewhat well made, but the pipes are very difficult to fit together and twist into the lock position. When I installed the adapter to the back of the stove, I thought it was screwed and locked into the pipe behind it, but after hooking everything up and using a ton of high temp RTV.... I bumped the stove and the pipe separated from the adapter. I pretty much have to re-do everything and scrape all the old RTV off. This happened late at night, so I gave up and I will have to attempt again next week when I have some time off.

CleanFire-- I tried to find that flue tape, but no one has it in my area. No Ace hardware here only Lowes and Home Depot. I am stuck with high temp RTV. I did install a surge protector and CO detector though.
 
Sorry to read you had issues on your install. Yes, the Duravent pipe can be difficult to lock in place when new, suggest using a permanent "sharpie" marker to draw a line across both pipes once you have it twist-locked in place, that makes it easy to re-install when fitting, just re-fit so the marks line up / the line is straight.

re: Flue tape @ Amazon, link: http://www.amazon.com/3M-High-Temperature-Flue-15-Foot/dp/B00004Z4DS/ref=sr_1_1?ie=UTF8&qid=1443759118&sr=8-1&keywords=3M High Temperature Aluminum Flue Tape
 
CleanFire-- I tried to find that flue tape, but no one has it in my area. No Ace hardware here only Lowes and Home Depot. I am stuck with high temp RTV. I did install a surge protector and CO detector though.

Home Depot has high temp silicone tap http://www.homedepot.com/p/Nashua-T...-Fusing-Silicone-Tape-Black-1208952/100206050. It is with the other tapes, not with the pellet stoves or heating vents. HD should also have the metallic tape - it is in the plumbing/heating section, Or sometimes it is with the rigid foam insulation (great for sealing seams between boards). After RTV'ing and screwing together the adapter to the stove, wrap the junction well in tape to help hold it in place while curing.

Sorry you are having such issues - sound a lot like most of my projects; takes 5 times longer and twice as much materials as it should - and a whole lot of cussing - then just sighing as I run out of original words to use :(. Hope it goes better the next time around!
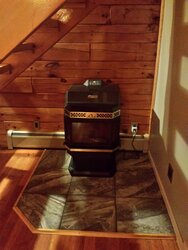
 
So attempt #2 went a lot better. I used some black 1 1/2" gas line pipe for the outside air intake to run through the wall of the house with a metal 90 degree elbow on the inside. This made the flex hose a lot easier to hook up. I just clamped it to the metal pipe and then to the stove. Eliminating about a foot worth of flex pipe and one of the bends that had to be in it made the flex pipe more movable. I checked out some flex hose at the auto parts store but it was very thick and would not bend at sharp angles. I still think the OAK flex hose is awful and they should make a better kit. I would not recommend this kit, it is made by US Stove and the part number is 69FAK.

As for the vent, I put the pipe together before hand with the RTV and let everything dry, then I hooked it all up. It went together well and after a day of waiting for the RTV that I put between the stove and the vent pipe to dry, the stove was fired up and worked well. No leaks or issues. Thanks to everyone for help a long the way in this thread. I will probably be posting in the future when the stove gets messed up. Here's a pic of everything hooked up:

Final Install.jpg
 
  • Like
Reactions: chken
Pic of flame - or it didn't happen ::-)
 
Status
Not open for further replies.