
Anyone buy or build their own log cradle for a log splitter. I don't want the other half of the logs to fall on the ground when splitting and posibly hit the motor or fenders. I have a few ideas, but I was wondering if anyone hs bought or built their own??
Log splitter log cradle
- Thread starter itsme again
- Start date
-
Active since 1995, Hearth.com is THE place on the internet for free information and advice about wood stoves, pellet stoves and other energy saving equipment.
We strive to provide opinions, articles, discussions and history related to Hearth Products and in a more general sense, energy issues.
We promote the EFFICIENT, RESPONSIBLE, CLEAN and SAFE use of all fuels, whether renewable or fossil. -
Super Cedar firestarters 30% discount Use code Hearth2024 Click here
You are using an out of date browser. It may not display this or other websites correctly.
You should upgrade or use an alternative browser.
You should upgrade or use an alternative browser.
- Status
- Not open for further replies.
i have seen some good ones on ebayitsmeagain said:Anyone buy or build their own log cradle for a log splitter. I don't want the other half of the logs to fall on the ground when splitting and posibly hit the motor or fenders. I have a few ideas, but I was wondering if anyone hs bought or built their own??
http://cgi.ebay.com/24x-CRADLE-FIRE...ryZ29520QQssPageNameZWDVWQQrdZ1QQcmdZViewItem
I bought one of the above and had to drill 3 5/16 inch holes in my I beam. I feel for the money it works fine. The only thing I would change is having another cross piece in the middle so the split doesn't fall through and on the ground if you have shorter splits.
Shipper
I bought one of the above and had to drill 3 5/16 inch holes in my I beam. I feel for the money it works fine. The only thing I would change is having another cross piece in the middle so the split doesn't fall through and on the ground if you have shorter splits.
Shipper
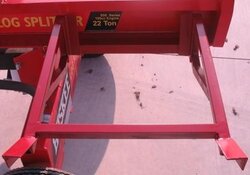
I have the 22ton Huskee splitter, it has built in log cradles, but I think you are actually referring to side table. I looked into the one on ebay, but did not want to drill holes into the web of the I-beam long story but totally against my practice, and was concerned about voiding the warranty.
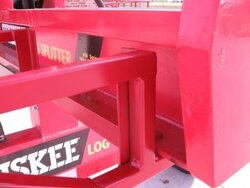
So I decided to build one, it attaches to the bottom side of the beam, basically clamping edge to edge on the bottom. It is very strong will hold me, and I weigh a lot more than I should (well over 200lbs), so it is pretty strong. I made it out of 1" square tubing and 1 1/2" angle iron. Thought about having it powder coated but decided to paint it. I have not split with it yet but hope to soon, once it cools off a bit.
May in the next day or two I will take pics to show the construction of might make a drawing.
aussieblake
aussieblake said:I have the 22ton Huskee splitter, it has built in log cradles, but I think you are actually referring to side table. I looked into the one on ebay, but did not want to drill holes into the web of the I-beam long story but totally against my practice, and was concerned about voiding the warranty.
So I decided to build one, it attaches to the bottom side of the beam, basically clamping edge to edge on the bottom. It is very strong will hold me, and I weigh a lot more than I should (well over 200lbs), so it is pretty strong. I made it out of 1" square tubing and 1 1/2" angle iron. Thought about having it powder coated but decided to paint it. I have not split with it yet but hope to soon, once it cools off a bit.
May in the next day or two I will take pics to show the construction of might make a drawing.
aussieblake
How much you want to make another one and ship it out to PA???
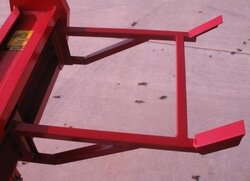
Attached are a couple of pics of my shelf as with anything that one builds comes the urge to tweak the design in the next one. Not my best welding job as I was in a hurry but it will serve the purpose. My intention is to put either a ply wood deck or a metal deck on it.
It is 18" wide and just over that long, much wider and you get into the base plate and the hinge pin. I have thought about weld some short pieces of re-bar to the clamp bolts so a wrench is not required.
FYI I am not a welder by profession, just do it for projects and when it is a necessity. So please not comments about my welds.
aussieblake
Attachments

Looks good :coolsmile: My father had one years ago that was made by a really crafty old guy. Had a wide table on each side, I sure miss it.
aussieblake said:FYI I am not a welder by profession, just do it for projects and when it is a necessity. So please not comments about my welds.
aussieblake
Hey- they look better than my welds. I always use 6013 rods because you can drag them. makes it easy for lamos like me
")
You did a great job!
I never thought I would want a table but I read a post somewhere. This guy said he just built a wooden table to sit right next to the splitter. I had a small table that was just the right size just laying around so I took it out and tried it. After a day of splitting with the table I took it inside and cleaned it up and put a couple coats of exterior paint on it so I could leave it outside and I'm still using it. Sometimes I feel like it is just in the way but most of the time I like it. Simple solution and it doesn't need to be bolted to your splitter.
I just leave a large round stood on end on the other side of the beam. I also stand a patio umbrella cast iron stand on that side. Only problem with that is that I tend to keep moving the splitter closer to the pile of rounds and have to move both the table and the umbrella stand. I'm going to weld a pipe on the beam for the umbrella and give some thought to a table too.
If you have a fixed wedge/moving wood, the out table needs to be smooth surface or it will get destroyed as the wood moves.
I have a moving wedge style machine, so wood does not move. The ebay ones have flat bars (flats on edge, with space between them) and seem to work well. I made one with a piece of 1-1/4 thick plywood about 18 x 18 or so. Used a hinge pin/angle bolted to splitter beam, and a tubing/pipe/conduit support leg down to the bottom of the support stand. This leg could go to the ground. I weld, but you could make all of it by bolting, or using plywood and 2x4's as necessary.
IMO it is essential. Acts as a staging area for next rounds, and table for the far half piece after the first split cycle. Make something crude and try it. Then you realize how much time, and back, is wasted picking up wood off the ground. You can always make a nicer one as a second try.
Productivity is keeping the wedge moving the maximum amount of time. a table really helps on that.
k
Jamess67 said:keep the pics coming
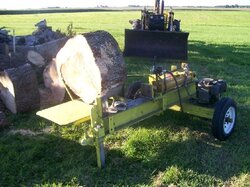
Attaches to the log lifter with 2 pieces of angle that slide into the square tubing that the lift is made from. Moves with lifter so the angle can be adjusted. Simply slides in for use, out for removal.
Attachments
- Status
- Not open for further replies.
Similar threads
- Replies
- 9
- Views
- 928
- Replies
- 6
- Views
- 685