new to the forum and would like to share my story of our 10 acre acreage and the install process process of our lopi leyden. Our goal was to have it up and running before the cold set in and we accomplished that goal. my wife and i bought our house sept 2008. over the past year was a complete demo of the inside so we could get down to the bear bones which we knew where good just everything was in need of repair on the inside- plumbing, electrical, roof, siding, windows, you name it we are replacing it in an effort to make an old house into a super efficent house. the entire perimeter of the house is getting a second layer of R13 insulation which will bring the entire house up to about R28. The original portion of the house was built in 1858 out of limestone from a nearby quary. the walls are 2 and half feet thick and show really no noticeable deteration in them.
most of these projects we are doing ourselves and with the help and expertise in buidling of my father. the goal is to have the house finished by late summer 2010.
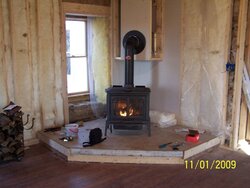
okay onto the install of our lopi leyden. I knew lopi was an excellent maker of stoves and decided cast iron was the way to go. We finished the install this past weekend and had our first couple burns in her. With the help of this website and the posters who shared there stories about there leydens/arbors, we were able to after just a couple burns be able to figure out how to operate this stove quickly and efficently. Im sure we may have had similar stories as people in the forums had as far as not being able to get it to operate properly.
We are using rutland magnetic stove thermometer and get the stove top up to 500-550 then kick in the secondary combustion. we can easily hear the low rumble described in earlier posts. stovepipe temps drop from 475 down to 350 while maintaining about 550-600 stove top with air wide open. if we dampen it all the way down we maintain 450 stove top and 300 stovepipe. we have been able to get 7-8 hour burns with the stove top still above 250 and easily ignitable coals using a combination of soft maple and ash. so far we are really happy with the stove and how it operates but for there is no pretty flame when you dampen it down all the way as most stoves. with the damper open part way then there are nice flames to enjoy.
http://lucaspoge.myphotoalbum.com/
here multiple photo albums with hundreds of pics of our progress. click on the fall 2009 to see the stove pics. there are also pics of our woodpiles scattered thoughout the albums
enjoy the website full of our pics- eventually a website will be put up with a caption under each picture.
thank you to all who contribute to this forum.
most of these projects we are doing ourselves and with the help and expertise in buidling of my father. the goal is to have the house finished by late summer 2010.
okay onto the install of our lopi leyden. I knew lopi was an excellent maker of stoves and decided cast iron was the way to go. We finished the install this past weekend and had our first couple burns in her. With the help of this website and the posters who shared there stories about there leydens/arbors, we were able to after just a couple burns be able to figure out how to operate this stove quickly and efficently. Im sure we may have had similar stories as people in the forums had as far as not being able to get it to operate properly.
We are using rutland magnetic stove thermometer and get the stove top up to 500-550 then kick in the secondary combustion. we can easily hear the low rumble described in earlier posts. stovepipe temps drop from 475 down to 350 while maintaining about 550-600 stove top with air wide open. if we dampen it all the way down we maintain 450 stove top and 300 stovepipe. we have been able to get 7-8 hour burns with the stove top still above 250 and easily ignitable coals using a combination of soft maple and ash. so far we are really happy with the stove and how it operates but for there is no pretty flame when you dampen it down all the way as most stoves. with the damper open part way then there are nice flames to enjoy.
http://lucaspoge.myphotoalbum.com/
here multiple photo albums with hundreds of pics of our progress. click on the fall 2009 to see the stove pics. there are also pics of our woodpiles scattered thoughout the albums
enjoy the website full of our pics- eventually a website will be put up with a caption under each picture.
thank you to all who contribute to this forum.