- Jun 27, 2006
- 82
Last fall I installed a Majestic BC36 woodburing fireplace in the livingroom of my 1920 home.
Installation was fairly straightforward with instructions and clearances strictly followed.
Definitely the most difficult thing was cutting a hole in the roof to put the chimney through. (yikes)
The permit and inspection by the city was a joke! To get a permit - I had to turn in a drawing of what I planned to do. I was thinking blueprint or something complicated and detailed..but I drew a simple picture of an ordinary fireplace and gave it to the guy at the courthouse.
BAM permit issued, 22 dollars please.
The inspection was even better. I had to schedule an appointment with the inspection guy at a point during the construction where everything is installed - but not covered up with drywall and whatnot. Sooo the guy shows up and I figure he has to measure all the clearances, make sure the chimney vents properly and basically check for fire hazards.
NOPE he walked in the front door, didn't even get halfway across the room and said "looks good." He signed the paper and turned to leave. I then asked him if he wanted to measure proper clearances. "No, not really, if you followed the installation instructions you should be ok." He didn't even check if my chimney poked through the roof. (Maybe I should have let it vent into the upstairs bedroom.)
I stood there with my mouth open as he drove away to his next "insta-spection" and wondered how now I was going to find out if I did something wrong. (The house burning down will be my first tiny clue.)
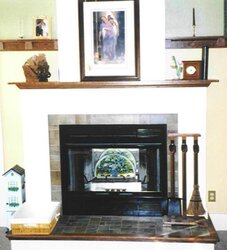
I had many "test-fires" in it before closing up the wall around the chimney and installing the surround and mantel. Checking the tempurature of the firebox, chimney, and all nearby wood framing. It all checked out ok and I was sick of looking at the huge mess I had created, so I closed it up and finished it off. I even made the lovely toolset and the basket of wax/sawdust firestarters.
...and here is the result:
Installation was fairly straightforward with instructions and clearances strictly followed.
Definitely the most difficult thing was cutting a hole in the roof to put the chimney through. (yikes)
The permit and inspection by the city was a joke! To get a permit - I had to turn in a drawing of what I planned to do. I was thinking blueprint or something complicated and detailed..but I drew a simple picture of an ordinary fireplace and gave it to the guy at the courthouse.
BAM permit issued, 22 dollars please.
The inspection was even better. I had to schedule an appointment with the inspection guy at a point during the construction where everything is installed - but not covered up with drywall and whatnot. Sooo the guy shows up and I figure he has to measure all the clearances, make sure the chimney vents properly and basically check for fire hazards.
NOPE he walked in the front door, didn't even get halfway across the room and said "looks good." He signed the paper and turned to leave. I then asked him if he wanted to measure proper clearances. "No, not really, if you followed the installation instructions you should be ok." He didn't even check if my chimney poked through the roof. (Maybe I should have let it vent into the upstairs bedroom.)
I stood there with my mouth open as he drove away to his next "insta-spection" and wondered how now I was going to find out if I did something wrong. (The house burning down will be my first tiny clue.)
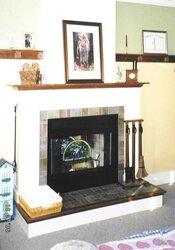
I had many "test-fires" in it before closing up the wall around the chimney and installing the surround and mantel. Checking the tempurature of the firebox, chimney, and all nearby wood framing. It all checked out ok and I was sick of looking at the huge mess I had created, so I closed it up and finished it off. I even made the lovely toolset and the basket of wax/sawdust firestarters.
...and here is the result: